End-Point PCR Protocol: A Comprehensive Guide to DNA Amplification for Biomedical Research
This article provides researchers, scientists, and drug development professionals with a complete guide to end-point PCR, a cornerstone technique for DNA amplification.
End-Point PCR Protocol: A Comprehensive Guide to DNA Amplification for Biomedical Research
Abstract
This article provides researchers, scientists, and drug development professionals with a complete guide to end-point PCR, a cornerstone technique for DNA amplification. It covers the foundational principles of the polymerase chain reaction, detailing the three main steps of denaturation, annealing, and extension. The content delivers a robust, optimized methodological protocol for setting up reactions, including guidance on component concentrations, cycling conditions, and specialized applications like hot-start, nested, and GC-rich PCR. A significant focus is placed on systematic troubleshooting and optimization strategies to resolve common issues such as nonspecific amplification, low yield, and no product. Finally, the article validates the technique by comparing it with advanced quantification methods like qPCR and digital PCR, highlighting the appropriate context of use for each technology in modern biomedical research.
Understanding End-Point PCR: Core Principles and Reaction Components
What is End-Point PCR? Defining the Workhorse of DNA Amplification
End-Point PCR, also known as conventional or traditional PCR, is a fundamental molecular biology technique for in vitro amplification of specific DNA sequences. Unlike quantitative methods, this technique provides a qualitative or semi-quantitative analysis of the amplified DNA product after all PCR cycles have completed [1]. The method relies on repeated thermal cycling to exponentially copy target DNA sequences using sequence-specific primers and a heat-stable DNA polymerase [2].
First developed in the 1980s, End-Point PCR remains a cornerstone technique in research laboratories worldwide due to its simplicity, reliability, and cost-effectiveness [2]. It serves as the foundational platform upon which more advanced PCR technologies have been built, maintaining its relevance through adaptability to diverse applications from basic cloning to complex diagnostic workflows.
Principle and Comparative Analysis
Core Principle of End-Point PCR
The End-Point PCR process involves amplifying a target DNA sequence through repeated cycles of thermal denaturation, primer annealing, and enzyme-driven extension [3]. The reaction begins with DNA denaturation at high temperature (typically 94-95°C), which separates double-stranded DNA into single strands. The temperature is then lowered to allow primers to anneal to their complementary sequences flanking the target region. Finally, a DNA polymerase extends the primers to synthesize new DNA strands at an intermediate temperature (usually 68-72°C) [4]. This cycle repeats 25-40 times, potentially generating millions of copies of the specific target sequence from just a few initial templates [3].
Following amplification, the accumulated product is typically analyzed using agarose gel electrophoresis with ethidium bromide staining [1]. The DNA fragments are separated by size, and the presence of a band at the expected molecular weight confirms successful amplification of the target sequence [5]. This end-point detection provides qualitative information about target presence or absence, and under optimized conditions, can offer semi-quantitative assessment through comparison of band intensity [1] [6].
Comparison of PCR Technologies
The table below summarizes key differences between End-Point PCR, quantitative PCR (qPCR), and digital PCR (dPCR):
| Parameter | End-Point PCR | Quantitative PCR (qPCR) | Digital PCR (dPCR) |
|---|---|---|---|
| Quantification | Qualitative to semi-quantitative | Quantitative based on standard curves | Quantitative based on Poisson statistics |
| Detection Method | Gel electrophoresis post-amplification | Fluorescence monitoring during amplification | Endpoint fluorescence in partitions |
| Throughput | Moderate | High | Moderate to High |
| Precision | + + | + + + | + + + + |
| Cost | Low | Moderate | High |
| Multiplexing Capability | Moderate | Moderate | High |
| Key Applications | Cloning, genotyping, presence/absence detection | Gene expression, viral load quantification | Rare variant detection, absolute quantification |
| Standard Curves Required | No | Yes | No |
| Dynamic Range | Limited | 5-6 logs | 3-4 logs |
Note: Adapted from comparative analysis of PCR technologies [1]
End-Point PCR distinguishes itself from qPCR in its final analysis approach – while qPCR monitors amplification in real-time through fluorescence detection, End-Point PCR analyzes the cumulative product after all cycles complete [1]. This fundamental difference makes End-Point PCR particularly suitable for applications where quantitative precision is less critical than robust, cost-effective detection of specific sequences [1].
Experimental Workflow and Protocol
Standard End-Point PCR Workflow
The following diagram illustrates the complete End-Point PCR experimental workflow:
Detailed Standard Protocol
Reagent Setup
Prepare a standard 50μL reaction mixture with the following components [5] [3]:
| Component | Volume | Final Concentration | Function |
|---|---|---|---|
| 10X PCR Buffer | 5 μL | 1X | Provides optimal chemical environment |
| MgCl₂ (25 mM) | 1-5 μL | 1.5-2.5 mM | Essential cofactor for DNA polymerase |
| dNTP Mix (10 mM each) | 1 μL | 200 μM each | Building blocks for DNA synthesis |
| Forward Primer (10 μM) | 2.5 μL | 0.5 μM | Binds 5' end of target sequence |
| Reverse Primer (10 μM) | 2.5 μL | 0.5 μM | Binds 3' end of target sequence |
| Template DNA | 2 μL | 10-500 ng | Source of target sequence |
| Taq DNA Polymerase | 0.2-0.5 μL | 1-2.5 units | Enzyme for DNA synthesis |
| Sterile dH₂O | To 50 μL | N/A | Reaction volume adjustment |
Thermal Cycling Parameters
Program your thermal cycler with the following standard parameters [3]:
- Initial Denaturation: 94°C for 2 minutes
- Cycling (25-35 cycles):
- Denaturation: 94°C for 30 seconds
- Annealing: 55-65°C for 30 seconds
- Extension: 72°C for 1 minute per kilobase of expected product
- Final Extension: 72°C for 5-10 minutes
- Hold: 4°C indefinitely
Product Analysis by Gel Electrophoresis
- Prepare a 1-2% agarose gel in 1X TBE or TAE buffer containing ethidium bromide (0.5 μg/mL)
- Load 8-10 μL of PCR product mixed with loading dye into wells
- Include appropriate DNA molecular weight markers
- Run electrophoresis at 5-10 V/cm until adequate separation occurs
- Visualize DNA bands under UV transillumination [5]
Specialized Protocol: Long and Accurate (LA) PCR
For amplification of longer fragments (up to 40 kb), follow this modified protocol [4]:
Specialized Reagent Setup
| Component | Volume | Final Concentration | Function |
|---|---|---|---|
| 10X LA PCR Buffer | 5 μL | 1X | High pH buffer to minimize depurination |
| Mg²⁺ Solution | 2.5-4 μL | 1-2 mM | Optimized for long-range amplification |
| dNTP Mix (10 mM each) | 2 μL | 400 μM each | Higher concentration for long products |
| Forward Primer (10 μM) | 2.5 μL | 0.5 μM | 21-34 bases, Tm 65-72°C |
| Reverse Primer (10 μM) | 2.5 μL | 0.5 μM | 21-34 bases, Tm 65-72°C |
| Template DNA | 0.5-1 μL | 10-100 ng | High-quality, intact DNA essential |
| LA DNA Polymerase Mix | 0.5 μL | 2.5 units | Blend of polymerase and proofreading enzyme |
| Sterile dH₂O | To 50 μL | N/A | Reaction volume adjustment |
Modified Thermal Cycling Parameters for Long Fragments
- Initial Denaturation: 94°C for 1 minute
- Cycling (30-40 cycles):
- Denaturation: 94°C for 30 seconds (shorter for effective denaturation)
- Annealing: 55-70°C for 30 seconds (primers with higher Tm)
- Extension: 68°C for 1-20 minutes (depending on product length)
- Final Extension: 68°C for 10-30 minutes (to ensure complete extension)
For fragments >20 kb, extension times should be increased to >20 minutes per cycle [4].
The Scientist's Toolkit: Essential Research Reagents
Core Research Reagent Solutions
| Reagent Category | Specific Examples | Key Features | Optimal Applications |
|---|---|---|---|
| Standard Polymerases | Taq DNA Polymerase, DreamTaq | Thermostable, 3'-A overhangs | Routine amplification, TA cloning |
| High-Fidelity Polymerases | Platinum SuperFi, Solis Hot Start HiFi | Proofreading (3'→5' exonuclease), >100x fidelity | Cloning, mutation analysis, protein expression |
| Hot-Start Polymerases | Platinum Taq Hot-Start, AmpliTaq Gold | Antibody or chemical modification | Reduced primer-dimers, enhanced specificity |
| Long-Range Systems | AccuTaq LA, UltraRun LongRange | Polymerase blends, proofreading activity | Amplification up to 40 kb, genomic analysis |
| Specialized Master Mixes | Multiplex PCR Master Mix, GC-Rich Mix | Optimized buffer systems | Complex templates, multiple targets |
| PCR Enhancers | GC Enhancer, PCRx Enhancer System | Betaine, DMSO, proprietary additives | GC-rich targets, problematic sequences |
Polymerase Selection Guide
The selection of appropriate DNA polymerase is critical for experimental success. The table below compares fidelity, applications, and key characteristics of various enzymes [7]:
| Polymerase | Relative Fidelity | Amplicon Length | 3' A-Overhang | Primary Applications |
|---|---|---|---|---|
| Taq | 1 (baseline) | <5 kb | Yes | Routine amplification, genotyping |
| Platinum II Taq Hot-Start | 1 | <5 kb | Yes | Standard PCR with hot-start benefit |
| Platinum SuperFi | >100x Taq | <20 kb | No | High-fidelity applications, cloning |
| AccuPrime Pfx | 26x Taq | <12 kb | No | Long-range with high fidelity |
| Platinum Taq HiFi | 6x Taq | <20 kb | +/- | Balance of fidelity and versatility |
Note: Fidelity values relative to standard Taq polymerase (error rate 1×10⁻⁴ to 2×10⁻⁵ bases/duplication) [7].
Advanced Applications and Considerations
Advanced Research Applications
End-Point PCR serves as the foundation for numerous advanced research applications:
Genome Analysis and Cloning: End-Point PCR enables amplification of specific genomic regions for subsequent cloning into expression vectors [4]. The generation of 3'-A overhangs by Taq polymerase facilitates efficient TA cloning strategies [7].
Mutation Analysis and Sequencing: High-fidelity polymerases with proofreading capabilities allow accurate amplification for sequencing and mutation detection, supporting research in genetic disorders and cancer biology [4] [7].
Multiplex PCR Applications: Simultaneous amplification of multiple targets in a single reaction provides efficiency for genotyping studies and diagnostic marker detection [8]. Specially formulated master mixes contain optimized buffers and additives that enable robust multiplexing without extensive optimization [9].
Long-Range Genomic Amplification: Specialized polymerase blends facilitate amplification of fragments up to 40 kb, enabling analysis of large genes, genomic rearrangements, and complex loci [4].
Troubleshooting and Optimization Strategies
Successful End-Point PCR requires careful optimization of several key parameters:
Magnesium Concentration Optimization: Titrate MgCl₂ or MgSO₄ between 1-5 mM to find optimal conditions for each primer-template system [4] [7]. Higher concentrations generally increase yield but may reduce specificity.
Annealing Temperature Optimization: Test temperatures 5°C above and below the calculated primer Tm using gradient PCR. Well-designed primers often anneal specifically at 60°C regardless of their Tm in optimized buffer systems [7].
Enhancers for Problematic Templates: For GC-rich targets (>65% GC), add GC enhancers or 1-5% DMSO to improve denaturation and amplification efficiency [7]. For AT-rich templates, reduce extension temperature to 68°C or add 5-15 mM tetramethylammonium chloride (TMAC) [7].
Template Quality and Integrity: Use high-quality, intact template DNA, especially for long-range PCR. Avoid repeated freeze-thaw cycles and consider higher pH buffers (>9.0) to minimize depurination damage during cycling [4].
End-Point PCR remains an indispensable tool in molecular biology research, providing a robust, accessible, and versatile method for DNA amplification. While quantitative PCR methods offer advantages for precise quantification, End-Point PCR maintains its position as the workhorse technique for applications requiring target detection, cloning, and sequence analysis. Through continued development of specialized polymerases, optimized buffer systems, and enhanced detection methods, this foundational technology continues to evolve to meet the demands of modern biological research.
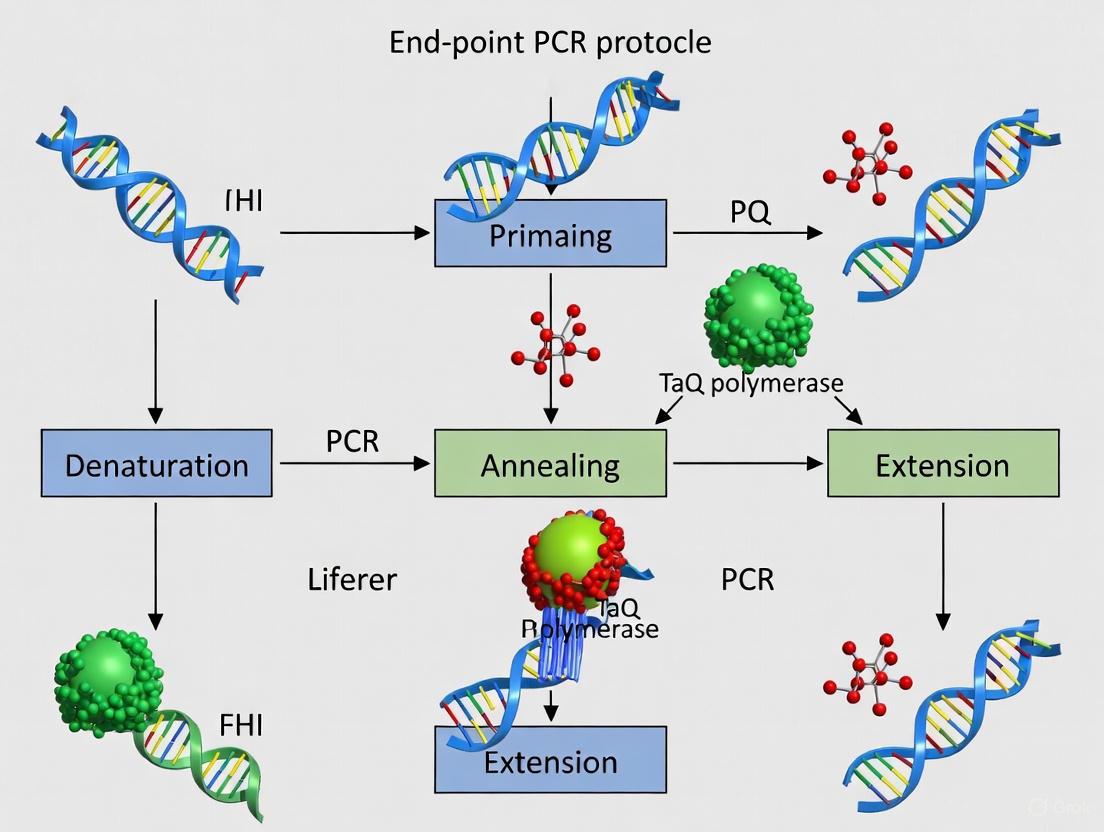
Within the framework of research on end-point PCR protocols for DNA amplification, a thorough comprehension of the fundamental thermal cycling steps is paramount for experimental success. The polymerase chain reaction (PCR) is a cornerstone technique in molecular biology labs, enabling the in vitro amplification of specific DNA fragments from just a few copies to millions of copies within hours [10]. This application note deconstructs the core three-step cycle—denaturation, annealing, and extension—providing detailed protocols and optimization strategies to ensure reliable and efficient amplification of target DNA for downstream applications in cloning, sequencing, and genetic analysis [11] [2].
The Core PCR Cycle: A Step-by-Step Deconstruction
The standard PCR cycle consists of three temperature-dependent steps, repeated 25-40 times, resulting in the exponential amplification of the DNA segment flanked by the two oligonucleotide primers [3] [12]. The following workflow illustrates the sequential stages of a complete PCR process, from initial setup to final analysis.
Denaturation
The denaturation step is the first and most critical in each cycle. During this phase, the reaction temperature is raised to 94–98°C for 15 seconds to 2 minutes, causing the double-stranded DNA (dsDNA) template to separate into single strands (ssDNA) by breaking the hydrogen bonds between complementary base pairs [13] [10] [12]. This provides the necessary single-stranded template for the primers to bind in the subsequent step. For the initial denaturation at the beginning of PCR, a longer incubation of 1–3 minutes (up to 10 minutes for complex templates) is recommended to ensure complete separation of all DNA strands and, when using hot-start polymerases, to activate the enzyme [13] [3] [12]. Templates with high GC content (>65%) require more stringent denaturation conditions, such as higher temperatures (e.g., 98°C) or longer incubation times, to overcome the stronger hydrogen bonding between guanine and cytosine bases [13] [14].
Annealing
Following denaturation, the reaction temperature is rapidly lowered to 45–60°C for 30 seconds to 1 minute to allow the forward and reverse primers to hybridize (anneal) to their complementary sequences on the single-stranded DNA template [2] [12]. The optimal annealing temperature (Ta) is determined by the melting temperature (Tm) of the primers, which is the temperature at which 50% of the primer-duplex dissociates [13]. A good starting point is to set the Ta 3–5°C below the calculated Tm of the primers [13] [3]. The simplest formula for Tm calculation is:
Tm = 4(G + C) + 2(A + T) [13] [12]
The presence of additives like DMSO can lower the effective Tm, requiring adjustment of the annealing temperature [13] [14]. If non-specific amplification is observed, the Ta should be increased in increments of 2–3°C. Conversely, if amplification yield is low, the Ta can be gradually decreased [13].
Extension
During the extension step, the temperature is raised to the optimal activity range of the DNA polymerase, typically 68–72°C for thermostable enzymes like Taq DNA polymerase [3] [10]. The DNA polymerase synthesizes a new DNA strand by adding deoxynucleoside triphosphates (dNTPs) to the 3' end of the annealed primer, elongating it in the 5'→3' direction [2]. The required extension time depends on the length of the amplicon and the synthesis rate of the polymerase. A common guideline is 1 minute per kilobase (kb) for Taq DNA polymerase, and 2 minutes per kb for slower, proofreading enzymes like Pfu [13]. After the last cycle, a final extension of 5–15 minutes is often performed to ensure all amplicons are fully synthesized and to facilitate proper 3'-dA tailing if the product is intended for TA cloning [13] [3].
Table 1: Standard Parameters for a Three-Step PCR Cycle
| Step | Temperature Range | Time Duration | Key Function |
|---|---|---|---|
| Denaturation | 94–98°C | 15 sec – 2 min | Separates dsDNA into single strands |
| Annealing | 45–60°C* | 30 sec – 1 min | Allows primers to bind to complementary sequences |
| Extension | 68–72°C | 1 min/kb | Synthesizes new DNA strand from the primer |
| Final Extension | 68–72°C | 5–15 min | Ensures complete synthesis of all amplicons |
Note: Annealing temperature is primer-specific and must be optimized.
Optimization of PCR Cycling Parameters
Achieving high specificity and yield in endpoint PCR often requires fine-tuning of the standard cycling parameters. The following diagram outlines a strategic decision-making process for optimizing these parameters based on experimental results.
Cycle Number
The number of PCR cycles typically ranges from 25 to 35 [13]. The optimal number depends on the starting copy number of the template DNA. While more cycles (up to 40) may be necessary for very low-abundance targets (fewer than 10 copies), exceeding 45 cycles is not recommended as it can lead to high background and nonspecific products due to reagent depletion and accumulation of by-products [13].
Advanced Strategies for Challenging Templates
- GC-Rich Templates: For DNA with high GC content (>65%), use PCR additives like DMSO, glycerol, formamide, or betaine (typically at 5-10%) to help denature stable secondary structures and reduce the template's effective melting temperature [13] [14]. A higher denaturation temperature of 98°C may also be beneficial [13] [14].
- Long-Range PCR: Amplification of targets longer than 5 kb requires a blend of DNA polymerases, typically a non-proofreading polymerase (e.g., Taq) for fast elongation and a proofreading polymerase (e.g., Pfu) for high fidelity [11] [10]. Extension times must be increased (e.g., >20 minutes for targets >20 kb), and the extension temperature is often maintained at 68°C for optimal enzyme performance [11].
- Hot-Start PCR: This technique enhances specificity by inhibiting DNA polymerase activity at room temperature during reaction setup, preventing nonspecific priming and primer-dimer formation [10] [14]. The polymerase is activated only during the initial high-temperature denaturation step.
Table 2: Troubleshooting Common PCR Issues
| Problem | Potential Cause | Suggested Optimization |
|---|---|---|
| No/Low Yield | Annealing temperature too high | Lower Ta in 2–3°C increments |
| Too few cycles | Increase cycles up to 40 | |
| Extension time too short | Increase extension time (1-2 min/kb) | |
| Inefficient denaturation | Increase initial denaturation time | |
| Non-Specific Bands | Annealing temperature too low | Increase Ta in 2–3°C increments |
| Too many cycles | Reduce cycles to 25-35 | |
| Enzyme activity at low T | Use hot-start DNA polymerase | |
| Smear on Gel | Template degraded | Use intact, high-quality DNA |
| Mg²⁺ concentration too high | Optimize Mg²⁺ concentration (1.5-5.5 mM) |
Detailed End-Point PCR Protocol for DNA Amplification
The Scientist's Toolkit: Reagents and Equipment
Table 3: Essential Reagents and Materials for End-Point PCR
| Reagent/Material | Function/Role | Example/Comment |
|---|---|---|
| Template DNA | Contains the target sequence to be amplified | 10 pg–1 µg of genomic DNA; must be intact for long targets [11] [12] |
| Thermostable DNA Polymerase | Enzymatically synthesizes new DNA strands | Taq DNA polymerase (standard); enzyme blends for long/fidelity PCR [11] [10] |
| Oligonucleotide Primers | Define the 5' and 3' boundaries of the amplicon | 15-34 nucleotides; 45-60% GC; similar Tm for each primer [11] [12] |
| dNTPs | Building blocks for new DNA strands | 200 µM of each dNTP (dATP, dCTP, dGTP, dTTP) in the reaction [3] [12] |
| PCR Buffer | Provides optimal chemical environment | Includes MgCl₂ (typically 1.5-2.5 mM final conc.), salts, and pH buffer [3] [12] |
| Magnesium Chloride (MgCl₂) | Essential cofactor for DNA polymerase | Concentration requires optimization (1.5-5.5 mM) [11] [12] |
| Nuclease-Free Water | Solvent for the reaction |
Equipment:
- Thermal cycler
- Thin-walled PCR tubes or plates
- Microcentrifuge and pipettes
- Agarose gel electrophoresis apparatus [11] [3]
Step-by-Step Standard Protocol
This protocol is adapted for a 50 µL reaction volume using a standard hot-start DNA polymerase [3].
A. Reaction Setup (on ice)
- Prepare Master Mix: Combine the following components in a nuclease-free tube to minimize pipetting errors and ensure consistency across multiple reactions. Gently mix by pipetting.
- Nuclease-Free Water: 36.8 µL
- 10X PCR Buffer (with MgCl₂): 5 µL
- dNTP Mix (10 mM each): 1 µL
- Forward Primer (10 µM): 2.5 µL
- Reverse Primer (10 µM): 2.5 µL
- Template DNA (e.g., 100 ng): 2 µL
- Hot-Start DNA Polymerase (5 U/µL): 0.2 µL
- Aliquot: Dispense 49.8 µL of the master mix into a thin-walled PCR tube. Then add 0.2 µL of DNA polymerase.
- Mix and Centrifuge: Gently mix the reaction and briefly centrifuge to collect all liquid at the bottom of the tube.
B. Thermal Cycling Program the thermal cycler with the following steps:
- Initial Denaturation: 94–98°C for 2–5 minutes (activates hot-start polymerase and fully denatures complex DNA) [13] [3].
- Amplification Cycles (25–35x):
- Denaturation: 94–98°C for 15–30 seconds.
- Annealing: 45–60°C (optimize based on primer Tm) for 15–30 seconds.
- Extension: 72°C for 1 minute per kb of product.
- Final Extension: 72°C for 5–10 minutes.
- Hold: 4–10°C indefinitely.
C. Post-Amplification Analysis
- Analyze 2–10 µL of the PCR product by agarose gel electrophoresis.
- Visualize the DNA band(s) of expected size using an intercalating dye like ethidium bromide or a modern substitute under UV light [11] [12].
A methodical understanding and optimization of the three core PCR steps—denaturation, annealing, and extension—are fundamental to successful DNA amplification in end-point PCR. By carefully considering parameters such as temperature, time, and cycle number, and by employing specialized strategies for challenging templates, researchers can consistently generate high yields of specific products. The protocols and guidelines provided here serve as a robust foundation for applications in gene cloning, sequencing, and molecular diagnostics, ensuring the reliability and efficiency of PCR-based research.
The polymerase chain reaction (PCR) is a foundational technique in molecular biology that enables the in vitro amplification of specific DNA sequences. This application note details the essential reaction components for a robust end-point PCR protocol, providing researchers and drug development professionals with detailed methodologies and optimization strategies to ensure high specificity, yield, and fidelity in DNA amplification research. The core components—template DNA, primers, DNA polymerase, deoxynucleoside triphosphates (dNTPs), and reaction buffer—form an interdependent system where the concentration and quality of each directly influence the success of the amplification reaction [2] [15]. Proper optimization of these elements is critical for applications ranging from gene cloning and mutagenesis to next-generation sequencing library preparation [16] [10].
The Core Components of End-Point PCR
Template DNA
The DNA template provides the sequence to be amplified. Its quality, quantity, and complexity are primary determinants of PCR success.
- Quality and Purity: Intact, high-purity DNA is crucial. Contaminants such as phenol, heparin, EDTA, or proteins can inhibit polymerase activity [2] [16]. EDTA is a particular concern as it chelates the essential Mg²⁺ cofactor [16]. DNA can be purified via dialysis, ethanol precipitation, chloroform extraction, or chromatography to remove inhibitors [2].
- Amount and Complexity: Optimal template amount depends on the source. For genomic DNA (gDNA), 5–50 ng is standard in a 50 µL reaction, while 0.1–1 ng is sufficient for plasmid DNA [15]. Higher complexity, as found in gDNA, requires a greater starting amount. For low-copy number targets (<100-200 pg), increasing cycle number to 34 may be necessary for detection [17].
- Secondary Structures: Templates with high guanine and cytosine (GC) content (>65%) can form stable secondary structures that impede polymerase progression. Additives such as dimethyl sulfoxide (DMSO), formamide, or betaine can help resolve these structures [16] [17].
Table 1: Recommended Template DNA Input for a 50 µL PCR
| Template Type | Recommended Amount | Notes |
|---|---|---|
| Genomic DNA (gDNA) | 5–50 ng | 30–100 ng is typical for human gDNA [15] [17]. |
| Plasmid DNA | 0.1–1 ng | Less complex, requires less input [15]. |
| cDNA | 1–10 ng | Derived from reverse transcription of RNA [10]. |
| PCR Product (re-amplification) | Diluted 1:10–1:1000 | Purification is recommended to remove previous reaction components [15]. |
Primers
Oligonucleotide primers define the start and end points of amplification and are the most critical factor for reaction specificity.
- Design Parameters: Primers should be 18–30 nucleotides long with a melting temperature (Tm) between 55°C and 70°C [16] [15]. The Tm values for the forward and reverse primers should be closely matched, ideally within 1–2°C [16]. GC content should be 40–60%, with a uniform distribution of G and C bases to prevent mispriming [16] [15].
- 3' End Stability: The last five bases at the 3' end are critical for initiation. This region should be rich in G and C bases to enhance stability, but no more than three G or C bases should be present at the very 3' end to minimize nonspecific priming [16] [15]. Including a single G or C at the 3' end can promote beneficial "anchoring" [15].
- Avoiding Secondary Structures: Primers must be analyzed for self-complementarity (hairpins) and complementarity to each other (primer-dimers). These structures consume reagents and reduce the efficiency of target amplification [16] [17].
- Concentration: Optimal primer concentrations typically range from 0.1 to 1 µM [15] [17]. Excess primer promotes mispriming and primer-dimer formation, while insufficient primer yields low product [15] [18].
DNA Polymerase
The DNA polymerase enzyme synthesizes new DNA strands by incorporating dNTPs complementary to the template.
- Types and Characteristics:
- Standard Taq Polymerase: Derived from Thermus aquaticus, it is robust and fast but lacks proofreading activity (3'→5' exonuclease), resulting in an error rate of ~2 x 10⁻⁴ to 2 x 10⁻⁵ errors per base pair [2] [17]. It also adds a single deoxyadenosine (dA) overhang at the 3' ends of PCR products, which is useful for TA cloning [13] [10].
- High-Fidelity Polymerases: Enzymes like Pfu (from Pyrococcus furiosus) possess proofreading activity, which lowers the error rate by 10-50 fold compared to Taq, making them essential for cloning, sequencing, and mutagenesis [16] [17]. For long-range PCR (>5 kb), a mixture of a non-proofreading and a proofreading polymerase is often used to maximize yield and accuracy [10].
- Thermostability and Hot-Start: PCR involves repeated heating to 95°C. Taq polymerase has a half-life of ~40 minutes at 95°C, while enzymes from hyperthermophiles like Pfu are more stable [15] [17]. Hot-Start PCR employs antibodies, aptamers, or chemical modifications to inhibit polymerase activity at room temperature, preventing nonspecific amplification and primer-dimer formation during reaction setup [10].
- Concentration: Generally, 1–2 units of polymerase per 50 µL reaction are sufficient. Inhibitors in the template may necessitate increased enzyme amounts, but this can also lead to nonspecific products [15].
Table 2: Common DNA Polymerases and Their Properties
| Polymerase | Proofreading | Error Rate (relative to Taq) | Primary Application | Recommended Extension Time |
|---|---|---|---|---|
| Taq | No | 1x (Baseline) | Routine screening, diagnostic assays, TA cloning | 1 min/kb [13] |
| Pfu | Yes (3'→5') | 10-50x lower | High-fidelity applications (cloning, sequencing) | 2 min/kb [13] |
| KOD | Yes (3'→5') | ~50x lower | Complex template amplification, high fidelity | Varies by manufacturer |
Deoxynucleoside Triphosphates (dNTPs)
dNTPs (dATP, dCTP, dGTP, dTTP) are the building blocks for new DNA strands.
- Concentration and Balance: The four dNTPs should be provided in equimolar concentrations. A final concentration of 0.2 mM for each dNTP is generally recommended for standard PCR [15] [17]. Higher concentrations can be inhibitory, while concentrations below the Km of the enzyme (0.010–0.015 mM) will reduce efficiency [15].
- Fidelity and Specificity: Lowering dNTP concentrations (0.01–0.05 mM) can improve the fidelity of non-proofreading polymerases but may reduce yield [15]. Free dNTPs bind Mg²⁺, so their concentration is intrinsically linked to the optimal Mg²⁺ level in the reaction [15].
- Modified dNTPs: For specialized applications, dTTP can be substituted with deoxyuridine triphosphate (dUTP). Subsequent treatment with Uracil-DNA Glycosylase (UDG) degrades any contaminating PCR products from previous reactions, preventing false positives [15]. Other modified nucleotides (e.g., biotin- or fluorescein-labeled dNTPs) are used for probe generation.
Buffer and Cofactors
The reaction buffer provides the optimal chemical environment for polymerase activity and primer-template hybridization.
- Magnesium Ions (Mg²⁺): This divalent cation is an essential cofactor for all thermostable DNA polymerases. It stabilizes the primer-template duplex and is directly involved in the catalytic reaction of phosphodiester bond formation [15] [17].
- Concentration and Optimization: The optimal Mg²⁺ concentration typically ranges from 1.5 to 2.5 mM but must be determined empirically for each primer-template pair [16] [17]. Excessive Mg²⁺ promotes non-specific amplification and reduces fidelity, while insufficient Mg²⁺ results in low yield or failed reactions [16] [15]. Since dNTPs chelate Mg²⁺, the concentration of Mg²⁺ must exceed the total dNTP concentration [15].
- Buffer Composition: Standard PCR buffers contain Tris-HCl to maintain a pH of ~8.0-8.5 at room temperature (which correlates to an optimal pH of ~7.2 at 72°C during extension), and potassium chloride to promote primer annealing [16] [17].
- Additives: Chemical additives can help overcome challenging templates.
- DMSO: Used at 2-10%, it helps denature DNA secondary structures in GC-rich templates by lowering the Tm [16] [17].
- Betaine: Used at 1-2 M, it homogenizes the thermodynamic stability of GC- and AT-rich regions, improving the amplification of long or GC-rich targets [16].
- Other Additives: Formamide (1.25-10%), BSA (~400 ng/µL), and non-ionic detergents (Tween 20, Triton X-100 at 0.1-1%) can also enhance specificity and yield by neutralizing inhibitors or preventing secondary structures [17].
Experimental Protocol: Optimizing a Standard End-Point PCR
Reagent Setup and Master Mix Preparation
A master mix ensures uniformity and minimizes pipetting errors when handling multiple samples.
Materials:
- Nuclease-free water
- 10X PCR Buffer (often supplied with MgCl₂)
- 50 mM MgCl₂ solution (if not included in the buffer)
- 10 mM dNTP mix (2.5 mM of each dNTP)
- 10 µM forward and reverse primers
- Template DNA (e.g., 50 ng/µL gDNA)
- DNA Polymerase (e.g., 5 U/µL)
Procedure:
- Thaw and Centrifuge: Thaw all reagents (except polymerase) on ice or a cooling block. Briefly centrifuge to collect contents at the bottom of the tube.
- Prepare Master Mix: Calculate the volumes required for n+1 reactions (where n is the number of samples) to account for pipetting loss. For a single 50 µL reaction, combine the components as shown in the table below in a sterile, nuclease-free tube.
- Aliquot and Add Template: Mix the master mix thoroughly by pipetting or gentle vortexing, then aliquot the appropriate volume into individual PCR tubes. Finally, add the template DNA to each tube.
- Control Reactions: Always include a negative control (no template DNA, replaced with nuclease-free water) to check for contamination.
Table 3: Master Mix Setup for a Single 50 µL Reaction
| Component | Final Concentration | Volume per 50 µL Reaction |
|---|---|---|
| Nuclease-free Water | - | Variable (to make 50 µL) |
| 10X PCR Buffer | 1X | 5 µL |
| 50 mM MgCl₂ | 1.5 - 2.5 mM | 1.5 - 2.5 µL (to be optimized) |
| 10 mM dNTP Mix | 0.2 mM each | 1 µL |
| 10 µM Forward Primer | 0.5 µM | 2.5 µL |
| 10 µM Reverse Primer | 0.5 µM | 2.5 µL |
| DNA Polymerase | 1.25 U | 0.25 µL (for 5 U/µL) |
| Master Mix Total | ~47.25 µL | |
| Template DNA | (e.g., 50 ng) | ~2.75 µL |
| Total Volume | 50 µL |
Thermal Cycling Conditions
PCR amplification is carried out in a thermal cycler programmed with the following three-step protocol. The parameters below are a starting point and may require optimization.
Cycling Protocol:
- Initial Denaturation: 94–98°C for 1–3 minutes. One cycle. This step fully denatures complex DNA and may activate hot-start polymerases [13].
- Amplification Cycles (25–35 cycles):
- Denaturation: 94–98°C for 10–60 seconds.
- Annealing: 55–65°C for 15–60 seconds. The optimal temperature must be determined empirically, often starting 3–5°C below the calculated Tm of the primers [13].
- Extension: 72°C for 1 minute per kilobase of target amplicon. For Taq polymerase, use 1 min/kb; for slower enzymes like Pfu, use 2 min/kb [13].
- Final Extension: 72°C for 5–15 minutes. One cycle. This ensures all amplicons are fully extended. A 30-minute final extension is recommended for TA cloning to ensure complete dA-tailing [13].
- Hold: 4°C. Indefinitely.
Post-Amplification Analysis
Analyze the PCR product using agarose gel electrophoresis.
- Prepare a 1–2% agarose gel in 1X TAE or TBE buffer, stained with ethidium bromide or a safer alternative.
- Mix 5–10 µL of the PCR reaction with 6X loading dye and load into the gel wells. Include a DNA ladder for size determination.
- Run the gel at 5–10 V/cm until adequate separation is achieved.
- Visualize the DNA bands under UV light. A single, sharp band of the expected size indicates a specific and successful amplification.
The Scientist's Toolkit: Research Reagent Solutions
Table 4: Essential Reagents for End-Point PCR
| Reagent / Kit | Function / Application | Example Notes |
|---|---|---|
| GoTaq G2 Hot Start Polymerase | Standardized master mix for routine PCR. | Includes an antibody-mediated hot-start mechanism for reduced background [10]. |
| High-Fidelity Enzyme Mix (e.g., Pfu) | High-accuracy amplification for cloning. | A blend of polymerases for long amplicons and low error rates [16] [10]. |
| DMSO | Additive for GC-rich templates. | Lowers DNA Tm; use at 2-10% final concentration [16] [17]. |
| dNTP Mix | Nucleotide building blocks for DNA synthesis. | Use equimolar, purified solutions to prevent misincorporation. |
| PCR Purification Kit | Post-amplification clean-up. | Removes primers, enzymes, and salts for downstream applications [15]. |
| Nucleic Acid Extraction Kit | Isolation of pure template DNA/RNA. | Critical for removing potent PCR inhibitors (e.g., heparin, phenols) [16]. |
Workflow and Troubleshooting
The following diagram illustrates the logical workflow of assembling and optimizing an end-point PCR reaction, highlighting the interdependence of its core components.
The workflow for PCR assembly and optimization shows how core components interact. If gel analysis reveals issues, consult the troubleshooting guide below.
Table 5: Common PCR Problems and Solutions
| Problem | Possible Cause | Recommended Solution |
|---|---|---|
| No / Low Yield | - Poor template quality/quantity- Primer degradation- Annealing temperature too high- Mg²⁺ concentration too low | - Re-purify template; check concentration- Order new primers- Lower annealing temperature in 2-3°C increments- Increase Mg²⁺ concentration [13] [18] |
| Non-specific Bands / Smearing | - Annealing temperature too low- Excess primers, enzyme, or Mg²⁺- Too many cycles | - Increase annealing temperature in 2-3°C increments- Titrate down primers, enzyme, Mg²⁺- Reduce cycle number (25-35 is standard) [16] [13] |
| Primer-Dimer | - Primer 3' end complementarity- Low annealing temperature- Excess primers | - Redesign primers to avoid 3' complementarity- Increase annealing temperature- Lower primer concentration [16] [15] |
Mastering the five essential components of end-point PCR is fundamental to successful DNA amplification research. Achieving the delicate balance between template integrity, primer specificity, polymerase fidelity, dNTP availability, and buffer chemistry requires systematic optimization. The protocols and guidelines presented here provide a robust framework for researchers to generate specific, high-yield amplicons suitable for a wide range of downstream applications, from basic cloning to advanced genomic analysis. By adhering to these detailed methodologies and leveraging the provided troubleshooting tools, scientists can ensure the reliability and reproducibility of their PCR-based experiments.
In the realm of molecular biology, the polymerase chain reaction (PCR) stands as a foundational technique for DNA amplification, with the end-point PCR protocol remaining a cornerstone for qualitative analysis in research and diagnostic applications. The success of this method hinges on the precise optimization of reaction components, among which magnesium ions (Mg2+) play an indispensable role. As a critical cofactor for DNA polymerase activity, Mg2+ influences the thermodynamics, kinetics, and fidelity of the amplification process. This application note delineates the multifaceted functions of Mg2+ in end-point PCR, providing evidence-based guidelines and detailed protocols to enable researchers to harness its full potential for robust and reliable DNA amplification.
The Biochemical Basis of Magnesium Function
Magnesium ions are fundamental to the catalytic mechanism of DNA polymerases. Structural studies reveal that the active site of DNA polymerases typically coordinates two divalent metal ions, designated Metal A (catalytic metal) and Metal B (nucleotide binding metal) [19]. Metal A is primarily responsible for lowering the pKa of the 3′-OH group of the terminal primer nucleotide, facilitating its deprotonation and subsequent nucleophilic attack on the α-phosphate of the incoming deoxynucleotide triphosphate (dNTP) [20]. Metal B coordinates the triphosphate moiety of the dNTP, stabilizing the negative charge and assisting in the release of pyrophosphate (PPi) following nucleotidyl transfer [19]. The absence of either the primer 3′-OH or the catalytic Mg2+ results in an incomplete and distorted active site geometry, underscoring their absolute requirement for proper function [19].
Beyond its direct role in catalysis, Mg2+ significantly influences nucleic acid stability and hybridization. It stabilizes the double-stranded DNA structure by neutralizing the negative charge repulsion along the phosphate backbone, thereby affecting the melting temperature (Tm) of DNA templates and primer-template complexes [21]. This property makes Mg2+ concentration a critical parameter for controlling the stringency of primer annealing and the efficiency of DNA strand separation during thermal cycling.
Diagram: Mg2+ Role in DNA Polymerase Catalytic Mechanism. The catalytic Mg2+ (blue) facilitates deprotonation and nucleophilic attack of the primer 3'-OH. The nucleotide-binding Mg2+ (green) stabilizes the dNTP triphosphate.
Quantitative Effects and Optimization Guidelines
The concentration of MgCl2 in a PCR reaction is a decisive factor for success, with optimal ranges identified through systematic meta-analysis. The following table summarizes the key quantitative relationships between MgCl2 concentration and PCR performance parameters, synthesized from empirical studies.
Table 1: MgCl2 Concentration Effects on PCR Parameters
| Parameter | Effect of Increasing [MgCl2] | Optimal Range | Quantitative Relationship |
|---|---|---|---|
| DNA Melting Temp (Tm) | Increases | N/A | ~1.2 °C increase per 0.5 mM within 1.5-3.0 mM range [21] |
| Polymerase Fidelity | Can decrease (promotes misincorporation) | Varies by enzyme | Lower fidelity with Mn2+ vs. Mg2+ [20] |
| Reaction Efficiency | Bell-shaped curve | 1.5 - 3.0 mM [21] | Log-linear relationship with Tm [21] |
| Template Specificity | Reduces at high concentrations | Template-dependent | Genomic DNA requires higher [MgCl2] than simple templates [21] |
The optimal Mg2+ concentration represents a balance between sufficient cofactor availability for polymerase activity and the maintenance of hybridization stringency. Excessive Mg2+ stabilizes DNA duplexes non-specifically, leading to spurious primer annealing and off-target amplification, while insufficient Mg2+ results in poor polymerase processivity and low product yield [21]. The complexity of the DNA template directly influences the required MgCl2 concentration, with genomic DNA templates generally necessitating higher concentrations than simpler, purified plasmid templates [21].
Interference from Divalent Metal Ions
The critical role of Mg2+ can be compromised by the presence of other divalent metal ions, which often act as potent PCR inhibitors. Forensic and environmental samples collected from metal surfaces (e.g., bullets, wires, weapons) are particularly susceptible to contamination with such ions [22].
Table 2: Inhibitory Effects of Common Divalent Metal Ions
| Metal Ion | Inhibitory Concentration (IC50) | Primary Mechanism of Inhibition |
|---|---|---|
| Calcium (Ca2+) | Varies | Competitive binding to polymerase instead of Mg2+ [22] |
| Copper (Cu2+) | < 1 mM | High-affinity binding to DNA bases [22] |
| Zinc (Zn2+) | < 1 mM | Strong inhibitory properties [22] |
| Iron (Fe2+) | < 1 mM | Not specified |
| Tin (Sn2+) | < 1 mM | Strong inhibitory properties [22] |
Calcium ions (Ca2+) exemplify a competitive inhibitor, binding to the polymerase's active site in place of Mg2+ and thereby reducing amplification efficiency [22]. This is a common issue when processing bone samples. The use of the calcium chelator ethylene glycol-bis(2-aminoethylether)-N,N,N′,N′-tetraacetic acid (EGTA) provides a simple and non-destructive method for reversing calcium-induced PCR inhibition [22]. Furthermore, the choice of DNA polymerase can influence susceptibility to metal inhibition; for instance, KOD polymerase has demonstrated greater resistance to metal inhibition compared to Q5 and Taq polymerases [22].
Essential Research Reagent Solutions
The selection of appropriate reagents is paramount for establishing a reliable end-point PCR protocol. The following toolkit comprises key components, with special emphasis on magnesium sources and polymerase selection.
Table 3: Research Reagent Toolkit for Mg2+-Dependent PCR
| Reagent | Function | Examples & Notes |
|---|---|---|
| DNA Polymerase | Catalyzes DNA synthesis | Taq Polymerase: Standard choice, requires MgCl2 [7]. Platinum SuperFi: >100x higher fidelity, uses proprietary buffer [7]. |
| Magnesium Source | Essential polymerase cofactor | MgCl2: Most common, concentration requires optimization [21] [7]. MgSO4: Used with some high-fidelity polymerases for more robust results [7]. |
| PCR Buffer | Provides optimal chemical environment | Often supplied with MgCl2 (e.g., 15 mM in GeneAmp 10X PCR Buffer) or separate MgCl2 solution for optimization [7]. |
| Enhancers | Ameliorate challenging templates | GC Enhancer: For targets >65% GC [7]. PCRx Enhancer System: Improves specificity and yield with problematic templates/primers [7]. |
| dNTPs | DNA building blocks | Concentration must be balanced with [Mg2+], as Mg2+ binds dNTPs. |
| Chelators | Counteract metal ion inhibition | EGTA: Reverses Ca2+ inhibition [22]. EDTA: General chelator, use with caution as it can also chelate Mg2+. |
Experimental Protocol for MgCl2 Optimization
This section provides a detailed step-by-step protocol for empirically determining the optimal MgCl2 concentration for a specific end-point PCR assay.
Materials and Reagents
- Template DNA (e.g., genomic DNA, plasmid)
- Target-specific forward and reverse primers
- 10X PCR Buffer (without MgCl2)
- 25 mM or 50 mM MgCl2 stock solution
- dNTP mix (e.g., 10 mM each)
- DNA Polymerase (e.g., Taq polymerase)
- Nuclease-free water
- Thermal cycler
- Gel electrophoresis equipment
Optimization Procedure
Prepare a Master Mix: For a 25 µL reaction, combine the following components in a 1.5 mL microcentrifuge tube on ice, multiplied by the number of reactions (n) plus 10% to account for pipetting error:
- X µL - Nuclease-free water
- 2.5 * n µL - 10X PCR Buffer (without MgCl2)
- 0.5 * n µL - dNTP Mix (10 mM)
- 0.5 * n µL - Forward Primer (10 µM)
- 0.5 * n µL - Reverse Primer (10 µM)
- 0.2 * n µL - DNA Polymerase (e.g., 5 U/µL)
- 1.0 * n µL - Template DNA (e.g., 50 ng/µL)
Aliquot and Add MgCl2: Aliquot the master mix into 8 individual PCR tubes. Add the appropriate volume of MgCl2 stock solution to achieve the final concentrations outlined below. Adjust the volume of nuclease-free water in the master mix to compensate.
Table 4: MgCl2 Optimization Test Matrix
Tube Final [MgCl2] (mM) Volume of 25 mM MgCl2 Stock (µL) 1 0.5 0.5 2 1.0 1.0 3 1.5 1.5 4 2.0 2.0 5 2.5 2.5 6 3.0 3.0 7 4.0 4.0 8 5.0 5.0 Perform PCR Amplification: Place the tubes in a thermal cycler and run the following standard cycling protocol, adjusting the annealing temperature as needed for your primers:
- Initial Denaturation: 95°C for 2-5 minutes
- 30-35 Cycles of:
- Denaturation: 95°C for 20-30 seconds
- Annealing: 50-65°C for 20-30 seconds
- Extension: 72°C for 1 minute per kb
- Final Extension: 72°C for 5-10 minutes
- Hold: 4°C
Analyze Results: Analyze 5-10 µL of each PCR product by agarose gel electrophoresis. The optimal MgCl2 concentration is identified by the condition that produces the highest yield of the desired specific amplicon with minimal to no non-specific background.
Diagram: MgCl2 Optimization Workflow. A stepwise protocol for empirically determining the optimal MgCl2 concentration for a specific PCR assay.
Magnesium ions serve as the linchpin of the PCR reaction, enabling the very catalysis that makes DNA amplification possible. Moving beyond empiricism to a quantitative understanding of how Mg2+ concentration affects DNA melting temperature, polymerase fidelity, and reaction specificity is crucial for advanced assay development. Furthermore, awareness of potential inhibition by contaminating metal ions and strategies to mitigate them, such as chelation or polymerase selection, ensures robustness, particularly when analyzing challenging forensic or environmental samples. By adhering to the detailed protocols and guidelines outlined in this application note, researchers and drug development professionals can systematically optimize this critical parameter, thereby enhancing the reliability and reproducibility of their end-point PCR-based research.
Agarose gel electrophoresis is a foundational technique in molecular biology laboratories, serving as the standard method for separating, identifying, and purifying DNA fragments based on their size [23]. Following the amplification of target DNA sequences via endpoint Polymerase Chain Reaction (PCR), researchers employ this technique to visualize and verify the success of their amplification reactions [24] [2]. The principle relies on applying an electrical field to move the negatively charged DNA through a porous agarose gel matrix toward a positive electrode [23]. Since shorter DNA fragments migrate through the gel pores more quickly and easily than longer ones, this process separates a mixture of DNA fragments by length, allowing researchers to determine the approximate size of amplified products by comparing their migration distance to a DNA ladder of known fragment sizes [23]. Within the context of endpoint PCR research, this analysis provides qualitative confirmation that the intended DNA target has been amplified, a critical step before proceeding to downstream applications such as cloning or sequencing [24] [25].
Detailed Experimental Protocol
Materials and Reagent Solutions
Table 1: Essential Reagents and Materials for Agarose Gel Electrophoresis
| Item | Function/Role | Typical Specification/Notes |
|---|---|---|
| Agarose | Forms the porous gel matrix that separates DNA fragments by size [23]. | 0.7% - 2.0% concentration; percentage chosen based on expected DNA fragment size [23]. |
| TAE or TBE Buffer | Provides the ions necessary to carry electrical current and maintains stable pH during electrophoresis [23]. | 1x concentration is used for both gel preparation and as the running buffer in the gel box [23]. |
| DNA Loading Buffer | Contains a visible dye to track migration and glycerol to increase sample density for well loading [23]. | Typically includes bromophenol blue and/or xylene cyanol [2]. |
| Ethidium Bromide (EtBr) | Fluorescent dye that intercalates with double-stranded DNA, allowing visualization under UV light [23]. | Caution: Known mutagen; handle with personal protective equipment (PPE) [23]. |
| DNA Ladder | A mixture of DNA fragments of known sizes, run alongside samples for size comparison and quantification [23]. | Essential for determining the approximate length of amplified DNA fragments. |
Step-by-Step Methodology
Gel Preparation and Casting
- Calculate Gel Volume and Concentration: Determine the volume of gel needed to fill your casting tray. Choose an agarose concentration based on the expected size of your PCR amplicons. A 1% gel is standard for separating 0.5 - 10 kb fragments [23].
- Dissolve Agarose: Combine the measured agarose powder with the appropriate volume of 1x TAE (or TBE) buffer in a microwavable flask [23]. Heat the mixture in a microwave using short, 30-45 second pulses, swirling in between, until the agarose is completely dissolved and the solution is clear. Caution: The solution will be very hot and can boil over; swirl carefully [23].
- Cool Agarose and Add Stain: Allow the dissolved agarose to cool to approximately 50°C (comfortable to touch). To visualize DNA, add a fluorescent nucleic acid stain. For Ethidium Bromide, add it to a final concentration of 0.2-0.5 μg/mL (e.g., 2-3 μL of a 10 mg/mL stock per 100 mL gel) [23]. Note: Alternative, safer DNA stains are available and follow manufacturer protocols.
- Cast the Gel: Place a well comb into the gel casting tray. Pour the cooled agarose solution into the tray, avoiding bubbles. If bubbles form, they can be moved away with a pipette tip. Let the gel solidify completely at room temperature for 20-30 minutes or at 4°C for 10-15 minutes [23].
Sample Loading and Electrophoresis Run
- Prepare Samples: Mix each PCR reaction product (e.g., 25 μL) with DNA loading buffer (e.g., 5 μL) [23]. Ensure the samples are mixed thoroughly.
- Set Up Electrophoresis Unit: Once solidified, carefully remove the comb and place the gel into the gel box. Fill the box with 1x TAE buffer until the gel is completely submerged [23]. If EtBr was added to the gel, also add it to the running buffer.
- Load Samples: Using a micropipette, slowly and steadily load the prepared DNA ladder and samples into the wells. Maintain positive pressure to prevent buffer from entering the pipette tip [23].
- Run the Gel: Connect the lid to the power supply, ensuring the electrodes are correctly oriented (DNA is negatively charged and will run toward the positive anode—always Run to Red). Run the gel at 80-150 V until the dye front has migrated 75-80% of the way down the gel, which typically takes 1-1.5 hours [23].
Post-Electrophoresis Visualization and Analysis
- Visualize DNA Bands: Turn off the power supply and carefully remove the gel from the chamber. If a stain like EtBr was used, place the gel on a UV transilluminator. Caution: When using UV light, always wear appropriate personal protective equipment, including a lab coat, gloves, and a UV face shield or goggles [23].
- Analyze Results: Compare the bands from your PCR samples to the DNA ladder. The presence of a single, sharp band of the expected size indicates successful amplification of the specific target [24]. The intensity of the band can provide a semi-quantitative estimate of the DNA yield [25].
- Troubleshooting: If bands are fuzzy, run the gel at a lower voltage for a longer time. For better separation of similarly sized fragments, adjust the agarose concentration—a higher percentage gel improves resolution of smaller fragments, while a lower percentage helps separate larger ones [23].
Workflow Integration with Endpoint PCR
Agarose gel electrophoresis is an integral and definitive quality-control step in the endpoint PCR workflow. It directly follows the termination of the thermal cycling process and precedes any downstream application of the amplified DNA product, such as purification for Sanger sequencing [24]. The following workflow diagram illustrates its critical role in the research pipeline.
Diagram 1: Agarose gel analysis in the endpoint PCR workflow.
Technical Considerations and Best Practices
Optimizing Resolution and Avoiding Artifacts
To ensure clear, interpretable results, several factors must be considered. The table below summarizes key parameters for optimizing an agarose gel and troubleshooting common issues.
Table 2: Agarose Gel Optimization and Troubleshooting Guide
| Parameter | Effect on Separation | Recommendation for Optimal Results |
|---|---|---|
| Agarose Concentration | Higher % for better separation of small fragments; Lower % for better separation of large fragments [23]. | Use 0.7-1% for fragments 0.5-10 kb; 1.5-2% for fragments 0.1-3 kb [23]. |
| Voltage Applied | Higher voltage leads to faster runs but poorer resolution and band smearing; Lower voltage improves band sharpness [23]. | For standard analytical gels, use 80-100 V. For maximum resolution, use lower voltages for longer durations [23]. |
| PCR Primer Design | Poorly designed primers can cause nonspecific amplification or "primer-dimer" artifacts, which appear as small, diffuse bands on the gel [2]. | Ensure primers are specific, have appropriate annealing temperatures, and avoid self-complementarity to minimize false bands [2]. |
| DNA Load Quantity | Overloading a well can cause smeared bands; underloading may result in faint or invisible bands [23]. | Load an appropriate amount of DNA (e.g., 1.0 μg in 10 μL) and make 10% extra volume to account for pipetting loss [23]. |
Limitations in Quantitative Analysis
While the intensity of an ethidium bromide-stained DNA band can provide a rough, semi-quantitative estimate of DNA concentration, endpoint PCR analyzed by gel electrophoresis is not suitable for reliable gene expression quantification or other applications requiring precise measurement [25]. This is because the technique measures the final product yield only after the PCR reaction has reached the plateau phase, where reagents become limiting and the correlation between initial template amount and final product is lost [25]. For accurate quantification, methods like quantitative real-time PCR (qPCR) are required, as they measure product accumulation during the exponential phase of amplification [25].
Executing a Robust End-Point PCR Protocol: From Setup to Specialized Applications
Within the broader scope of developing a robust end-point PCR protocol for DNA amplification research, the precise assembly of the reaction mix and master mixes is a critical foundational step. The polymerase chain reaction (PCR) is a cornerstone nucleic acid amplification technique that enables researchers to amplify specific DNA fragments through repeated thermal cycling [2]. The reliability and success of this process are profoundly influenced by the accuracy of initial reaction setup, which ensures the specificity, yield, and fidelity required for downstream applications in drug development and biomedical research [26] [27]. This protocol details a standardized procedure for assembling these mixes, incorporating best practices for reagent preparation, pipetting techniques, and quality control to ensure reproducible and high-quality amplification results.
Principle of the Method
The core principle of this method is the systematic combination of specific reagents into a single reaction tube to create the optimal biochemical environment for the enzymatic amplification of a target DNA sequence. The process involves creating a Master Mix—a homogeneous solution containing all common reaction components—which is then aliquoted to individual PCR tubes. The template DNA is added last to initiate the reaction. This approach offers several key advantages:
- Minimized Contamination: Using master mixes reduces the number of pipetting steps and tube openings, thereby lowering the risk of cross-contamination [2].
- Enhanced Reproducibility: By creating a homogeneous mixture, all sample reactions are exposed to identical concentrations of reagents, improving consistency across replicates [27].
- Increased Efficiency: Streamlining the setup process is less time-consuming and reduces the potential for pipetting errors, which is crucial for high-throughput applications in drug development.
Research Reagent Solutions
The table below details the essential reagents and materials required for a standard end-point PCR setup, along with their specific functions.
Table 1: Essential Reagents and Materials for PCR Setup
| Reagent/Material | Function | Notes & Considerations |
|---|---|---|
| DNA Polymerase | Enzyme that synthesizes new DNA strands by adding nucleotides to the 3' end of primers [2]. | For standard PCR, Taq DNA polymerase is common. For high-fidelity or long PCR, use proofreading polymerases (e.g., Q5, Phusion, AccuTaq LA) [28] [26]. |
| 10X Reaction Buffer | Provides optimal pH, ionic strength, and co-factors (like Mg²⁺) for polymerase activity [26]. | Supplied with the enzyme. Always vortex thoroughly before use to redissolve any precipitated salts [26]. |
| Magnesium Solution (MgCl₂/MgSO₄) | Essential co-factor for DNA polymerase activity; concentration significantly impacts specificity and yield [28] [27]. | Concentration typically optimized between 1-5 mM. Proofreading polymerases may prefer MgSO₄ [27]. |
| dNTP Mix | Building blocks of DNA (dATP, dCTP, dGTP, dTTP) [26]. | Use balanced, equimolar concentrations (e.g., 10 mM each) to prevent misincorporation [28] [27]. |
| Forward & Reverse Primers | Short, single-stranded DNA sequences that define the start and end points of the DNA segment to be amplified [2]. | Designed for specificity and appropriate Tm. Working stocks are typically 10 µM. Aliquot and store properly to prevent degradation [26] [27]. |
| Template DNA | The DNA sample containing the target sequence to be amplified. | Use high-quality, intact DNA. The amount required varies by template complexity (e.g., 1 pg–10 ng for plasmid, 1 ng–1 µg for genomic DNA) [27]. |
| Nuclease-Free Water | Inert solvent to bring the reaction to the final volume. | Ensures no enzymatic degradation of reaction components. |
| PCR Tubes/Plates | Thin-walled vessels for efficient heat transfer during thermal cycling. | Compatible with the thermal cycler being used. |
Equipment
- Pipettes dispensing volumes from <1 to 200 µL [26]
- Benchtop microcentrifuge [26]
- Thermal cycler [26] [2]
- Sterile, filter pipette tips to prevent aerosol contamination [26]
- Dedicated workspace, ideally a laminar flow hood with UV light [2]
Step-by-Step Experimental Protocol
Part I: Preparation
- Defrost Reagents: Thaw all reagents (except the enzyme) on ice or at room temperature. Vortex each reagent briefly after thawing and then centrifuge to collect the contents at the bottom of the tube.
- Prepare Workspace: Decontaminate the work area and use dedicated equipment. Wear gloves and a face mask throughout the procedure to minimize contamination [2].
- Calculate Volumes: Determine the number of reactions (n) including an extra 10% to account for pipetting error. Calculate the required volumes for each component as outlined in Table 2.
Table 2: Reaction Setup for a Single 50 µL Reaction
| Component | Final Concentration/Amount | Volume per 50 µL Reaction | Master Mix Volume for n + 1 reactions |
|---|---|---|---|
| Nuclease-Free Water | - | To 50 µL | (To 50 µL) x (n+1) |
| 10X Reaction Buffer | 1X | 5 µL | 5 µL x (n+1) |
| MgCl₂/MgSO₄ (25 mM) | 1.5 mM (optimize) | 3 µL | 3 µL x (n+1) |
| dNTP Mix (10 mM each) | 200 µM each | 1 µL | 1 µL x (n+1) |
| Forward Primer (10 µM) | 0.2 µM (optimize) | 1 µL | 1 µL x (n+1) |
| Reverse Primer (10 µM) | 0.2 µM (optimize) | 1 µL | 1 µL x (n+1) |
| DNA Polymerase (e.g., 5 U/µL) | 1.25 U | 0.25 µL | 0.25 µL x (n+1) |
| Subtotal Master Mix Volume | ~16.25 µL | ~16.25 µL x (n+1) | |
| Template DNA | Variable (e.g., 1 pg–1 µg) | Variable (e.g., 2 µL) | - |
| Total Reaction Volume | 50 µL |
Part II: Assembling the Reaction
The following workflow diagram illustrates the key steps for assembling the PCR reaction mix using the master mix method.
- Prepare Master Mix: In a single, sterile 1.5 mL microcentrifuge tube, combine the calculated volumes of nuclease-free water, 10X reaction buffer, magnesium solution, dNTP mix, and forward and reverse primers. Mix thoroughly by pipetting up and down or by vortexing gently. Centrifuge briefly.
- Add Enzyme: Add the calculated volume of DNA polymerase to the master mix. Mix gently by pipetting. Note: For hot-start polymerases, this addition may be done after a preliminary heating step or the enzyme may be pre-formulated for hot-start activation [27].
- Aliquot Master Mix: Dispense the appropriate volume of the completed master mix (e.g., 48 µL if using 2 µL of template) into each labeled PCR tube or plate well.
- Add Template DNA: Add the predetermined volume of template DNA to each respective tube. Avoid adding template to the negative control.
- Set Up Controls:
- No-Template Control (NTC): Add nuclease-free water instead of template DNA to one aliquot of the master mix. This is essential for detecting contamination [26].
- Finalize Setup: Seal the PCR tubes or plates with caps or adhesive seals. Centrifuge the tubes briefly (10-15 seconds) in a benchtop centrifuge to collect all liquid at the bottom of the tube and eliminate air bubbles.
Standard Thermal Cycling Conditions
After setup, the reactions are placed in a thermal cycler. The following program serves as a general reference and must be optimized for the specific template, primers, and polymerase being used [26] [2].
Table 3: Example Thermal Cycling Protocol for a ~1 kb Amplicon
| Step | Temperature | Duration | Purpose |
|---|---|---|---|
| Initial Denaturation | 94–95 °C | 2–5 minutes | Complete denaturation of complex DNA. |
| Cycling (25–35x) | |||
| › Denaturation | 94–95 °C | 20–30 seconds | Separate double-stranded DNA. |
| › Annealing | 45–72 °C (Tm-based) | 20–30 seconds | Primer binding to template. |
| › Extension | 68–72 °C | 1 minute per kb | DNA synthesis. |
| Final Extension | 68–72 °C | 5–10 minutes | Complete synthesis of all amplicons. |
| Hold | 4–10 °C | ∞ | Short-term storage. |
Expected Results and Analysis
Following successful amplification, analyze the PCR products by agarose gel electrophoresis. A successful reaction should yield a single, discrete band of the expected size when visualized under UV light, with minimal to no background smear or non-specific bands. The no-template control (NTC) should show no bands, confirming the absence of contamination.
Troubleshooting Common Issues
Even with careful setup, issues can arise. The table below outlines common problems, their potential causes, and recommended solutions.
Table 4: PCR Troubleshooting Guide
| Observation | Possible Cause | Solution |
|---|---|---|
| No Product | Poor primer design, insufficient template, suboptimal cycling conditions, missing component [28]. | Verify primer specificity and Tm. Check template quality/quantity [27]. Optimize annealing temperature and Mg²⁺ concentration [28]. |
| Multiple or Non-Specific Bands | Primer annealing temperature too low, excess primers/Mg²⁺, mispriming [28] [27]. | Increase annealing temperature. Optimize primer and Mg²⁺ concentrations. Use hot-start polymerase [27]. |
| Smear of Bands | Excess template, too many cycles, degraded template [27]. | Reduce amount of input DNA. Reduce number of cycles. Check template integrity. |
| Primer-Dimer Formation | Primer self-complementarity, excess primers, low annealing temperature [27]. | Redesign primers to avoid 3' complementarity. Lower primer concentration. Increase annealing temperature. |
Within the framework of DNA amplification research, the polymerase chain reaction (PCR) stands as a fundamental technique for amplifying specific DNA sequences. Endpoint PCR, the classical form of this method, relies on thermal cycling to exponentially increase the number of target DNA copies, which are then analyzed post-amplification. The reliability and yield of this process are critically dependent on the precise optimization of thermal cycler conditions. This application note provides a detailed, standardized 30-cycle protocol for robust DNA amplification, complete with optimized parameters, troubleshooting guidance, and requisite material specifications tailored for research scientists and drug development professionals.
The PCR Process: A Three-Step Cycle
The following diagram illustrates the core three-step cycle of denaturation, annealing, and extension, which is repeated to amplify the target DNA sequence.
Standard 30-Cycle PCR Protocol
This protocol is designed for the amplification of a standard 0.5-2 kb amplicon from a genomic DNA template using a Taq DNA polymerase.
Master Mix Preparation
Assemble the following reagents in a sterile, nuclease-free tube on ice Table 1.
Table 1: Reaction Master Mix Components for a 50 µL Reaction
| Component | Final Concentration/Amount | Function |
|---|---|---|
| PCR Buffer (10X) | 1X | Provides optimal salt conditions (e.g., KCl) and pH for polymerase activity [13] [29]. |
| dNTP Mix | 200 µM each | Building blocks for new DNA synthesis [30]. |
| Forward Primer | 0.1–0.5 µM | Binds to the complementary sequence on one DNA strand [30]. |
| Reverse Primer | 0.1–0.5 µM | Binds to the complementary sequence on the opposite strand [30]. |
| Taq DNA Polymerase | 1.25 units | Thermally stable enzyme that synthesizes new DNA strands [30] [2]. |
| Magnesium Chloride (MgCl₂) | 1.5–2.0 mM | Essential cofactor for DNA polymerase activity; concentration is critical and may require optimization [29] [30]. |
| Template DNA | 10 pg–1 µg | The DNA containing the target sequence to be amplified [29] [30]. |
| Nuclease-Free Water | To 50 µL | Solvent for the reaction. |
Thermal Cycler Parameters
Load the reaction tubes into a preheated thermal cycler (lid temperature: 105°C) and run the following program Table 2.
Table 2: Standard 30-Cycle Thermal Cycler Protocol
| Step | Temperature | Time | Notes |
|---|---|---|---|
| Initial Denaturation | 95°C | 2 minutes | Ensures complete separation of double-stranded template DNA; required for hot-start polymerase activation [13] [30]. |
| [ | 30 Cycles | ||
| ┠ Denaturation | 95°C | 15–30 seconds | Separates the newly synthesized DNA strands [13] [30]. |
| ┠ Annealing | 50–60°C* | 15–30 seconds | Temperature is primer-specific; critical for specificity [13] [29]. |
| ┠ Extension | 68°C | 1 minute per kb | Time depends on amplicon length and polymerase synthesis rate [13] [29] [30]. |
| ] | |||
| Final Extension | 68°C | 5–10 minutes | Ensures all amplicons are fully extended and can be used for 3'-dA tailing if cloning [13] [30]. |
| Hold | 4–10°C | ∞ | Short-term storage of samples [30]. |
The optimal annealing temperature is typically 3–5°C below the calculated Tm (melting temperature) of the primer with the lower Tm [13].
The Scientist's Toolkit: Essential Research Reagents
The success of PCR is dependent on the quality and selection of key reagents Table 3.
Table 3: Key Research Reagent Solutions for End-Point PCR
| Item | Function | Application Notes |
|---|---|---|
| Thermostable DNA Polymerase | Catalyzes DNA synthesis at high temperatures. | Taq Polymerase: Standard for routine PCR. Pfu or similar high-fidelity enzymes: Preferred when accuracy is critical due to proofreading activity [13]. |
| Optimized Buffer Systems | Provides ionic strength and pH for enzyme activity and primer binding. | May contain stabilizers for a "universal annealing temperature," reducing optimization needs [13]. Formulations with MgCl₂ included simplify setup, while separate Mg²⁺ allows for fine-tuning [29] [30]. |
| PCR Additives | Enhances amplification of complex templates. | DMSO, formamide, or betaine can help denature GC-rich templates with strong secondary structure by lowering the overall Tm [13] [29]. |
| Nuclease-Free Water | Solvent for the reaction. | Ensures the reaction is not degraded by environmental nucleases, which is critical for robustness and reproducibility. |
Critical Optimization Parameters
While the standard protocol is effective, specific template and primer characteristics often require optimization of key parameters.
- Annealing Temperature: This is the most critical variable for assay specificity. The simplest formula for estimating primer Tm is: Tm = 4(G + C) + 2(A + T). Start with an annealing temperature 3–5°C below the calculated Tm and optimize using a gradient thermal cycler. Increase the temperature if nonspecific products are observed; decrease it if yield is low [13] [30].
- Mg²⁺ Concentration: As a essential cofactor, Mg²⁺ concentration directly impacts enzyme activity and fidelity. A final concentration of 1.5–2.0 mM is standard for Taq polymerase. If no product is formed, titrate Mg²⁺ in 0.5 mM increments up to 4 mM. Excess Mg²⁺ can reduce fidelity and promote nonspecific amplification [29] [30].
- Cycle Number: The standard 25–35 cycles provides a balance between yield and specificity. For low-copy-number targets (e.g., <10 copies), up to 40 cycles may be necessary. Exceeding 45 cycles is not recommended due to increased nonspecific background and reagent depletion (plateau effect) [13].
Advanced Applications: Protocol Modifications
The standard protocol can be modified to address challenging amplification scenarios.
- Two-Step PCR: If the primer annealing temperature (Tm) is close to or above 68°C, combine the annealing and extension steps into a single incubation at 68–72°C. This simplifies the cycling profile and can reduce overall run time [13] [29].
- GC-Rich Templates: For templates with >65% GC content, which form stable secondary structures, use a higher denaturation temperature (e.g., 98°C) and include additives like 2.5–5% DMSO in the master mix [13] [29].
- Long-Range PCR: For amplicons >5 kb, use a polymerase blend with proofreading activity. Extension times should be increased (e.g., 1–2 min/kb), and a lower denaturation temperature (e.g., 92–94°C) can be used to reduce template depurination and DNA damage [29].
Within the framework of research dedicated to optimizing end-point PCR protocols for DNA amplification, the demand for high specificity and sensitivity is paramount. Conventional PCR can be plagued by nonspecific amplification and primer-dimer formation, especially when amplifying low-copy-number targets or working with complex templates. These artifacts compete with the desired amplicon for reaction components, thereby reducing yield and amplification efficiency. To overcome these challenges, several advanced PCR methodologies have been developed. This application note details three key strategies—Hot-Start, Touchdown, and Nested PCR—that significantly enhance the specificity and reliability of endpoint detection in DNA amplification research. Provided within are detailed principles, structured protocols, and essential reagent solutions to facilitate their successful implementation in the laboratory.
Hot-Start PCR
Principle and Applications
Hot-Start PCR is a powerful technique designed to suppress nonspecific amplification during the reaction setup and initial heating phases. The core principle involves inhibiting the DNA polymerase's activity at lower temperatures, thereby preventing the extension of primers that have bound to nonspecific sequences or to each other (primer-dimer formation) [14]. This inhibition is typically achieved through the use of an enzyme modifier, such as an antibody, affibody, aptamer, or chemical modification [14]. Upon the initial high-temperature denaturation step (usually above 90°C), the inhibitor is released or degraded, rendering the DNA polymerase fully active for the remainder of the amplification process [14]. This method is particularly valuable for high-throughput applications where reactions are set up at ambient temperature, for amplifying low-copy-number targets, and for multiplex PCR where multiple primer pairs are used simultaneously [14].
Detailed Protocol
The following protocol utilizes Hot-Start dNTPs, which are nucleotides modified with a thermolabile protecting group. This modification blocks DNA polymerase-mediated incorporation until the protecting group is removed during a heat activation step [31].
Research Reagent Solutions
- Hot-Start dNTP Mix: A mix of dATP, dCTP, dGTP, and dTTP, each modified with a thermolabile group at the 3'-terminus. Function: Provides the essential nucleotides for DNA synthesis while preventing extension until a heat activation step is complete [31].
- Taq DNA Polymerase: A thermostable DNA polymerase. Function: Catalyzes the template-dependent synthesis of DNA [31].
- 10x PCR Buffer: Typically supplied with the enzyme. Function: Provides optimal pH and salt conditions for polymerase activity. MgCl₂ may be included or added separately [31].
- Template DNA: The nucleic acid sample containing the target sequence to be amplified.
Method
- Reaction Setup: Prepare a master mix on ice containing the following components for a single 25 µL reaction. Multiply volumes by the number of reactions required.
- Sterile ultra-pure water: to a final volume of 25 µL
- 10x PCR Buffer: 2.5 µL
- MgCl₂ (if not in buffer): 1.5 µL (for a final concentration of 1.5-2.0 mM)
- Forward and Reverse Primers (each): 0.5 µL (final concentration 0.2 µM)
- Hot-Start dNTP Mix: 0.5 µL (final concentration of 200 µM per dNTP)
- Taq DNA Polymerase: 0.25 µL (1.25 U) [31]
- Mix and Aliquot: Gently mix the master mix by pipetting up and down. Do not vortex. Aliquot 20 µL of the master mix into each thin-walled PCR tube.
- Add Template: Add 5 µL of template DNA to each tube for a final reaction volume of 25 µL.
- Thermal Cycling: Place the tubes in a thermal cycler and run the following program:
- Initial Denaturation/Activation: 95°C for 2-10 minutes (activates the dNTPs and denatures the template) [31]
- Amplification (25-35 cycles):
- Denaturation: 94°C for 30 seconds
- Annealing: 45-60°C for 30 seconds (optimize based on primer Tm)
- Extension: 72°C for 1 minute (adjust time based on amplicon length; ~1 min per 1000 bp)
- Final Extension: 72°C for 5 minutes
- Hold: 4°C ∞ [32]
- Analysis: Analyze 10 µL of the PCR product by agarose gel electrophoresis.
Comparison of Hot-Start Technologies
Table 1: Common Hot-Start Activation Methods and Their Characteristics
| Method | Mechanism | Activation Requirement | Key Characteristics |
|---|---|---|---|
| Antibody-Mediated | Anti-DNA polymerase antibody binds and inhibits the enzyme [7] [14]. | Heat denaturation (e.g., 30 sec to 2 min at 94°C) [7]. | Rapid activation; common in many commercial kits (e.g., Platinum Taq) [7]. |
| Chemical Modification | Enzyme is chemically modified and inactive at room temperature [7]. | Prolonged heating (e.g., 10 min at 95°C) for chemical reversal [7]. | Requires longer initial activation (e.g., AmpliTaq Gold) [7]. |
| Primer-Based | Primers contain thermolabile groups (e.g., OXP) that block extension [33]. | Heat-dependent conversion of the primer to an extendable form [33]. | High specificity; can be introduced into any oligonucleotide sequence [33]. |
| dNTP-Based | dNTPs are modified with a thermolabile protecting group [31]. | Heat activation step (e.g., 95°C) to remove protecting groups [31]. | Allows for flexible experimental design; can replace natural dNTPs [31]. |
Touchdown PCR
Principle and Applications
Touchdown PCR is a thermal cycling strategy that enhances amplification specificity by progressively lowering the annealing temperature during the initial cycles of the PCR. The process begins with an annealing temperature set 5-10°C above the calculated melting temperature (Tm) of the primers [34] [35]. This high stringency favors only the most perfectly matched primer-template hybrids, selectively enriching the reaction with the correct amplicon in the early stages. Over subsequent cycles, the annealing temperature is gradually decreased (e.g., by 1°C per cycle) until it reaches a temperature 2-5°C below the primer Tm [34] [35]. By this "touchdown" point, the specific product dominates the reaction and outcompetes any nonspecific products that may begin to form at the lower, more permissive temperatures. This technique is especially useful when the precise annealing temperature is unknown, for primers with sequence mismatches, or for templates with high background complexity [36] [35].
Detailed Protocol
Method
- Reaction Setup: Prepare a standard PCR master mix. A hot-start DNA polymerase is highly recommended to work in concert with the touchdown program, further reducing nonspecific amplification during setup and the initial cycles [34] [35].
- Thermal Cycling: Use a thermal cycler capable of programming a gradual decrease in temperature. The following program is based on a primer Tm of 57°C.
- Initial Denaturation: 95°C for 3 minutes
- Stage 1 - Touchdown Phase (10 cycles):
- Denaturation: 95°C for 30 seconds
- Annealing: Start at 67°C (Tm +10°C) for 45 seconds. Decrease the annealing temperature by 1°C per cycle over these 10 cycles.
- Extension: 72°C for 45 seconds [34]
- Stage 2 - Amplification Phase (20-25 cycles):
- Denaturation: 95°C for 30 seconds
- Annealing: Use the final annealing temperature from Stage 1 (e.g., 57°C) for 45 seconds.
- Extension: 72°C for 45 seconds [34]
- Final Extension: 72°C for 5 minutes
- Hold: 4°C ∞
Tips for Success:
- Keep it Cool: Keep all reactions on ice until thermal cycling begins to prevent nonspecific priming [34].
- Cycle Number: Keep the total number of amplification cycles (including the touchdown phase) below 35 to minimize the appearance of nonspecific bands [34].
- Additives: For difficult templates (e.g., GC-rich sequences), consider using PCR additives like DMSO or a commercial GC enhancer to improve results [34] [14].
Diagram 1: Touchdown PCR workflow. The annealing temperature decreases during the initial cycles to enhance specificity.
Nested PCR
Principle and Applications
Nested PCR is a two-stage amplification method that significantly improves the specificity and sensitivity of target detection by employing two sets of primers. The first round of PCR uses an outer pair of primers to amplify a larger fragment that contains the target region of interest. A small aliquot of this first-round product is then used as the template for a second round of PCR, which employs an inner (nested) pair of primers that bind within the first amplicon [37] [14] [32]. This two-step process drastically reduces non-specific products because it is highly improbable that a fragment amplified nonspecifically in the first round would also contain the correct binding sites for the second set of primers [32]. Nested PCR is particularly beneficial for amplifying targets present in very low copy numbers, for analyzing complex samples like microbial communities, or when the template DNA is of poor quality [32]. A significant drawback is the high risk of contamination from opening the reaction tube to add the second set of primers, though this can be mitigated by using single-tube nested PCR protocols [32].
Detailed Protocol
Research Reagent Solutions
- Outer Primers: The first pair of primers, designed to flank the target region. Function: Generate the initial, larger amplicon that contains the desired target sequence [32].
- Inner (Nested) Primers: The second pair of primers, designed to bind within the first PCR product. Function: Specifically amplify the final target from the first-round amplicon, providing a second level of specificity [32].
- Taq DNA Polymerase, dNTPs, Buffer: Standard PCR components as listed in the Hot-Start protocol.
Method
- First Round PCR Amplification
- Prepare a 25 µL reaction mixture as described in the Hot-Start protocol, but using the outer primers.
- Thermal cycle using standard conditions (e.g., initial denaturation at 94°C for 2 min; 30-35 cycles of 94°C/30s, [45-60°C]/30s, 72°C/1min; final extension at 72°C for 5 min) [32].
- Second Round PCR Amplification
- Dilute the first-round PCR product (e.g., 1:10 to 1:1000) with sterile ultra-pure water [32].
- Prepare a new PCR master mix as in the first round, but using the inner primers.
- Add 1-2 µL of the diluted first-round product as the template for this second round of amplification [32].
- Thermal cycle using the same conditions as the first round.
- Analysis: Analyze the second-round PCR products by agarose gel electrophoresis. The band should be more specific and correspond to the expected size of the inner amplicon.
Diagram 2: Nested PCR principle. Two sequential amplifications with inner and outer primers ensure high specificity.
Nested PCR Primer Design Guidelines
Table 2: Key Parameters for Designing Primers for Nested PCR
| Parameter | Requirement | Rationale |
|---|---|---|
| Primer Pair Location | The forward outer primer must be upstream of the forward inner primer, which must be upstream of the reverse inner primer, which must be upstream of the reverse outer primer [37]. | Ensures the outer fragment encompasses the inner fragment, allowing for sequential amplification. |
| Melting Temperature (Tm) | The inner and outer primer pairs should have a significant difference in their Tm (e.g., >5°C) [37]. | Allows the two PCR reactions to be run at different, optimized annealing temperatures, reducing cross-talk. |
| Amplicon Size | The inner amplicon should be shorter than and contained within the outer amplicon [32]. | The goal is to specifically amplify a smaller, internal fragment from the larger first-round product. |
| Specificity | All primers should be designed for high specificity to their intended binding sites. | Minimizes off-target binding and ensures that the inner primers can only amplify the correct first-round product. |
Hot-Start, Touchdown, and Nested PCR are three robust methodologies that address the critical need for high specificity and sensitivity in endpoint PCR-based research. Hot-Start PCR prevents pre-amplification artifacts, Touchdown PCR exploits thermal stringency to favor the correct product, and Nested PCR adds a powerful second layer of amplification specificity. By integrating the detailed protocols and reagent solutions provided in this application note, researchers and drug development professionals can strategically select and implement these advanced techniques to overcome common amplification challenges, thereby enhancing the quality and reliability of their DNA amplification data.
Within the framework of endpoint PCR protocol research for DNA amplification, scientists frequently encounter templates that resist efficient amplification. Two of the most common challenges are GC-rich sequences and the need for long-range PCR to amplify large genomic segments. GC-rich regions (typically >65% GC content) exhibit strong hydrogen bonding and a propensity for forming stable secondary structures, which hinder complete denaturation and primer annealing [14] [38]. Long-range PCR, targeting amplicons longer than 5 kb, demands sustained enzyme processivity and high fidelity to minimize errors during elongation [14] [39]. This application note provides detailed methodologies and optimization strategies to overcome these hurdles, enabling robust and reliable amplification of challenging templates for downstream applications such as genotyping, cloning, and sequencing.
Fundamental Challenges and Optimization Strategies
GC-Rich PCR: Overcoming Stability and Secondary Structures
The primary obstacles in amplifying GC-rich templates are the intense hydrogen bonding between guanine and cytosine bases and the formation of intra-strand secondary structures. These factors prevent complete denaturation and block polymerase progression [14]. A fundamental theoretical and experimental study conclusively demonstrated that shorter annealing times are not only sufficient but necessary for efficient amplification of GC-rich templates to minimize nonspecific amplification and smearing [38].
Key optimization strategies include:
- Chemical Additives: Incorporating co-solvents like DMSO, betaine, glycerol, or formamide helps denature stable GC-rich duplexes by disrupting base pairing. Betaine, for instance, equalizes the stability of AT and GC pairs by binding in the minor groove [38].
- Enhanced Denaturation: Using higher denaturation temperatures (98°C) and/or longer initial denaturation times (up to 5 minutes) ensures complete separation of DNA strands [13].
- Primer and Template Design: Employing primers with matched melting temperatures (Tm) and optimizing their concentration reduces mispriming. Template denaturation with NaOH before PCR can also be beneficial [38].
- Polymerase Selection: Highly processive and hyperthermostable DNA polymerases are advantageous as they maintain activity through prolonged high-temperature denaturation cycles and can synthesize through complex secondary structures [14] [13].
Long-Range PCR: Sustaining Polymerase Processivity and Fidelity
Amplifying long DNA targets (>5 kb) presents distinct challenges, primarily related to the fidelity and sustained activity of the DNA polymerase. Non-proofreading polymerases like Taq are prone to introducing errors, while proofreading enzymes can exhibit 3'→5' exonuclease activity that may degrade primers [39]. A common and effective solution is using a blend of a non-proofreading polymerase as the main enzyme and a proofreading polymerase at a lower concentration (e.g., Tth and Vent) to achieve a balance of speed, yield, and accuracy [39].
Critical parameters for success include:
- Specialized Buffer Systems: Long PCR buffers often use alternative buffering agents like tricine (pH 8.7) and include components such as glycerol and DMSO to enhance enzyme stability and processivity over long extensions [39].
- Optimized Cycling Conditions: Extension times must be calculated based on polymerase speed (e.g., 1-2 minutes per kb). A two-temperature cycling protocol with a combined annealing/extension step at 68°C is often employed to simplify the process and improve efficiency [39].
- Template Quality: High-quality, intact template DNA is crucial. Degraded DNA will prevent amplification of full-length products.
- Hot-Start Technique: Implementing a hot start, by physically separating polymerase from other reaction components until the first high-temperature step, is recommended for all long-range PCR to prevent nonspecific amplification and primer-dimer formation [39].
Experimental Protocols
Protocol 1: Amplification of GC-Rich Templates
This protocol is optimized for a 660 bp fragment of the human ARX gene (78.72% GC content) [38] and can be adapted for other GC-rich targets.
Research Reagent Solutions
Table 1: Key Reagents for GC-Rich PCR
| Reagent | Function | Example/Note |
|---|---|---|
| Hot-Start DNA Polymerase | Reduces nonspecific amplification; maintains activity at high temps | KOD Hot Start Polymerase [38] |
| Template DNA | Source of target sequence | Human genomic DNA (100 ng/reaction) [38] |
| dNTPs | Building blocks for DNA synthesis | 200 µM of each dNTP [38] |
| MgSO₄ | Cofactor for polymerase activity | 4 mM in final reaction [38] |
| Primers | Sequence-specific amplification | 0.75 µM each; designed per guidelines [38] |
| DMSO | Additive to destabilize GC pairs | 11% (v/v) in final reaction [38] |
| BSA | Stabilizes polymerase; counters inhibitors | 400 µg/mL non-acetylated BSA [38] |
Workflow and Procedure
The following diagram outlines the optimized workflow for GC-rich PCR, highlighting critical optimization points.
Reaction Setup: Prepare a 25 µL reaction mixture containing:
- 1X manufacturer's buffer
- 100 ng human genomic DNA
- 200 µM of each dNTP
- 4 mM MgSO₄
- 400 µg/mL non-acetylated BSA
- 0.75 µM of each forward and reverse primer
- 11% (v/v) DMSO
- 0.5 units of a hot-start DNA polymerase (e.g., KOD Hot Start)
Thermal Cycling: Perform PCR using the following program:
- Initial Denaturation: 94°C for 30 seconds.
- Amplification Cycles (35 cycles):
- Denaturation: 94°C for 2 seconds.
- Annealing: 60°C for 3 seconds. This short time is critical for specificity [38].
- Extension: 72°C for 4 seconds.
- Final Extension: 72°C for 30 seconds.
Analysis: Analyze the PCR product by agarose gel electrophoresis. A unique, specific band at the expected size (660 bp) should be visible with minimal smear.
Protocol 2: Long-Range PCR Amplification
This protocol is based on a established long PCR method [39] and is suitable for amplifying targets over 5 kb from high-complexity templates like human genomic DNA.
Research Reagent Solutions
Table 2: Key Reagents for Long-Range PCR
| Reagent | Function | Example/Note |
|---|---|---|
| Polymerase Blend | Balances processivity (Tth) and fidelity (Vent) | Tth (main) and Vent (fractional) [39] |
| Long PCR Buffer | Optimized pH and composition for long amplicons | 25 mM Tricine, 85 mM KOAc, 8% Glycerol, 1% DMSO [39] |
| Template DNA | High-quality, intact source DNA | Human genomic DNA |
| dNTPs | Building blocks for DNA synthesis | 200 µM of each dNTP |
| Mg(OAc)₂ | Cofactor for polymerase activity | 1.2 mM in final reaction [39] |
| Primers | Sequence-specific amplification | 20-23 bases; Tm 60-68°C [39] |
Workflow and Procedure
The workflow for long-range PCR emphasizes a specialized buffer and a two-step cycling profile with progressively increasing extension times.
Reaction Setup with Hot Start:
- Prepare the Template/Primer Fraction (¾ of total volume) containing 1X Long PCR Buffer, template DNA (50-500 ng), primers, dNTPs, and water.
- Prepare the Polymerase Fraction (¼ of total volume) containing 1X Long PCR Buffer, the Tth/Vent polymerase blend, and water.
- The 5X Long PCR Buffer consists of:
- 425 mM KOAc
- 125 mM Tricine, pH 8.7 (adjusted with KOH)
- 40% Glycerol
- 5% DMSO
- 6.0 mM Mg(OAc)₂
Thermal Cycling:
- Place the Template/Primer fraction in the tube and heat to 94°C for 10 seconds in the thermal cycler.
- Pause the cycler and add the Polymerase Fraction.
- Resume cycling with the following program:
- Cycles 1-15: Denaturation at 94°C for 10 seconds; Annealing/Extension at 68°C for n minutes. Calculate n as 1 minute + (2.5 seconds/100 bases).
- Cycles 16-30: Denaturation at 94°C for 10 seconds; Annealing/Extension at 68°C for n + 15 seconds per cycle.
- Final Extension: 72°C for 10 minutes to ensure complete extension of all amplicons.
Analysis: Verify the amplification of the full-length product by agarose gel electrophoresis.
Troubleshooting and Data Analysis
Troubleshooting Common Issues
Table 3: Troubleshooting PCR Amplification Problems
| Problem | Potential Cause | Solution |
|---|---|---|
| No/Smeared Bands (GC-Rich) | Long annealing times | Reduce annealing time to 3-6 seconds [38] |
| No Amplification | Over-optimistic annealing temperature | Lower annealing temperature in 2-3°C increments [13] |
| Nonspecific Bands | Annealing temperature too low | Increase annealing temperature in 2-3°C increments [13] |
| Poor Long-Range Yield | Inefficient denaturation or short extension | Increase denaturation temperature to 98°C; ensure extension time is 1-2 min/kb [39] [13] |
Application in Genotyping: High-Resolution Melting (HRM) Analysis
Endpoint PCR products from optimized reactions can be used for downstream genotyping without sequencing. High-Resolution Melting (HRM) analysis is a powerful, cost-effective technique that differentiates sequence variants based on their melt curve profiles [40].
- Principle: Following PCR in the presence of a saturating DNA dye, the amplicon is slowly heated. The temperature at which the double-stranded DNA denatures into single strands is recorded as a drop in fluorescence. This melting temperature ((T_m)) is highly sensitive to the amplicon's GC content, length, and sequence [40].
- Application Example: HRM can distinguish E. coli sequence type ST131 from non-ST131 isolates with 100% sensitivity and 99.2% specificity, providing a rapid screening tool without the need for sequencing [40].
- Procedure:
- Perform the endpoint PCR protocol in a thermocycler capable of HRM, using a dye like EvaGreen or SYTO-9.
- After amplification, denature the products at 95°C and then cool to a low temperature (e.g., 50°C) to form uniform double-stranded DNA.
- Gradually increase the temperature (e.g., from 50°C to 95°C at 0.1°C/resolution) while continuously monitoring fluorescence.
- Analyze the resulting derivative melt curves (-dF/dT vs. Temperature). Differences in curve shape or (T_m) indicate sequence variations [40].
Application Note
Within the broader framework of research on End-Point PCR protocols for DNA amplification, three applications stand as fundamental pillars in molecular biology: cloning, sequencing, and mutagenesis. These techniques leverage the core principle of PCR—to amplify specific DNA sequences from a complex pool of DNA [41]—and adapt it for specialized downstream research and development goals, crucial for scientists and drug development professionals.
PCR Cloning enables researchers to insert a DNA fragment of interest into a vector for propagation and further study. The process can be direct, using specially designed vectors, or indirect, where the PCR primers are designed with additional nucleotides at their 5' end for further manipulation before insertion [42]. Sequencing applications, particularly for Sanger sequencing, use high-fidelity PCR to enrich template DNA. The resulting amplicons are purified and sequenced, with primers often tagged at their 5' ends with universal primer binding sites (e.g., M13 or T7) to streamline the workflow [42]. For Site-Directed Mutagenesis, PCR is used to create specific, targeted changes in double-stranded plasmid DNA, allowing for the study of changes in protein activity, screening for desired mutations, or the introduction/removal of restriction sites [42] [43].
A critical factor for success across these applications is the choice of DNA polymerase. Standard Taq DNA polymerase is sufficient for many routine amplifications. However, for longer fragments or when high sequence accuracy is paramount—as in cloning, sequencing, and mutagenesis—the use of a high-fidelity DNA polymerase is strongly recommended [44] [42]. These polymerases often possess a 3′→5′ exonuclease or "proofreading" activity, which repairs misincorporated nucleotides during amplification, dramatically increasing fidelity and the potential length of the amplifiable product [44].
Experimental Protocols
Protocol 1: PCR Cloning
This protocol outlines the method for amplifying and preparing a DNA insert for subsequent cloning into a compatible vector [42].
- Primer Design: Design primers homologous to the sequence flanking the target DNA. For direct cloning, no additions are needed. For indirect cloning, add the required 5' sequences, such as restriction enzyme sites or recombination sites.
- PCR Reaction Setup: Assemble a reaction on ice [44]:
- PCR-grade water: to a final volume of 50 µL
- 10X PCR Buffer (provided with enzyme): 5 µL
- dNTP Mix (10 mM each): 1 µL
- Forward Primer (10 µM): 1.25 µL
- Reverse Primer (10 µM): 1.25 µL
- DNA Template: 50–500 ng (complex genomic DNA) or 1–10 ng (plasmid DNA) [44]
- High-Fidelity DNA Polymerase: 0.5 µL (or as per manufacturer's instructions)
- Thermal Cycling:
- Initial Denaturation: 94°C for 2–5 minutes
- 25–35 cycles of:
- Denaturation: 94°C for 30 seconds
- Annealing: 55–65°C for 30 seconds (optimize based on primer Tm)
- Extension: 72°C for 1 minute per kb of product
- Final Extension: 72°C for 5–10 minutes
- Post-Amplification Analysis: Evaluate 8–10 µL of the PCR product by 0.8–1% agarose gel electrophoresis [44].
- Insert Preparation: Purify the remaining PCR product from the reaction mixture to remove enzymes and nucleotides. For indirect cloning, perform the necessary enzymatic modification (e.g., restriction digest) on the purified product.
Protocol 2: Preparation of Sequencing Templates
This protocol describes the amplification of a DNA fragment for subsequent Sanger sequencing [42].
- Primer Design: Design gene-specific primers. To facilitate sequencing, tag the 5' ends of these primers with a universal sequencing primer binding site (e.g., M13 forward or T7 promoter sequences).
- PCR Reaction Setup: Use a high-fidelity DNA polymerase to minimize introduction of errors during amplification [42]. The reaction setup is identical to Protocol 1.
- Thermal Cycling: The cycling parameters are identical to Protocol 1 but may be adjusted based on the specific target.
- Post-Amplification Purification: Purify the PCR product thoroughly to remove excess primers, dNTPs, and salts that can interfere with the sequencing reaction. This can be done using commercial PCR purification kits.
Protocol 3: Site-Directed Mutagenesis
This protocol uses inverse PCR with back-to-back primers to introduce a point mutation into a plasmid [43].
- Mutagenic Primer Design: Design two primers that are complementary to the same region on the plasmid template but point away from each other (back-to-back orientation). The primers should contain the desired mutation (e.g., a base substitution) in the middle, flanked by 15–20 nucleotides of correct sequence on both sides [42] [43].
- PCR Reaction Setup: Use a high-fidelity polymerase to ensure only the desired mutation is introduced. The reaction components are similar to Protocol 1, but the template is the plasmid to be mutated (typically 10–100 ng).
- Thermal Cycling:
- Initial Denaturation: 98°C for 30 seconds
- 25 cycles of:
- Denaturation: 98°C for 10 seconds
- Annealing: 55–70°C for 30 seconds (optimize based on primer Tm)
- Extension: 72°C for 2–3 minutes (depending on plasmid size)
- Final Extension: 72°C for 5–10 minutes
- Post-Amplification Processing: The resulting linear, amplified PCR product contains the mutation. Treat the product with an enzyme, such as DpnI, to digest the methylated parental DNA template. Subsequently, the nicked circular DNA can be directly transformed into competent E. coli [43].
Data Presentation
Table 1: Key Quantitative Parameters for End-Point PCR Applications
| Application | Recommended Polymerase Type | Typical Amplicon Size | Fidelity (Relative to Taq) | Critical Primer Design Consideration |
|---|---|---|---|---|
| Cloning | High-Fidelity [42] | Varies with insert | Up to 6.5x higher [44] | Addition of 5' restriction sites or recombination sequences [42] |
| Sequencing | High-Fidelity [42] | Varies with target | Up to 6.5x higher [44] | 5' tagging with universal sequencing primer sites [42] |
| Mutagenesis | High-Fidelity [42] | Full plasmid length | Up to 6.5x higher [44] | Mutation placed centrally with 15-20 bp correct flanking sequence [42] [43] |
Table 2: PCR Master Mix Formulation for a 50 µL Reaction
| Component | Final Concentration/Amount | Volume for 1 Reaction | Notes |
|---|---|---|---|
| PCR-Grade Water | n/a | Variable (to 50 µL total) | Nuclease-free |
| 10X PCR Buffer | 1X | 5 µL | MgCl₂ may be included |
| dNTP Mix (10 mM each) | 200 µM each | 1 µL | - |
| Forward Primer (10 µM) | 0.25 µM | 1.25 µL | - |
| Reverse Primer (10 µM) | 0.25 µM | 1.25 µL | - |
| DNA Template | 50–500 ng (genomic) | Variable | Amount depends on complexity [44] |
| DNA Polymerase | As per manufacturer | 0.5–1.25 U | Standard or high-fidelity |
Workflow Diagrams
The Scientist's Toolkit
Table 3: Essential Research Reagent Solutions for PCR Applications
| Reagent / Material | Function / Application Note |
|---|---|
| High-Fidelity DNA Polymerase Mix | Enzyme blends with proofreading (3'→5' exonuclease) activity for high-accuracy amplification in cloning, sequencing, and mutagenesis [44] [42]. |
| dNTP Mix (10 mM each) | Building blocks (dATP, dCTP, dGTP, dTTP) for DNA synthesis during PCR amplification [44]. |
| Optimized Reaction Buffers | Buffers supplied with the polymerase, often containing betaine or other enhancers for amplification of GC-rich templates or long targets [44]. |
| PCR Cloning Kits (TA/Blunt) | Specialized vector systems for the direct ligation of PCR products, streamlining the cloning workflow [42]. |
| Agarose Gel Electrophoresis System | Standard method for analyzing PCR product presence, size, and yield post-amplification [44] [41]. |
| PCR Purification Kits | For desalting and concentrating PCR products and for removing enzymes and dNTPs prior to sequencing or cloning steps [42]. |
Troubleshooting End-Point PCR: Solving Common Problems for Perfect Results
Within the framework of DNA amplification research, the end-point polymerase chain reaction (PCR) remains a fundamental technique. However, researchers frequently encounter experimental hurdles that compromise data integrity and progress. This application note provides a systematic troubleshooting guide for three common PCR failures—no product, low yield, and smearing—offering detailed protocols and solutions to ensure robust and reliable amplification results for scientists and drug development professionals.
Decoding PCR Failure: Causes and Corrective Actions
A systematic approach to troubleshooting begins with identifying the observable problem and understanding its underlying causes. The following table outlines the primary issues, their common origins, and recommended solutions.
Table 1: Comprehensive Guide to Common PCR Failures and Solutions
| Observation | Possible Cause | Recommended Solution |
|---|---|---|
| No Product | Incorrect annealing temperature [45] | Recalculate primer Tm and test a temperature gradient starting 5°C below the lower primer Tm [45]. |
| Poor primer design or specificity [27] [45] | Verify primer complementarity to the target and ensure they lack self-complementarity. Use online design tools [27]. | |
| Insufficient template quality/quantity [27] [46] | Check DNA integrity via gel electrophoresis, ensure 260/280 ratio is ~1.8, and use 1pg–10ng (plasmid) or 1ng–1µg (genomic) DNA [47] [46]. | |
| Missing reaction component or enzyme inhibitors [45] | Confirm all reagents are added. Use fresh reagents and further purify template via alcohol precipitation or cleanup kits to remove inhibitors [45]. | |
| Low Yield | Suboptimal reagent concentrations [27] | Optimize Mg2+ concentration (typically 1.5-2.0 mM for Taq) and primer concentration (typically 0.1–0.5 µM) [47]. |
| Insufficient number of cycles or extension time [27] | Increase cycle number to 25–40; ensure extension time is ~1 minute/kb [27] [47]. | |
| Complex template (e.g., GC-rich) [27] | Use a polymerase with high processivity. Incorporate additives like betaine or DMSO, or use a specialized GC enhancer [27] [48]. | |
| Enzyme activity compromised [48] | Use a hot-start polymerase to prevent non-specific amplification and premature activity [27] [48]. Ensure denaturation temperature is not too high. | |
| Smearing | Annealing temperature too low [48] [49] | Increase the annealing temperature incrementally (e.g., in 2–5°C steps) to improve specificity [48]. |
| Excess enzyme, primers, or template [48] [49] | Reduce the amount of DNA polymerase, optimize primer concentration, and perform serial dilutions of the template DNA [49]. | |
| Too many cycles [48] | Reduce the number of amplification cycles, typically by 3-cycle steps, to prevent accumulation of non-specific products [49]. | |
| Non-homogeneous reagents or primer dimer [27] [50] | Mix all reagent stocks thoroughly before use. Review primer design to avoid 3'-end complementarity and optimize concentrations [27] [50]. |
Experimental Protocols for Systematic PCR Optimization
Protocol: Optimization of Magnesium Concentration
Magnesium ion (Mg2+) concentration is a critical factor, as it acts as a cofactor for the DNA polymerase and can significantly impact yield and specificity [47].
- Prepare Master Mix: Create a master mix containing all standard PCR components—buffer, dNTPs, primers, template, and polymerase—but omit Mg2+.
- Set Up Reactions: Aliquot the master mix into a series of PCR tubes (e.g., 8 tubes).
- Supplement with Mg2+: Add a magnesium chloride (MgCl2) or magnesium sulfate (MgSO4) solution to each tube to create a final concentration gradient. A typical range is 1.0 mM to 4.0 mM in increments of 0.5 mM [47] [49].
- Run PCR: Perform amplification using standard cycling conditions.
- Analyze Results: Separate the PCR products on an agarose gel. Identify the Mg2+ concentration that produces the highest yield of the specific product with minimal background.
Protocol: Optimization of Annealing Temperature
The annealing temperature is paramount for specific primer binding [27] [51].
- Calculate Tm: Determine the melting temperature (Tm) for each primer using the formula provided by your polymerase's manufacturer.
- Program Thermocycler: Use a thermal cycler with a gradient function. Set the annealing temperature gradient to span a range of approximately 5°C below to 5°C above the calculated Tm of the lower-Tm primer [45].
- Run PCR: Perform amplification with a single reaction plate placed in the gradient block.
- Analyze Results: Analyze the PCR products by gel electrophoresis. The optimal annealing temperature is the one that yields the brightest specific band with the absence of non-specific bands or primer-dimer.
The following workflow provides a logical, step-by-step guide for diagnosing and resolving the most common PCR issues.
The Scientist's Toolkit: Essential Research Reagents
Successful PCR amplification, especially of challenging templates, often requires the selection of specialized reagents. The table below details key solutions.
Table 2: Key Research Reagent Solutions for PCR Optimization
| Reagent | Function | Application Notes |
|---|---|---|
| Hot-Start DNA Polymerase | Remains inactive at room temperature, preventing non-specific priming and primer-dimer formation prior to the first denaturation step [27] [50]. | Essential for improving specificity and yield. Available in various formats (antibody-mediated, chemically modified) [50]. |
| Proofreading High-Fidelity Polymerase | Possesses 3'→5' exonuclease activity to correct misincorporated nucleotides during amplification [45]. | Critical for downstream applications like cloning and sequencing where low error rates are required. |
| Betaine or DMSO | PCR additives that destabilize DNA secondary structures, effectively reducing the melting temperature of DNA [48]. | Used to amplify GC-rich templates (typically >60% GC). A combination of 1.0 M betaine with 5-8% DMSO can be highly effective [48]. |
| BSA (Bovine Serum Albumin) | Binds to and neutralizes common PCR inhibitors that may be co-purified with the template DNA, such as phenols or humic acids [50] [48]. | Particularly useful when amplifying from complex samples like blood, soil, or plant tissues. |
| Specialized PCR Kits | Designed for specific challenges, such as long-range PCR or amplification from difficult samples. | Kits often include optimized buffers and enzyme blends. For example, Platinum DNA polymerases feature a universal 60°C annealing buffer, simplifying multiplex PCR [51]. |
Advanced Troubleshooting: Special Cases
Amplification of GC-Rich Templates
GC-rich sequences (>60%) form stable secondary structures that impede polymerase progression.
- Solution: Use a polymerase with high processivity and a specialized buffer [27] [45].
- Protocol: Supplement reactions with 1-1.5 M betaine or 3-10% DMSO [48]. Increase the denaturation temperature and/or time. A "touchdown PCR" protocol, which starts with a high annealing temperature and gradually decreases it, can also enhance specificity.
Preventing Primer-Dimer Formation
Primer-dimer results from primers annealing to each other, producing short, unwanted products.
- Solution: Meticulous primer design is the best prevention.
- Protocol: Use bioinformatics tools to ensure primers lack complementary sequences at their 3' ends. Optimize primer concentrations and increase the annealing temperature. If problems persist, reformulate the primer sequences to avoid these interactions [27] [50].
Effective diagnosis and resolution of PCR failures are critical skills in molecular biology research. By systematically addressing reaction components, cycling conditions, and template quality, researchers can overcome the common challenges of no product, low yield, and smearing. The protocols and reagent solutions provided herein offer a robust framework for optimizing end-point PCR, ensuring the generation of high-quality, reliable data for downstream applications in research and drug development.
In end-point PCR research, the success of DNA amplification is fundamentally governed by the meticulous design of oligonucleotide primers. Key parameters such as melting temperature (Tm), GC content, and specificity directly determine assay efficiency, yield, and reliability [52] [53]. suboptimal primer design can lead to primer-dimer formation, non-specific amplification, and complete amplification failure, thereby compromising experimental integrity and reproducibility [54] [55].
This application note provides a comprehensive framework for optimizing primer design within the context of end-point PCR protocols for DNA amplification. We detail established principles, advanced computational tools, and practical validation protocols to enable researchers to design highly specific and efficient primers, thereby enhancing the robustness of their molecular research and drug development pipelines.
Fundamental Principles of Primer Design
The core principles of primer design involve balancing several interdependent thermodynamic and sequence-based properties to ensure specific and efficient annealing to the target DNA template.
Melting Temperature (Tm) and Annealing Temperature (Ta)
The melting temperature (Tm) is the temperature at which 50% of the DNA duplex dissociates into single strands and is a critical determinant for selecting the appropriate annealing temperature (Ta) during PCR cycling [56] [57].
- Tm Calculation: The simplistic Wallace Rule (
Tm = 2°C(A + T) + 4°C(G + C)) provides a quick estimate but lacks accuracy [57]. For robust experimental design, use the modified Allawi & SantaLucia's thermodynamics method or online calculators (e.g., IDT OligoAnalyzer, Thermo Fisher Tm Calculator) that account for salt concentrations, divalent cations, and oligonucleotide concentration [58] [59] [56]. Tm is not a constant and varies with experimental conditions [56]. - Ta Selection: The optimal annealing temperature should be no more than 5°C below the Tm of the primers [59]. For primer pairs, the individual Tm values should not differ by more than 2–5°C to ensure simultaneous and efficient binding [59] [53] [60]. A common initial approach is to set the Ta at 2–5°C above the primer's Tm to enhance specificity [61].
Table 1: Key Guidelines for Tm and Ta
| Parameter | Recommended Range | Rationale | Considerations |
|---|---|---|---|
| Primer Tm | 60–75°C [54] [59] [60] | Compatible with enzyme activity; promotes specific binding. | Varies with oligo concentration and salt. Calculate using nearest-neighbor methods [56]. |
| Ta vs Tm | Ta ≈ Tm - 5°C to Tm - 2°C [59] [61] | Balances annealing efficiency with specificity. | Can be optimized empirically via gradient PCR [58]. |
| Tm Difference (Fwd vs Rev) | ≤ 2–5°C [59] [60] | Ensures both primers anneal with similar efficiency. | Critical for symmetric amplification. |
GC Content and Sequence Composition
GC content significantly influences primer stability and specificity due to the stronger triple hydrogen bonds between G and C bases compared to the double bonds of A and T [61].
- Optimal GC Content: Aim for a GC content of 40–60%, with an ideal of around 50% [54] [59] [61]. This provides sufficient sequence complexity and stability without promoting non-specific binding.
- GC Clamp: Include a G or C base at the 3' end of the primer (a GC clamp) to strengthen binding due to the stronger hydrogen bonding. However, avoid more than 3 G or C residues in the last 5 bases at the 3' end, as this can promote non-specific annealing [54] [61].
- Sequence Repeats: Avoid runs of 4 or more identical bases (e.g., AAAA or CCCC) and dinucleotide repeats (e.g., ATATAT), as these can complicate synthesis and cause mispriming [54] [59] [53].
Specificity and Secondary Structures
Primer specificity is paramount for amplifying the intended target and avoiding spurious products.
- Secondary Structures: Screen primers for self-dimers, cross-dimers, and hairpins. The free energy (ΔG) for any such structures should be weaker (more positive) than –9.0 kcal/mol to prevent stable, non-productive structures from forming [59].
- Off-Target Binding: Always perform a sequence homology check (e.g., using NCBI BLAST) to ensure the primer pair is unique to the intended target sequence, thereby minimizing off-target amplification [52] [59].
- 3' End Complementarity: Pay special attention to avoid complementarity at the 3' ends between forward and reverse primers, as this is a primary cause of primer-dimer artifacts [54] [53].
Table 2: Primer Design Parameters for Specificity and Stability
| Parameter | Recommendation | Purpose | Tool for Analysis |
|---|---|---|---|
| Primer Length | 18–30 nucleotides [54] [59] [53] | Balances specificity with efficient annealing. | Primer design software (e.g., Primer3). |
| GC Content | 40–60% [54] [59] [61] | Provides optimal primer stability. | Built-in analysis in most design tools. |
| Self-Complementarity | ΔG > –9.0 kcal/mol [59] | Minimizes hairpin formation and self-dimers. | IDT OligoAnalyzer [59]. |
| 3'-End Complementarity | Avoid >3 bp complementarity, especially at 3' end. | Prevents primer-dimer formation. | IDT OligoAnalyzer; Primer3. |
Experimental Protocols
In Silico Primer Design and Specificity Analysis
This protocol leverages automated tools for high-quality primer design and rigorous specificity evaluation, which is critical for large-scale projects.
Primary Design with Primer3: Use Primer3 (command-line or web interface) with standard parameters to generate candidate primer pairs for each target site [52]. Key input settings include:
PRIMER_OPT_SIZE=20PRIMER_MIN_GC=40.0PRIMER_OPT_TM=60.0PRIMER_MAX_POLY_X=4(to avoid homopolymers)
Specificity Analysis with ISPCR: Process all candidate primers through the ISPCR tool to identify potential off-target binding sites across the reference genome. Use parameters such as
-minPerfect=1(minimum size of perfect match at 3' end) and-maxSize=800(maximum amplicon size) [52].Evaluation and Annotation (CREPE Pipeline): A custom evaluation script parses ISPCR output to annotate primers based on specificity [52].
- Filtering: Remove primer pairs aligning to decoy contigs and those with an ISPCR score <750.
- Off-Target Classification: Align all off-target amplicons to the intended on-target amplicon. Off-targets with a normalized match percentage ≥80% are classified as high-quality off-targets (HQ-Off) and are considered concerning. Those below 80% are low-quality (LQ-Off) and less problematic [52].
- Final Selection: The final output prioritizes primer pairs with no HQ-Off targets for experimental validation.
PCR Setup and Thermal Cycling for End-Point Amplification
This protocol is adapted for the amplification of DNA fragments using a standard high-fidelity polymerase mix, suitable for cloning and sequencing.
Reaction Setup: Prepare a master mix on ice with the following components for a 50 µL reaction [60]:
- PCR-grade water: to 50 µL final volume.
- 10X PCR Buffer: 5 µL (provided with enzyme).
- MgCl₂ (25 mM): 2–4 µL (Final conc. 1–5 mM; requires optimization).
- dNTP Mix (10 mM each): 1 µL (Final conc. 200 µM each).
- Forward Primer (10 µM): 1.25 µL (Final conc. 0.25 µM).
- Reverse Primer (10 µM): 1.25 µL (Final conc. 0.25 µM).
- DNA Template: 10 pg–500 ng (adjust based on complexity).
- DNA Polymerase: 0.5–1.25 U (e.g., AccuTaq LA DNA Polymerase Mix).
Include a no-template control (NTC) with PCR-grade water replacing the DNA template.
Thermal Cycling Conditions: The following program is a starting point for a cycler with a heated lid. Optimize the annealing temperature (Ta) and extension time based on primer Tm and amplicon length [60].
- Post-Amplification Analysis: Analyze 5–10 µL of the PCR product by agarose gel electrophoresis (e.g., 1% gel) alongside an appropriate DNA ladder to confirm the presence and size of the expected amplicon and assess specificity and primer-dimer formation [60].
Advanced Considerations and Tools
Addressing Amplification Bias in Multi-Template PCR
In applications like targeted amplicon sequencing or metabarcoding, where multiple templates are amplified in a single reaction, sequence-specific variations in amplification efficiency can severely skew abundance results [55]. Recent research using deep learning (1D-CNNs) has shown that specific sequence motifs adjacent to primer binding sites can lead to dramatically lower amplification efficiencies, independent of GC content [55]. Tools like CluMo (Motif Discovery via Attribution and Clustering) can identify these problematic motifs, enabling the design of amplicon libraries with inherently more homogeneous amplification performance, which is critical for quantitative accuracy [55].
Essential Tools for the Scientist's Toolkit
Leveraging specialized software and reagents is non-negotiable for modern, efficient primer design and PCR optimization.
Table 3: Research Reagent Solutions and Computational Tools
| Tool / Reagent | Category | Primary Function | Reference/Source |
|---|---|---|---|
| Primer3 | Software | Core algorithm for automated primer design. | [52] |
| CREPE Pipeline | Software | Integrated pipeline for large-scale primer design and specificity evaluation. | [52] |
| IDT OligoAnalyzer | Online Tool | Analyze Tm, hairpins, dimers, and run BLAST for specificity. | [59] |
| Thermo Fisher Tm Calculator | Online Tool | Calculate Tm and Ta for specific polymerases. | [58] |
| High-Fidelity DNA Polymerase Mix | Reagent | Provides high accuracy and processivity for long amplicons. | [60] |
| Hot-Start DNA Polymerase | Reagent | Reduces non-specific amplification during reaction setup. | [60] |
Troubleshooting Common Primer-Related Issues
Even with careful in silico design, empirical optimization is often required.
- No Amplification or Low Yield: This can result from an annealing temperature that is too high, poor primer binding efficiency, or degraded primers. Solution: Verify primer concentration and quality. Perform a temperature gradient PCR to empirically determine the optimal Ta. Ensure the Tm calculation accounts for the actual reaction buffer conditions [58] [56] [53].
- Non-Specific Bands/Multiple Bands: Often caused by an annealing temperature that is too low, excessive primer concentration, or primers with low specificity. Solution: Incrementally increase the annealing temperature. Check primers for off-target binding using BLAST and re-design if necessary. Consider using Touchdown PCR to increase specificity in early cycles [53].
- Primer-Dimer Formation: Caused by complementarity between the 3' ends of primers. Solution: Use software to screen for and minimize self-complementarity and cross-dimer formation. Increase the annealing temperature. If unavoidable, consider re-designing the primers [54] [59].
The optimization of primer melting temperature, GC content, and specificity is a critical determinant of success in end-point PCR research. By adhering to the established design principles outlined herein, employing rigorous in-silico validation pipelines like CREPE, and utilizing advanced tools to understand and mitigate biases in complex assays, researchers can significantly enhance the reliability and reproducibility of their DNA amplification experiments. This structured approach to primer design provides a solid foundation for a wide range of applications in genomics, diagnostics, and drug development.
Within the framework of research dedicated to developing robust end-point PCR protocols for DNA amplification, the optimization of reaction conditions is a critical step that directly determines the success and reliability of experimental outcomes. Two of the most pivotal parameters demanding precise calibration are the annealing temperature and the concentration of magnesium ions (Mg2+). Incorrect annealing temperatures can lead to nonspecific amplification or complete reaction failure, while suboptimal Mg2+ concentrations can drastically alter DNA polymerase fidelity and efficiency [62] [63]. This application note provides detailed methodologies for the systematic optimization of these parameters, ensuring the acquisition of specific and ample amplicons for downstream analysis in genetic research and drug development.
The Critical Role of Annealing Temperature
Principles and Definition
The annealing temperature in a PCR cycle is the temperature at which primers bind, or anneal, to their complementary sequences on the single-stranded DNA template. This step is fundamental for defining the reaction's specificity. An temperature that is too low permits primers to bind to sequences with partial complementarity, resulting in spurious amplification products. Conversely, an temperature that is too high may prevent primers from binding to the intended target altogether, leading to a weak or negative amplification signal [64]. The objective is to identify the highest possible temperature that still allows for efficient primer binding to the exact target sequence.
The theoretical starting point for optimization is the melting temperature (Tm), defined as the temperature at which 50% of the DNA duplex dissociates into single strands. A typical starting annealing temperature is set at 3–5 °C below the calculated Tm of the primers [64]. For a robust reaction, both the forward and reverse primers should have Tms within 5 °C of each other to allow both to anneal efficiently at the same temperature [65] [62].
Optimization Protocol: Gradient PCR
A systematic approach to determining the optimal annealing temperature is to perform a gradient PCR [62].
Materials:
- Thermal cycler with gradient functionality
- Standard PCR reagents: DNA polymerase, corresponding buffer, dNTPs, sterile water
- Optimized primer pair
- Template DNA
- PCR tubes
Method:
- Prepare a master mix containing all standard PCR components, ensuring homogeneity across all reactions.
- Aliquot the master mix into PCR tubes.
- Place the tubes in the thermal cycler and set the annealing step to a temperature gradient spanning a realistic range (e.g., 50°C to 65°C). The cycler will create a different annealing temperature for each tube.
- Run the PCR cycles to completion.
- Analyze the resulting amplicons using agarose gel electrophoresis.
Analysis: The optimal annealing temperature is identified as the highest temperature within the gradient that produces a single, intense band of the expected amplicon size. Higher temperatures within this range generally promote greater specificity [62] [14].
Advanced Technique: Touchdown PCR
For challenging assays with persistent nonspecific amplification, touchdown PCR is a highly effective strategy [14]. This technique involves starting with an annealing temperature higher than the expected Tm and progressively decreasing it in subsequent cycles until the optimal temperature is "touched down." This ensures that amplification in the initial cycles is highly stringent, favoring the specific target. Once a specific product is generated, it is preferentially amplified in the remaining cycles.
Table 1: Summary of Annealing Temperature Optimization Strategies
| Strategy | Principle | Advantages | Typical Application |
|---|---|---|---|
| Gradient PCR | Empirical testing of a temperature range in a single run. | Directly identifies the optimal temperature for a specific primer-template system. | Standard optimization for new primer sets. |
| Touchdown PCR | Starts high, decreases incrementally to a predetermined optimum. | Enhances specificity by favoring specific product formation in early cycles. | Complex templates (e.g., genomic DNA), multiplex PCR, or problematic primers. |
| Fixed Temperature | Uses a universal annealing temperature (e.g., 60°C). | Simplifies protocol; no need for optimization. | Specialized polymerases and buffers designed for uniform primer annealing [7]. |
The following workflow diagram illustrates the stepwise logical process for optimizing the annealing temperature.
The Critical Role of Mg2+ Concentration
Principles and Definition
Magnesium ions (Mg2+) are an essential cofactor for all DNA polymerases. They facilitate the binding of the enzyme to the DNA template and are directly involved in the catalytic reaction of nucleotide incorporation [64]. The Mg2+ concentration in the reaction mix is therefore a primary determinant of enzyme activity and fidelity.
The Mg2+ in a PCR reaction is typically supplied as MgCl2 and its concentration must be carefully optimized. A concentration that is too low results in low enzyme activity, yielding weak or no amplification. A concentration that is too high reduces specificity, promoting non-specific primer binding, primer-dimer formation, and increased error rates during DNA synthesis [62] [63]. The optimal concentration is influenced by the presence of chelating agents in the buffer and the concentration of dNTPs, which also bind Mg2+.
Optimization Protocol: Mg2+ Titration
A titration experiment is the standard method for determining the optimal Mg2+ concentration.
Materials:
- PCR reagents, including a 10X buffer without MgCl2
- MgCl2 stock solution (e.g., 25 mM)
- Template DNA and primer pair
Method:
- Prepare a series of PCR master mixes identical in all components except for the MgCl2 concentration.
- Create a dilution series of MgCl2 to achieve a final concentration range of 0.5 mM to 5.0 mM in 0.5 mM increments. A common starting point is 1.5 mM [65] [63].
- Run the PCR using an annealing temperature that has been previously determined or estimated.
- Analyze the amplicons using agarose gel electrophoresis.
Analysis: The optimal Mg2+ concentration is the lowest concentration that produces a strong, specific band of the expected size. This minimizes the risk of nonspecific amplification while ensuring robust yield [63].
Table 2: Effects and Optimization of Mg2+ Concentration
| Parameter | Low Concentration (<1.5 mM) | Optimal Concentration (1.5 - 2.5 mM) | High Concentration (>4.5 mM) |
|---|---|---|---|
| PCR Yield | Very low to no yield. | Strong, specific amplification. | High yield, but with non-specific products. |
| Specificity | High (but unproductive). | High. | Low; spurious bands and smearing. |
| Fidelity | N/A | Standard for the polymerase. | Reduced; increased error rate. |
| Primary Issue | Enzyme inactivity. | -- | Mispriming and primer-dimer formation. |
The relationship between Mg2+ concentration and PCR outcomes can be visualized as a balance, as shown in the following diagram.
The Scientist's Toolkit: Essential Reagents for Optimization
The following table details key reagents and their functions critical for successfully fine-tuning PCR conditions.
Table 3: Research Reagent Solutions for PCR Optimization
| Reagent / Material | Function / Role in Optimization |
|---|---|
| Hot-Start DNA Polymerase | An enzyme modified (e.g., by antibody, aptamer, or chemical modification) to be inactive at room temperature. Prevents non-specific amplification and primer-dimer formation during reaction setup, thereby enhancing specificity before thermal cycling begins [14]. |
| Thermal Cycler with Gradient Function | Essential equipment that allows different annealing temperatures to be tested across a single block of tubes in a single run, dramatically accelerating the optimization process [62]. |
| dNTP Mix | The building blocks (dATP, dCTP, dGTP, dTTP) for DNA synthesis. Consistent and accurate pipetting is crucial as dNTPs can chelate Mg2+, effectively reducing the free concentration available to the polymerase [62]. |
| MgCl2 Stock Solution | The source of Mg2+ ions. A separate, high-quality stock solution is required for titration experiments when using a buffer that does not already contain Mg2+ [65]. |
| PCR Additives (e.g., DMSO, Betaine) | Chemical enhancers that can aid in denaturing templates with high GC content or strong secondary structure. They often lower the effective Tm of the primers, which may require re-optimization of the annealing temperature [65] [14]. |
| Agarose Gel Electrophoresis System | The standard method for visualizing PCR products post-amplification. Allows for direct assessment of amplicon specificity, yield, and size, which are the key readouts for optimization experiments [65] [41]. |
The meticulous optimization of annealing temperature and Mg2+ concentration is not an optional refinement but a foundational requirement for generating reliable and interpretable data in endpoint PCR research. By employing the systematic protocols outlined in this application note—namely, gradient PCR for annealing temperature and Mg2+ titration—researchers and drug development professionals can significantly enhance the specificity and efficiency of their amplification assays. This rigorous approach to protocol fine-tuning ensures that subsequent genetic analysis, whether for basic research or diagnostic purposes, is built upon a robust and reproducible experimental foundation.
Identifying and Removing PCR Inhibitors from Sample and Reagents
The polymerase chain reaction (PCR) is a foundational technique for in vitro DNA amplification, essential for downstream applications including cloning, genotyping, and pathogen surveillance [66]. However, the sensitivity of PCR makes it susceptible to failure due to the presence of PCR inhibitors—diverse organic and inorganic molecules that co-purify with nucleic acids and interfere with the amplification reaction [66] [67]. These substances can originate from the original sample material (e.g., blood, soil, plant tissues), reagents used during nucleic acid extraction, or even laboratory plastics [68]. In the context of endpoint PCR research, inhibitors can lead to false-negative results, erroneous data, and ultimately, a failure to detect the target DNA sequence, compromising research integrity and drug development processes [66]. Understanding the sources, mechanisms, and solutions for PCR inhibition is therefore critical for developing robust DNA amplification protocols.
Common PCR Inhibitors and Their Mechanisms
PCR inhibitors are a heterogeneous group of compounds that disrupt amplification through several biochemical mechanisms. Understanding these modes of action is key to diagnosing and troubleshooting inhibition.
- Binding to DNA Polymerase: Many inhibitors, such as hematin from blood, melanin from tissue, and polyphenolics from plants, can bind directly to the DNA polymerase enzyme. This interaction prevents the enzyme from functioning correctly, halting the elongation step of PCR [66] [69].
- Chelating Cofactors: Molecules like EDTA (a common preservative) and tannins act by chelating magnesium ions (Mg²⁺), which are essential cofactors for DNA polymerase activity. This sequestration effectively decreases or completely inactivates the enzyme, reducing the reaction rate [66].
- Interacting with Nucleic Acids: Substances such as humic acids from soil can bind to the DNA template itself, preventing the denaturation step where DNA strands separate. Similarly, polysaccharides from plant tissues can physically entrap nucleic acids, making them inaccessible to the polymerase [66] [70].
- Fluorescence Quenching: For real-time PCR and other fluorescence-based detection methods, some inhibitors can quench the fluorescence signal. This occurs through collisional or static quenching mechanisms, leading to an underestimation of the DNA concentration or a false negative, even if amplification has occurred [67].
The table below summarizes common inhibitors, their sources, and primary mechanisms of action.
Table 1: Common PCR Inhibitors, Their Sources, and Mechanisms of Action
| Inhibitor | Common Sample Sources | Primary Mechanism of Inhibition |
|---|---|---|
| Hematin / Heme | Blood, tissue samples | Binds to and inactivates DNA polymerase [66] [68] |
| Humic and Fulvic Acids | Soil, sediment, environmental water | Binds to DNA polymerase and interacts with nucleic acids [66] [67] |
| Collagen | Bone, tissue | Binds to and inactivates DNA polymerase [71] [72] |
| Polysaccharides | Plant tissues, feces | Entraps nucleic acids, making them inaccessible [70] |
| Polyphenolics (Tannins) | Plant tissues, coprolites | Chelates Mg²⁺ ions and binds to polymerase [66] [70] |
| Melanin | Hair, skin tissue | Binds to thermostable DNA polymerase [72] [69] |
| Calcium Ions | Bone, some reagents | Can inhibit polymerase activity at high concentrations [72] |
| Indigo Dyes | Fabrics, textiles | Inhibits DNA polymerase [72] |
| EDTA | Purification reagents, lysis buffers | Chelates Mg²⁺ ions [66] |
| SDS & Other Detergents | Lysis buffers, purification reagents | Disrupts polymerase activity; can be difficult to remove [66] [68] |
Detection and Diagnosis of PCR Inhibition
Identifying the presence of inhibitors is a critical first step before moving to more complex DNA extraction or purification protocols. Several straightforward methods can be employed.
Dilution Assay
The simplest method to test for inhibition is to perform a sample dilution series. If an undiluted sample fails to amplify but a diluted (e.g., 1:10) sample shows successful amplification, this strongly indicates the presence of PCR inhibitors. When inhibitors are diluted to a sub-critical concentration, amplification can proceed, even though the DNA template is also diluted [66] [68].
Internal Controls and qPCR Profiling
In quantitative PCR (qPCR), the use of an internal control (IC) is a powerful diagnostic tool. The IC is a known DNA sequence added to each reaction. If both the target and the IC fail to amplify, inhibition is likely. A clear delay in the cycle threshold (Ct) value of the IC in a test sample compared to a control indicates the presence of inhibitors [73]. In endpoint PCR, the failure to form primer-dimers can also be a sign of severe inhibition [71].
Spectrophotometric Analysis
Spectrophotometric measurements (A260/A280 and A260/A230 ratios) can provide clues about purity. While an A260/A280 ratio between 1.8 and 2.0 is ideal for DNA, a discolored extract (yellowish- to reddish-brown) or a skewed A260/A230 ratio can indicate contamination with inhibitors like humic acids or phenolics [71] [68]. However, this method is not definitive, as some inhibitors do not affect these ratios.
Strategies for Removing PCR Inhibitors
Optimized DNA Extraction Protocols
The choice of DNA extraction method is the first line of defense against co-purification of inhibitors.
CTAB-Based Extraction for Plant Tissues
The Cetyltrimethylammonium bromide (CTAB) method is effective for challenging plant tissues high in polysaccharides and polyphenols. The protocol below is adapted for grapevine leaf tissue, a known source of inhibitors [74].
Reagents:
- Buffer 1: 200 mM Tris-HCl, 1.4 M NaCl, 0.5% (v/v) Triton X-100, 3% (w/v) CTAB.
- PVP: Polyvinylpyrrolidone (0.1-1% w/v), added to bind polyphenols.
- Chloroform-Isoamyl Alcohol (24:1)
- Isopropanol and 70% Ethanol
- TE Buffer (for elution)
Protocol:
- Homogenize 50-100 mg of plant tissue in 400-500 µL of pre-warmed (60°C) CTAB buffer containing PVP and β-mercaptoethanol.
- Incubate the homogenate at 60°C for 30-60 minutes.
- Add an equal volume of Chloroform-Isoamyl Alcohol (24:1), mix thoroughly, and centrifuge at >10,000 × g for 10 minutes.
- Transfer the upper aqueous phase to a new tube. Add 0.6-1.0 volumes of isopropanol, mix, and incubate to precipitate DNA.
- Pellet the DNA by centrifugation (e.g., 12,000 × g for 15 min). Wash the pellet with 70% ethanol.
- Air-dry the pellet and resuspend in TE Buffer or nuclease-free water [70] [74].
HotShot Alkaline Lysis for Rapid Extraction
The HotShot method is a rapid, cost-effective technique suitable for high-throughput screening. It has been successfully optimized for grapevine ("HotShot Vitis") and other recalcitrant tissues [74].
Reagents:
- Alkaline Lysis Buffer: 25 mM NaOH, 0.2 mM disodium EDTA (pH ~12).
- Neutralization Buffer: 40 mM Tris-HCl (pH 5).
Protocol:
- Add 50-100 µL of Alkaline Lysis Buffer to a small amount of tissue (e.g., a leaf punch or few cells).
- Incubate at 95°C for 10-30 minutes.
- Cool the samples briefly, then add an equal volume of Neutralization Buffer.
- Vortex and centrifuge. The supernatant contains PCR-ready DNA [74].
The workflow for this rapid method can be visualized as follows:
Post-Extraction Purification Methods
If inhibition persists after initial DNA extraction, post-extraction purification is required.
Silica-Based Column Purification
Silica membrane columns are highly effective for removing a wide range of inhibitors. They work by binding DNA in high-salt conditions while inhibitors pass through, followed by washing and elution of pure DNA. Repeat silica extraction has been demonstrated as a simple technique for removing stubborn inhibitors from ancient DNA and forensic samples [71] [73].
Table 2: Comparison of Commercial Kits for PCR Inhibitor Removal
| Product / Method | Principle | Suitable For / Inhibitors Removed | Key Advantage |
|---|---|---|---|
| OneStep PCR Inhibitor Removal Kit (Zymo Research) [75] | Silica-based column that binds polyphenolics | Polyphenolics (humic/fulvic acids, tannins, melanin) | Fast, one-step procedure; no prep buffer required |
| PowerClean DNA Clean-Up Kit (MoBio) [72] | Silica-based purification | Humic acids, polyphenols, dyes, hematin, collagen | Very effective for various inhibitors from forensic and environmental samples |
| DNA IQ System (Promega) [72] | Magnetic silica beads | Humic acid, melanin, collagen, indigo, urea | Effective removal and compatibility with automation |
| Phenol-Chloroform Extraction [72] | Liquid-liquid phase separation | Proteins, lipids, some organic compounds | Can be effective for certain inhibitors but uses hazardous chemicals |
| Chelex-100 Resin [72] | Chelating resin | Some ions, small molecules | Simple and fast, but lower effectiveness for many inhibitors |
Chemical and Additive Enhancements
Certain additives can be included in the PCR master mix to counteract the effect of inhibitors.
- Bovine Serum Albumin (BSA): BSA acts as a "competitive" protein, binding to inhibitors like polyphenols and tannins, thereby preventing them from inactivating the DNA polymerase [71].
- Increasing DNA Polymerase Concentration: Adding more polymerase units can sometimes overcome mild inhibition by ensuring enough active enzyme is present [71].
- Use of Inhibitor-Tolerant Polymerase Blends: Specialized DNA polymerase formulations are commercially available that demonstrate heightened resistance to common inhibitors found in blood, soil, and plant tissues, offering a straightforward solution for direct PCR protocols [67].
The Scientist's Toolkit: Research Reagent Solutions
The following table compiles key reagents and kits essential for effective PCR inhibitor management in a research setting.
Table 3: Essential Research Reagents for Managing PCR Inhibition
| Reagent / Kit | Function / Purpose | Key Components / Mechanism |
|---|---|---|
| CTAB Buffer [70] [74] | Lysis and precipitation of polysaccharides and proteins during DNA extraction from plants. | Cetyltrimethylammonium bromide, NaCl, Tris-HCl, EDTA. |
| Polyvinylpyrrolidone (PVP) [70] [74] | Binds and removes polyphenolic compounds during extraction. | PVP-40; forms complexes with polyphenols. |
| Silica Membrane Columns (e.g., QIAamp, NucleoSpin) [71] [73] [74] | Purification of DNA by binding in high salt and eluting in low salt, removing inhibitors. | Silica gel membrane, chaotropic salts, wash buffers. |
| OneStep PCR Inhibitor Removal Kit [75] | Specific removal of polyphenolics from pre-extracted DNA/RNA. | Specialized column matrix that binds humic/fulvic acids, tannins, melanin. |
| Bovine Serum Albumin (BSA) [71] | PCR additive that neutralizes inhibitors by non-specific binding. | Molecular biology-grade BSA. |
| Inhibitor-Tolerant DNA Polymerase Blends [67] | Enzymes engineered for performance in inhibited samples. | Proprietary polymerase mixes (e.g., Phusion Flash). |
The reliable amplification of DNA via endpoint PCR is a cornerstone of molecular research. The pervasive challenge of PCR inhibitors necessitates a systematic approach, from selecting the appropriate extraction protocol for the sample type to employing diagnostic assays and targeted purification strategies. By integrating the methodologies outlined in this application note—such as optimized CTAB and HotShot extractions, strategic use of silica-based purification columns, and the judicious application of enhancers like BSA—researchers can effectively mitigate the risk of inhibition. This ensures the generation of robust, reproducible data, thereby accelerating discovery and development in scientific and pharmaceutical contexts.
Within the framework of research on end-point PCR protocols for DNA amplification, the reliability of the assay is paramount. Many biological samples, from crime scene evidence to clinical specimens, present significant challenges for polymerase chain reaction (PCR), including the presence of inhibitors, complex secondary structures, and high GC content. These factors can lead to amplification failure, non-specific products, or the "ski-slope" effect—a pronounced decrease in the signal intensity of larger amplicons. To overcome these hurdles, the strategic use of PCR enhancers is a critical step in protocol optimization. This application note provides a detailed evaluation of three common additives—Dimethyl Sulfoxide (DMSO), Bovine Serum Albumin (BSA), and Betaine—summarizing quantitative data and providing robust, ready-to-use protocols for researchers and scientists in drug development.
Each additive functions through a distinct mechanism to enhance PCR. The following table summarizes their roles, optimal concentrations, and primary applications.
Table 1: Properties and Applications of PCR Additives
| Additive | Optimal Concentration | Primary Mechanism of Action | Key Applications |
|---|---|---|---|
| DMSO | 3.75% - 5% (v/v) [76] [77] | Disrupts secondary DNA structures, reduces melting temperature (Tm), and improves strand separation [76]. | Reducing the ski-slope effect in multiplex PCR; enhancing amplification of large-sized sequences; improving specificity in isothermal amplifications like HDA [76] [77]. |
| Betaine | 0.8 - 1.6 M (equivalent to 8 µL/reaction in some systems) [78] | Destabilizes DNA secondary structures, especially in GC-rich regions; reduces primer-dimer formation and non-specific primer binding [78]. | Eliminating non-specific amplification in multiplex systems; assisting amplification of GC-rich templates [78]. |
| BSA | 40 mg/mL [79] | Binds to and neutralizes PCR inhibitors present in the sample; stabilizes the DNA polymerase [79]. | Relieving interference from complex biological samples; increasing reaction specificity and yield in inhibitor-prone samples [79]. |
Detailed Experimental Protocols
Protocol for DMSO Enhancement in Direct Multiplex PCR
This protocol is adapted from a forensic science study that successfully used DMSO to mitigate the ski-slope effect in direct PCR amplification of buccal samples [76].
Research Reagent Solutions:
- Primer Set: GlobalFiler PCR Amplification Kit (Applied Biosystems)
- Master Mix: GlobalFiler PCR Amplification Master Mix
- Direct PCR Buffer: Prep-n-Go Buffer (Applied Biosystems)
- Additive: Molecular biology-grade DMSO
- Sample: 1.2 mm punched buccal sample on an OC card or 2 µg of 2800M Control DNA
- Equipment: GeneAmp PCR System 9700 thermal cycler
Procedure:
- Prepare the reaction mix on ice in a total volume of 25 µL:
- 7.5 µL GlobalFiler Master Mix
- 2.5 µL GlobalFiler Primer Set
- 2.0 µL Prep-n-Go Buffer
- 0.9 µL DMSO (final concentration of 3.75%)
- Nuclease-free water to volume.
- Add the sample (punched card or DNA) directly to the reaction tube.
- Run the PCR with the following cycling conditions:
- Initial Denaturation: 95°C for 1 min
- 29 Cycles:
- Denaturation: 94°C for 10 s
- Annealing & Extension: 59°C for 90 s
- Final Extension: 60°C for 10 min
- Analyze the PCR product using capillary electrophoresis (e.g., on an Applied Biosystems 3500xL Genetic Analyzer) and analyze with software such as GeneMapper ID-X [76].
Protocol for Betaine-Assisted Multiplex Isothermal Amplification
While developed for a recombinase polymerase amplification (RPA) lateral flow assay, this protocol demonstrates the effective use of betaine to suppress non-specific amplification in a complex, multiplex setting [78].
Research Reagent Solutions:
- Core Kit: TwistAmp Basic RPA kit (TwistDX)
- Primers: Target-specific primers (e.g., for SARS-CoV-2 variant typing)
- Additive: Betaine solution
- Magnesium Acetate: 280 mM MgOAc
- Detection: Lateral Flow Strips
Procedure:
- Prepare the main RPA reaction dry pellet according to the manufacturer's instructions.
- Resuspend the pellet in a master mix containing:
- Target DNA template
- Forward and reverse primers for multiple targets
- 8 µL of Betaine (optimized concentration per reaction)
- Nuclease-free water.
- Initiate the reaction by adding 2.5 µL of 280 mM magnesium acetate (MgOAc).
- Incubate the reaction tube at 39°C for 15-20 minutes.
- To detect the amplicons, dilute the RPA product and apply it to a lateral flow strip. The results can be interpreted by the naked eye within 5 minutes [78].
Protocol for BSA Enhancement in Exponential Amplification Reaction (EXPAR)
This protocol utilizes BSA to increase the specificity of isothermal exponential amplification reactions, which are particularly prone to non-specific, target-independent amplification [79].
Research Reagent Solutions:
- Enzymes: Bst 2.0 WarmStart DNA Polymerase, Nt.BstNBI nicking enzyme
- Template: EXPAR template oligonucleotide
- Target: Short oligonucleotide (e.g., miRNA)
- Buffer: 10x Isothermal Amplification Buffer
- Additive: Molecular biology-grade BSA
Procedure:
- Prepare the EXPAR reaction on ice in a total volume of 25 µL:
- 1X Isothermal Amplification Buffer
- dNTPs (concentration as optimized)
- Target oligonucleotide (or nuclease-free water for no-template control)
- EXPAR template
- Bst DNA Polymerase
- Nicking enzyme
- 40 mg/mL BSA
- Incubate the reaction in a real-time PCR instrument or thermal block at a constant 55-60°C for 30-60 minutes.
- Monitor the reaction kinetics in real-time using a dsDNA-binding dye (e.g., SYBR Green) or analyze the end-point products via gel electrophoresis [79].
Workflow and Decision Pathway for Additive Selection
The following diagram illustrates a logical workflow for diagnosing PCR issues and selecting the appropriate additive to troubleshoot amplification problems.
The strategic incorporation of DMSO, BSA, and Betaine provides a powerful, cost-effective approach to rescue and optimize challenging amplification reactions. DMSO is the additive of choice for mitigating the ski-slope effect and resolving issues related to template secondary structure. Betaine excels in suppressing non-specific amplification and is particularly useful for multiplex assays and GC-rich templates. BSA acts as a essential neutralizer of PCR inhibitors found in complex biological samples. By following the structured workflow and detailed protocols outlined in this application note, researchers can systematically troubleshoot their end-point PCR assays, thereby enhancing the robustness and reproducibility of their data for drug development and other critical research applications.
Beyond End-Point PCR: Validation, Comparison with qPCR and Digital PCR
Within the framework of research on end-point PCR protocols for DNA amplification, the validation of results stands as a critical pillar of scientific rigor. Specificity and quality control (QC) are not merely supplementary steps but are fundamental to ensuring the reliability, accuracy, and reproducibility of experimental data. For researchers, scientists, and drug development professionals, adhering to a structured validation protocol is essential for generating credible findings that can inform downstream applications, from diagnostic development to therapeutic discovery. This document outlines detailed application notes and protocols for establishing a comprehensive validation framework, emphasizing the critical role of specificity testing and robust QC measures in end-point PCR workflows.
Key Validation Parameters and Metrics
A validated PCR assay is characterized by several key analytical performance parameters. The following table summarizes the core metrics that must be established during validation, drawing from guidelines for both research use and regulatory compliance [80] [81].
Table 1: Essential Validation Parameters for PCR Assays
| Parameter | Definition | Target Performance | Validation Method |
|---|---|---|---|
| Analytical Specificity | The ability of an assay to detect only the intended target sequence. | No cross-reactivity with non-target organisms or sequences. | BLAST analysis; testing against a panel of non-target DNA [81]. |
| Analytical Sensitivity (LOD) | The lowest copy number of the target that can be reliably detected. | Detectable with >95% confidence [80]. | Probit analysis using serial dilutions of target DNA [80] [81]. |
| Amplification Efficiency | The rate at which a PCR target is amplified during the exponential phase. | Optimal range: 90–110% [80]. | Calculation from a standard curve slope: ( E = (10^{-1/slope} - 1) \times 100\% ) [82]. |
| Precision | The reproducibility of results, measured as variation between replicate assays. | Intra- and inter-assay coefficient of variation (CV) within acceptable limits [80]. | Repeated measurements of identical samples across different runs and days. |
Experimental Protocols
Protocol 1: Establishing Analytical Specificity
Objective: To verify that the PCR assay amplifies only the intended target DNA and does not cross-react with genetically similar or common contaminating organisms.
Materials:
- Test DNA: Purified target DNA (positive control).
- Specificity Panel: Genomic DNA from a panel of non-target organisms (e.g., related species, host DNA, common environmental contaminants).
- Reagents: PCR master mix (e.g., AccuTaq LA or similar high-fidelity mix [83]), primers, nuclease-free water.
- Equipment: Thermal cycler, electrophoresis system, UV transilluminator.
Methodology:
- Primer Specificity Check: Perform an in silico analysis of primer sequences using tools like BLAST to ensure they are unique to the target gene and lack significant homology to non-target sequences [81].
- Experimental Testing: a. Set up a series of 50 µL PCR reactions containing: - 1X PCR buffer - 200 µM of each dNTP - 0.2 µM of each forward and reverse primer - 1.5 units of DNA polymerase - 50-100 ng of DNA template from the specificity panel members. b. Include a positive control (target DNA) and a no-template control (Nuclease-free water). c. Run the PCR using the optimized cycling conditions for your end-point assay [83]. d. Analyze the PCR products by agarose gel electrophoresis (e.g., 1-2% gel).
- Analysis: A specific assay will yield a single amplicon of the expected size only in the positive control reaction. The absence of bands in all non-target DNA reactions confirms specificity.
Protocol 2: Implementing a Comprehensive QC System
Objective: To integrate internal and external controls into the PCR workflow to monitor for contamination, inhibition, and reagent failure, thereby safeguarding the integrity of every experimental run.
Materials:
- Internal Control (IC): A synthetic, non-target DNA or RNA sequence (e.g., bacteriophage MS2 or armored RNA) that is co-amplified in the same reaction tube [80].
- External Controls:
- Positive Control: A sample known to contain the target sequence.
- Negative Control: Nuclease-free water or irrelevant DNA.
- Reagents: PCR master mix, primers.
Methodology:
- Internal Control: a. Spiked into every sample and control reaction at a defined concentration. b. The IC must be designed with a unique primer-binding site and produce an amplicon of a different size than the target, or be detected in a different fluorescence channel in multiplex qPCR assays. c. Interpretation: A successful IC amplification indicates the reaction was not inhibited. Failure of the IC signal suggests possible PCR inhibition in the sample [80].
- External Controls: [80] a. Positive Control: Run in every assay to confirm that the PCR reagents and thermal cycling conditions are functioning correctly. b. Negative Control (No-Template Control, NTC): Run in every assay to detect contamination from reagents or the environment. A clean NTC is critical for ruling out false positives. c. Extraction Control: For protocols involving nucleic acid extraction, a control should be included to verify extraction efficiency. This can be an external sample processed alongside test samples or a spiked internal extraction control [80].
The following workflow diagram illustrates the logical relationship and integration of these quality control measures into a standard PCR process:
The Scientist's Toolkit: Research Reagent Solutions
Successful validation and execution of PCR assays depend on the selection of appropriate reagents. The table below details essential materials and their functions, curated for researchers developing and validating end-point PCR protocols.
Table 2: Essential Research Reagents for PCR Validation
| Reagent / Material | Function / Application | Key Considerations |
|---|---|---|
| High-Fidelity DNA Polymerase Mixes (e.g., AccuTaq LA, Q5) | Amplification of long templates and high-fidelity PCR for cloning and sequencing. | Blends of processive and proofreading enzymes increase fidelity and yield for long targets [83] [84]. |
| Internal Control (IC) Templates (e.g., bacteriophage MS2, armored RNA) | Co-amplified control to detect PCR inhibition in individual samples. | Must not interfere with target amplification; should be added at a consistent, optimal concentration [80]. |
| Positive Control DNA | A known template to verify assay functionality and reagent performance in each run. | Should be a well-characterized material with a known concentration; used for establishing the LOD [80] [81]. |
| dNTP Mix | Building blocks for DNA synthesis. | Use balanced solutions (e.g., 10 mM each of dATP, dCTP, dGTP, dTTP) to prevent misincorporation [83]. |
| Optimized Reaction Buffers | Provides optimal pH, ionic strength, and co-factors (e.g., Mg²⁺) for polymerase activity. | Mg²⁺ concentration often requires optimization (typically 1–5 mM); high pH buffers can minimize depurination of long templates [83]. |
The path to reliable and reproducible DNA amplification research is paved with rigorous validation. By systematically establishing assay specificity through experimental and in silico methods and embedding a multi-layered QC system into every PCR run, researchers can defend the integrity of their data. The protocols and guidelines provided here, aligned with established standards [85] [81], offer a actionable framework. Adherence to these practices is not just a technical formality but a fundamental commitment to scientific quality, ensuring that research outcomes in drug development and beyond are built upon a foundation of trust and accuracy.
Within the framework of DNA amplification research, the choice between End-Point PCR and Quantitative PCR (qPCR) fundamentally dictates whether the resulting data will be qualitative or quantitative in nature. The core principle of the Polymerase Chain Reaction (PCR) involves the thermal cycling of a nucleic acid sample through repeated steps of denaturation, annealing, and extension to amplify a specific DNA target [2]. While this foundational process is common to both techniques, the method and timing of product detection create a critical divergence.
End-Point PCR, also known as conventional PCR, is a qualitative or semi-quantitative technique where data collection occurs after all amplification cycles are complete, at the reaction's plateau phase [1] [25]. In contrast, Quantitative PCR (qPCR), also referred to as real-time PCR, is a quantitative technique that monitors the accumulation of DNA product during each cycle of the amplification process, specifically within the exponential phase [86] [25]. This distinction in measurement timing is the primary determinant of the data quality and the subsequent applications for which each method is suited. This application note delineates the operational parameters, provides detailed protocols, and guides researchers in selecting the appropriate method for their experimental objectives within drug development and basic research.
Comparative Analysis: End-Point PCR vs. qPCR
The following table summarizes the core differences between End-Point PCR and qPCR, highlighting their distinct methodologies, data outputs, and ideal use cases.
Table 1: Comprehensive Comparison of End-Point PCR and Quantitative PCR (qPCR)
| Feature | End-Point PCR | Quantitative PCR (qPCR) |
|---|---|---|
| Basic Principle | Amplification followed by end-point detection | Amplification with real-time fluorescence monitoring [1] |
| Data Type | Qualitative or Semi-Quantitative [1] | Quantitative (Absolute or Relative) [1] [86] |
| Detection Method | Agarose Gel Electrophoresis (e.g., ethidium bromide) [1] | Fluorescent dyes (SYBR Green) or sequence-specific probes (TaqMan) [86] [25] |
| Measurement Phase | Plateau Phase [87] [25] | Exponential Phase [87] [86] |
| Key Output | Band presence/intensity on a gel | Quantification Cycle (Cq) value [1] [88] |
| Throughput | Lower (requires post-processing) | Higher (no post-processing, automated) [25] |
| Dynamic Range | Limited (semi-quantitative over 2-3 logs) | Wide (quantitative over 5-6 logs) [88] |
| Precision & Sensitivity | Lower sensitivity, semi-quantitative precision [1] | High sensitivity and precision; can detect single copies [86] |
| Cost & Infrastructure | Lower cost, standard thermocycler required [25] | Higher cost, specialized real-time PCR instrument required [25] |
| Primary Applications | Cloning, genotyping, sequencing, presence/absence detection [89] | Gene expression, viral load quantification, copy number variation [1] [25] |
Experimental Protocols
Protocol 1: End-Point PCR for Qualitative Analysis
This protocol is designed for the detection of a specific DNA sequence, suitable for applications like genotyping or confirming plasmid inserts.
3.1.1 Research Reagent Solutions
Table 2: Key Reagents for End-Point PCR
| Reagent | Function | Example & Notes |
|---|---|---|
| DNA Polymerase | Enzymatically synthesizes new DNA strands. | Taq DNA Polymerase: Common, cost-effective, adds 3' A-overhangs for TA cloning [7]. High-Fidelity Polymerases (e.g., Q5, Platinum SuperFi): Offer higher accuracy for cloning and sequencing [90] [7]. |
| dNTPs | Building blocks (A, T, C, G) for new DNA strands. | Required in equimolar concentrations. |
| Primers | Short, single-stranded DNA sequences that define the start and end of the target amplicon. | Typically 18-25 nucleotides; require careful design for specificity and Tm. |
| Reaction Buffer | Provides optimal ionic conditions and pH for polymerase activity. | Often includes MgCl₂, a essential cofactor for the polymerase [7]. |
| Template DNA | The DNA sample containing the target sequence to be amplified. | Can be genomic DNA, plasmid DNA, or cDNA; must be of high quality. |
| Gel Electrophoresis Reagents | For post-amplification visualization. | Agarose and a DNA-staining dye (e.g., ethidium bromide, SYBR Safe). |
3.1.2 Workflow Diagram
3.1.3 Step-by-Step Procedure
- Reaction Setup: On ice, assemble a master mix in a thin-walled PCR tube to ensure consistency and minimize contamination. A typical 25 µL reaction may contain:
- 1X PCR Reaction Buffer
- 1.5 - 2.5 mM MgCl₂ (concentration may require optimization)
- 200 µM of each dNTP
- 0.2 - 1.0 µM of each forward and reverse primer
- 0.5 - 2.5 Units of DNA Polymerase (e.g., Taq)
- 10 - 100 ng of Template DNA
- Nuclease-Free Water to volume
- Thermal Cycling: Place the tubes in a thermal cycler and run the following program:
- Initial Denaturation: 95°C for 2-5 minutes (to fully denature complex DNA).
- Amplification (25-40 cycles):
- Denaturation: 95°C for 15-30 seconds.
- Annealing: 55-65°C for 15-30 seconds (temperature is primer-specific).
- Extension: 72°C for 1 minute per kilobase of amplicon.
- Final Extension: 72°C for 5-10 minutes (to ensure all products are fully extended).
- Hold: 4°C ∞.
- Post-Amplification Analysis:
- Prepare a 1-2% agarose gel in 1X TAE or TBE buffer, incorporating an intercalating DNA dye.
- Mix 5-10 µL of the PCR product with a DNA loading dye and load into the gel wells. Include a DNA molecular weight ladder.
- Run the gel at 5-10 V/cm until adequate separation is achieved.
- Visualize the gel under UV light. The presence of a band at the expected size confirms the target sequence.
Protocol 2: Quantitative PCR (qPCR) for Gene Expression Analysis
This protocol uses a two-step RT-qPCR approach for relative quantification of gene expression, utilizing the comparative Cq (ΔΔCq) method [86].
3.2.1 Workflow Diagram
3.2.2 Step-by-Step Procedure
- RNA to cDNA Synthesis (Reverse Transcription):
- Begin with high-quality, DNA-free total RNA (e.g., 100 ng - 1 µg).
- Combine RNA with reverse transcriptase, dNTPs, a buffer, RNase inhibitor, and primers. Primers can be oligo(dT) (for mRNA), random hexamers (for all RNA including rRNA/tRNA), or gene-specific.
- Incubate according to the reverse transcriptase manufacturer's protocol (e.g., 25°C for 10 min, 50°C for 30-60 min, 85°C for 5 min).
- The resulting cDNA can be used immediately or stored at -20°C.
- qPCR Reaction Setup:
- Assemble reactions on ice, in optical plates or tubes compatible with the real-time PCR instrument. A typical 20 µL reaction contains:
- 1X qPCR Master Mix (containing DNA polymerase, dNTPs, buffer, Mg²⁺, and a fluorescent reporter).
- Fluorescent Reporter: Either:
- 0.1 - 0.9 µM of each forward and reverse primer.
- 1-5 µL of cDNA template (diluted 1:5 to 1:10 is often optimal).
- Nuclease-Free Water to volume.
- Include technical replicates for each sample and controls (No-Template Control, NTC).
- Assemble reactions on ice, in optical plates or tubes compatible with the real-time PCR instrument. A typical 20 µL reaction contains:
- Real-Time Amplification:
- Seal the plate and centrifuge briefly.
- Load the plate into the real-time PCR instrument.
- Run the standard two-step or three-step amplification protocol:
- Initial Denaturation: 95°C for 2-10 minutes.
- Amplification (40 cycles):
- Denaturation: 95°C for 15 seconds.
- Annealing/Extension & Data Acquisition: 60°C for 30-60 seconds (acquire fluorescence at this step).
- Data Analysis:
- The instrument software will generate an amplification plot and assign a Cq (Quantification Cycle) value for each reaction. The Cq is the cycle at which the fluorescence crosses a threshold set within the exponential phase [86] [88].
- For relative quantification (e.g., gene expression):
- Normalize the Cq of the target gene to the Cq of one or more stable endogenous control genes (e.g., GAPDH, ACTB) for each sample: ΔCq = Cq(target) - Cq(reference).
- Calculate the ΔΔCq by comparing the ΔCq of the experimental sample to the ΔCq of a calibrator sample (e.g., untreated control): ΔΔCq = ΔCq(test) - ΔΔCq(calibrator).
- The fold-change in gene expression is calculated as 2^(-ΔΔCq) [86].
The Measurement Principle: Exponential vs. Plateau Phase
The core technical difference underpinning the quantitative capability of qPCR lies in the phase of the reaction where measurement occurs.
As illustrated in the diagram, qPCR measures the Cq during the exponential phase, where the relationship between the amount of product and the starting template concentration is precise and reproducible [87] [86]. End-Point PCR measures the final accumulated product at the plateau phase, where reaction components are depleted and the final yield is not reliably correlated with the initial amount of target, making it unsuitable for accurate quantification [87] [25].
Application Guidance in Drug Development and Research
The selection between these two techniques should be driven by the experimental question.
Use End-Point PCR for:
- Clone Screening: Verifying the insertion of a DNA fragment into a plasmid vector.
- Genotyping: Identifying specific alleles or mutations via amplicon size analysis or subsequent sequencing.
- Pathogen Screening: Qualitative detection of a pathogen's presence or absence.
- Generating Template DNA for downstream applications like sequencing.
Use qPCR for:
- Gene Expression Profiling: Quantifying changes in mRNA transcript levels in response to drug treatments or disease states (e.g., validating microarray or RNA-Seq data) [86].
- Pharmacodynamics/Biomarker Discovery: Measuring the levels of specific biomarkers in patient samples during clinical trials.
- Viral Load Testing: Precisely quantifying viral titers to monitor disease progression or treatment efficacy in infectious disease research [25].
- Copy Number Variation (CNV) Analysis: Determining the number of copies of a specific gene in a genome [1] [25].
End-Point PCR and qPCR are complementary yet distinct tools in the molecular biologist's arsenal. End-Point PCR remains a robust, cost-effective method for answering qualitative questions about the presence, size, or sequence of a DNA fragment. However, for research and drug development applications demanding precise, sensitive, and reproducible quantification of nucleic acids—such as gene expression studies or viral load determination—qPCR is the unequivocal gold standard. By understanding the principles, protocols, and applications detailed in this note, researchers can make an informed choice that aligns with their data requirements, ensuring the integrity and success of their DNA amplification research.
Digital PCR (dPCR) represents the third generation of polymerase chain reaction technology, following conventional PCR and real-time quantitative PCR (qPCR). This method enables the absolute quantification of nucleic acid targets without the need for a standard curve, relying instead on limiting dilution, end-point PCR, and Poisson statistics [91] [92]. The fundamental breakthrough of dPCR lies in its partitioning approach, where a PCR reaction mixture is divided into thousands to millions of separate nanoliter or picoliter reactions, allowing individual amplification events to be counted as discrete digital signals [93] [94].
The technique was conceptually born from limiting dilution methods described in the early 1990s, but was truly established in 1999 when Vogelstein and Kinzler coined the term "digital PCR" while detecting K-RAS mutations in colorectal cancer patients [92]. The first commercial dPCR systems emerged in 2006-2007, with significant advancements in microfluidics enabling the high-throughput partitioning necessary for practical implementation [93] [91]. Today, dPCR has become an essential tool in research, clinical diagnostics, and biotechnology, particularly valued for its precision in detecting rare genetic events and quantifying subtle genetic variations [93].
Fundamental Principles of dPCR
The Partitioning Concept and Absolute Quantification
The core principle of dPCR involves partitioning a single PCR reaction into thousands of individual reactions so that each compartment contains either zero, one, or a few nucleic acid molecules [93]. Following amplification, each partition is analyzed as either positive (1) or negative (0) for the target sequence, creating a binary readout that gives the technology its "digital" name [91] [94]. The absolute concentration of the target nucleic acid in the original sample is then calculated using Poisson statistics based on the ratio of positive to negative partitions [91] [92].
This partitioning approach provides several key advantages. First, it creates an artificial enrichment of low-abundance sequences by separating them from background DNA, significantly enhancing detection sensitivity [94]. Second, it alleviates template competition that can occur in standard PCR when multiple targets amplify in the same reaction [94]. Finally, the massive parallelization of reactions provides robust statistical power for quantification, with precision determined by the number of partitions analyzed [95].
Poisson Statistics in Quantification
Poisson statistics are essential to dPCR because they account for the random distribution of molecules across partitions and the probability that any partition may contain more than one target molecule [91] [92]. The Poisson model calculates the probability of a microreaction receiving a certain number of target copies according to the formula:
P(k) = (λ^k × e^(-λ)) / k!
Where:
- P(k) = probability of a partition containing k target molecules
- λ = average number of target molecules per partition (copies/partition)
- k = actual number of target molecules in a partition
- e = base of the natural logarithm (~2.71828) [91]
For accurate absolute quantification, the partition count must be sufficiently high to ensure statistical significance. At low concentrations (λ = 0.1), most partitions contain zero target molecules, while nearly all positive partitions contain only one copy. At medium concentrations (λ = 0.5), some positive partitions contain multiple copies, and at high concentrations (λ = 5), most positive partitions contain multiple copies [91]. The target concentration is calculated as:
λ = -ln(1 - p)
Where p is the proportion of positive partitions [93]. The absolute concentration in copies per microliter is then derived using the partition volume and the total number of partitions [91].
Comparative Analysis of PCR Technologies
dot code for generating the diagram below:

dot code for generating the diagram below:

Table 1: Technical Comparison of PCR Generations
| Parameter | Conventional PCR | Quantitative PCR (qPCR) | Digital PCR (dPCR) |
|---|---|---|---|
| Quantification Method | Semi-quantitative (gel electrophoresis) | Relative quantification (requires standard curve) | Absolute quantification (Poisson statistics) |
| Detection Principle | End-point, size-based separation | Real-time fluorescence monitoring | End-point, binary fluorescence detection |
| Sensitivity | Low | Moderate (detection limit ~1%) | High (detection limit ~0.001%) [92] |
| Precision | Low | Moderate | High (thousands of data points) |
| Dependence on Amplification Efficiency | High | High | Low [92] |
| Tolerance to Inhibitors | Low | Moderate | High [91] |
| Dynamic Range | Narrow | Wide (5-6 logs) | Narrower than qPCR [91] |
| Primary Applications | Target amplification, cloning | Gene expression, viral load | Rare variant detection, absolute copy number, liquid biopsy |
dPCR Platform Technologies and Methodologies
Partitioning Technologies: Droplet vs. Chip-Based Systems
Modern dPCR platforms utilize two primary partitioning methods: droplet-based systems and chip-based systems. Each technology has distinct advantages and considerations for experimental design.
Droplet Digital PCR (ddPCR) creates water-in-oil emulsions where each droplet functions as an individual PCR reactor. Systems like Bio-Rad's QX200 can generate ~20,000 droplets per sample, while RainDance technologies can create 1-10 million droplets [92]. The process involves microfluidic circuits with specific geometries (T-junction, Y-shaped, or cross-shaped) to form monodisperse droplets stabilized by surfactants to prevent coalescence during thermal cycling [93] [92]. Reading is typically performed using in-line detection where droplets flow single-file past a fluorescence detector, allowing high-throughput analysis [93].
Chip-Based dPCR utilizes microfabricated arrays of microscopic wells or chambers. Early systems like Fluidigm's BioMark contained ~10,000-40,000 microchambers, while newer systems like QuantStudio 3D use chips with ~20,000 nanowells [92]. These systems often employ integrated fluidic circuits (IFCs) with multilayer soft lithography to control sample partitioning through microscopic valves and channels [92]. Readout is typically via planar imaging using fluorescence scanners or microscopes, providing a static snapshot of all partitions simultaneously [93].
Table 2: Comparison of Commercial dPCR Platforms
| Platform | Partitioning Technology | Number of Partitions | Detection Method | Multiplexing Capacity |
|---|---|---|---|---|
| QX200 (Bio-Rad) | Droplet-based | 20,000 droplets/sample | In-line fluorescence flow cytometer | 2-plex (FAM/HEX) |
| Naica System (Stilla) | Droplet-based (Sapphire Chip) | 20,000-30,000 droplets/sample | End-point imaging (3-color) | 3-plex [96] |
| QuantStudio 3D (Thermo Fisher) | Chip-based (nanowell array) | 20,000 chambers/chip | Planar fluorescence imaging | 2-plex |
| QIAcuity (Qiagen) | Nanoplate-based | 8,000-24,000 partitions/well | Planar fluorescence imaging | 4-plex |
| LOAA (Optolane) | Chip-based (microchambers) | Not specified | Real-time fluorescence monitoring | Not specified [96] |
Essential Reagents and Experimental Components
Table 3: Research Reagent Solutions for dPCR Experiments
| Reagent Component | Function | Considerations for dPCR |
|---|---|---|
| DNA Polymerase | Enzymatic amplification of target sequences | BstI polymerase commonly used in LAMP-based dPCR for robustness to inhibitors [97] |
| Primers & Probes | Sequence-specific target recognition | Must be optimized for specificity; FAM, VIC, HEX common for multiplexing [96] |
| dNTPs | Building blocks for new DNA strands | Standard equimolar mixture (dATP, dCTP, dGTP, dTTP) at 0.2 mM each [15] |
| Mg²⁺ Ions | Cofactor for polymerase activity | Concentration critical for enzyme efficiency; binds dNTPs reducing availability [15] |
| Buffer Components | Optimal pH and salt conditions | Must be compatible with partitioning technology (emulsion stability) |
| Surfactants | Stabilize droplets in ddPCR | Prevent coalescence during thermal cycling; concentration affects partition integrity [93] |
| Fluorescent Dyes/Probes | Detection of amplified targets | Intercalating dyes (EvaGreen) or sequence-specific probes (TaqMan) |
Detailed dPCR Protocol for Absolute Quantification
Sample Preparation and Reaction Setup
Proper sample preparation is critical for robust dPCR results. The protocol below outlines a standard approach for absolute quantification of DNA targets:
Template DNA Isolation: Extract DNA using methods appropriate for your sample type (e.g., silica-based columns for blood, specialized kits for formalin-fixed tissues). For challenging samples, consider direct PCR protocols that bypass extraction to minimize DNA loss [98].
DNA Quality Assessment: Measure DNA concentration using spectrophotometry (A260/A280 ratio of ~1.8-2.0 indicates pure DNA). While dPCR is less affected by inhibitors than other PCR methods, quality assessment helps troubleshoot potential issues [96].
Reaction Mixture Preparation:
- Prepare master mix containing (per reaction):
- 5-10 μL of 2× dPCR supermix
- 250 nM each probe (FAM, VIC/HEX)
- 450-900 nM each primer
- 1-100 ng template DNA
- Nuclease-free water to final volume (varies by platform)
- Gently mix by pipetting; avoid introducing bubbles
- Centrifuge briefly to collect solution
- Prepare master mix containing (per reaction):
Partition Generation:
- Droplet systems: Load reaction mixture into droplet generator cartridges with appropriate oil; follow manufacturer's recommended ratios
- Chip-based systems: Pipette reaction mixture into chip loading wells; use specialized instruments for partitioning
- Critical: Process samples promptly after partition generation to prevent evaporation or degradation
Thermal Cycling Conditions
Amplification conditions must be optimized for specific target-primer combinations. A standard TaqMan-based protocol includes:
- Enzyme Activation: 10 minutes at 95°C (for hot-start polymerases)
- Amplification Cycles (40-50 cycles):
- Denaturation: 15-30 seconds at 94°C
- Annealing/Extension: 30-60 seconds at 55-60°C (optimize based on primer Tm)
- Enzyme Inactivation: 10 minutes at 98°C (optional)
- Signal Stabilization: Hold at 4-12°C until reading
Note: Ramp rates can affect amplification efficiency; follow manufacturer recommendations for specific instruments.
Data Acquisition and Analysis
Partition Reading:
- For droplet systems: Transfer stabilized droplets to reader plate/cartridge
- For chip systems: Place partitioned chip in imaging device
- Set appropriate fluorescence gain settings for each channel
- Acquire data according to instrument specifications
Threshold Determination:
- Analyze 1D or 2D scatter plots of fluorescence amplitude
- Set thresholds to clearly distinguish positive from negative populations
- Manual adjustment may be necessary for suboptimal separations
Concentration Calculation:
- Software automatically applies Poisson correction:
- Copies/μL = [-ln(1 - p)] / partition volume
- Where p = number of positive partitions / total partitions
- Review quality metrics: total partition count, brightness separation, etc.
- Software automatically applies Poisson correction:
Data Interpretation:
- For rare event detection, ensure sufficient partitions are analyzed for statistical significance
- For copy number variation, calculate ratio of target to reference gene
- Apply multiple testing correction when analyzing multiple targets
Applications in Research and Clinical Diagnostics
dPCR has enabled breakthrough applications across multiple fields, particularly where precision, sensitivity, and absolute quantification are required.
In oncology research, dPCR excels at liquid biopsy applications, detecting and quantifying circulating tumor DNA (ctDNA) with sensitivity to ~0.01% allele frequency [99]. This enables monitoring of minimal residual disease, tracking treatment response, and detecting resistance mutations non-invasively [93]. The technology's precision allows for identification of rare mutations within a background of wild-type DNA, crucial for cancer heterogeneity studies and early detection [92].
For infectious disease monitoring, dPCR provides absolute viral load quantification without standard curves, offering superior accuracy for HIV, HBV, and CMV monitoring [92]. During the COVID-19 pandemic, dPCR demonstrated enhanced detection of low viral load SARS-CoV-2 infections and was deployed for wastewater surveillance to track community transmission [91] [99].
In genetic disorder diagnosis, dPCR enables non-invasive prenatal testing (NIPT) by quantifying fetal DNA in maternal plasma, detecting trisomies like Down syndrome with high accuracy [92]. The technology also facilitates copy number variation (CNV) analysis with exquisite precision, identifying subtle gene duplications or deletions associated with genetic disorders [91] [94].
Additional applications include quality control for next-generation sequencing libraries, validating structural variations, quantifying gene editing outcomes, and monitoring minimal residual disease in hematological malignancies [93] [92]. The technology's tolerance to inhibitors also makes it valuable for environmental DNA monitoring and food safety testing where complex matrices are common [97].
Advantages, Limitations, and Future Perspectives
Key Advantages of dPCR Technology
dPCR offers several distinct advantages over earlier PCR generations. Its absolute quantification capability eliminates the need for standard curves, reducing labor, materials, and potential errors associated with reference preparation [91] [92]. The technology demonstrates superior sensitivity for rare allele detection, with applications in liquid biopsy requiring detection of mutations at frequencies as low as 0.001% [92]. The partitioning approach provides high tolerance to PCR inhibitors, as inhibitors are diluted into individual partitions, reducing their effective concentration in target-positive compartments [91]. dPCR also offers exceptional precision through thousands of individual data points, enabling detection of small fold-changes (as low as 1.1-1.2×) that are challenging for qPCR [95]. Finally, the technology provides high reproducibility across laboratories and platforms, with minimal inter-laboratory variation due to reduced dependence on amplification efficiency [91].
Current Limitations and Considerations
Despite its advantages, dPCR has limitations that influence experimental design. The dynamic range is constrained by partition count, typically covering 3-4 orders of magnitude compared to 5-6 for qPCR [91]. The technology has limited suitability for large amplicons due to partitioning constraints and potential shearing of longer DNA fragments [91]. Platform cost can be prohibitive for low-volume laboratories, with instrument and consumable expenses exceeding qPCR systems [99]. Potential statistical biases include template linkage (related molecules co-partitioning), molecular dropout (false negatives), and partition volume variability [91]. Finally, assay standardization remains challenging, requiring extensive validation (up to 200 runs for rare mutation detection) to establish accuracy thresholds [99].
Emerging Trends and Future Directions
The dPCR field continues to evolve with several promising developments. Multiplexing capacity is expanding, with newer platforms supporting up to 6-color detection for simultaneous quantification of multiple targets [99]. Portable, point-of-care dPCR systems are emerging, featuring battery operation and rapid turnaround (≤90 minutes) for field applications [99]. Artificial intelligence integration is optimizing assay design, droplet classification, and data interpretation, reducing analysis time by up to 40% and improving accuracy above 99% [99]. Single-cell dPCR applications are advancing, enabling quantification of gene expression from minimal samples (≤500 cells) for immuno-oncology and stem cell research [99]. Finally, cloud-based data analytics platforms are enabling real-time quality control, multi-site collaboration, and standardized result reporting across laboratory networks [99].
The global dPCR market, valued at $712 million in 2024 and projected to reach $1.45 billion by 2032, reflects the growing adoption and continuing innovation in this transformative technology [99]. As platforms become more accessible and applications expand, dPCR is poised to become an increasingly essential tool for precision measurements in molecular biology, clinical diagnostics, and biotechnology.
Within the broader research on endpoint PCR protocols for DNA amplification, selecting the appropriate polymerase chain reaction (PCR) technology is a critical decision that directly impacts the efficiency, cost, and analytical outcomes of an experiment. PCR serves as a cornerstone technique in molecular biology, enabling the amplification of trace amounts of DNA for various applications, from basic research to clinical diagnostics and drug development [2] [100]. While conventional endpoint PCR provides a fundamental method for detecting the presence of a specific DNA sequence, technological advancements have given rise to sophisticated quantitative methods like real-time PCR (qPCR) and digital PCR (dPCR), which offer greater precision and absolute quantification [1] [101].
This article provides a structured comparison of these core PCR technologies, detailing their methodologies, applications, and performance characteristics. The content is framed to guide researchers, scientists, and drug development professionals in making an informed choice tailored to their specific experimental needs within the context of DNA amplification research.
Comparative Analysis of PCR Technologies
The evolution of PCR has led to distinct platforms, each with unique advantages and limitations. The following table summarizes the key characteristics of endpoint PCR, qPCR, and dPCR to facilitate a direct comparison.
Table 1: Comparative Overview of Major PCR Technologies
| Feature | Endpoint PCR | Quantitative PCR (qPCR) | Digital PCR (dPCR) |
|---|---|---|---|
| Core Principle | Amplification is measured post-PCR via gel electrophoresis [1]. | Fluorescence in a bulk reaction is measured after each cycle to monitor amplification in real-time [1]. | Sample is partitioned into thousands of reactions; endpoint fluorescence is counted in each partition [1]. |
| Quantification | Qualitative or semi-quantitative [1]. | Quantitative, based on standard curves [1]. | Absolute quantification, based on Poisson statistics without need for standards [1]. |
| Precision | Low (+) [1]. | Moderate (++) [1]. | High (+++) [1]. |
| Speed/Throughput | Moderate (+) [1]. | High (+++) [1]. | Moderate (++) [1]. |
| Multiplexing Capability | Low (+) [1]. | Moderate (+) [1]. | High (+++) [1]. |
| Key Applications | Cloning, genotyping, mutation screening, educational use [102] [65]. | Gene expression analysis, viral load quantification, pathogen detection [2] [1] [101]. | Detection of rare mutations, copy number variation analysis, validation of NGS results, liquid biopsies [1] [101]. |
| Data Output | Band intensity/size on a gel. | Quantification Cycle (Cq) value [2] [1]. | Absolute count of target molecules. |
| Tolerance to Inhibitors | Low | Moderate | High [1]. |
Technology Workflow and Logical Relationship
The fundamental workflow of PCR involves iterative cycles of denaturation, annealing, and extension. However, the sample handling and data acquisition steps differ significantly between the conventional endpoint method and the more advanced quantitative platforms. The following diagram illustrates the core pathways for each technology, highlighting the divergent steps after the initial amplification cycles.
Detailed Experimental Protocols
Endpoint PCR Protocol for Long and Accurate DNA Amplification
Technology Overview: For applications such as genome analysis, cloning, and sequencing, Long and Accurate (LA) PCR is often necessary. This protocol uses a blend of a highly processive polymerase and a proofreading enzyme to amplify DNA targets up to 40 kb, offering higher fidelity compared to standard Taq polymerase [102].
Research Reagent Solutions
Table 2: Essential Reagents for Endpoint PCR
| Reagent | Function | Example & Notes |
|---|---|---|
| DNA Polymerase Mix | Enzymatically synthesizes new DNA strands. | AccuTaq LA or KlenTaq LA DNA Polymerase Mixes. A blend that provides high processivity and proofreading (3′→5′ exonuclease) activity for long, high-fidelity amplification [102]. |
| 10X PCR Buffer | Provides optimal chemical environment (pH, salts) for polymerase activity. | Often supplied with the enzyme. For long PCR, a buffer with a pH >9.0 at 25°C is recommended to minimize depurination of DNA templates during cycling [102]. |
| dNTP Mix | The building blocks (dATP, dCTP, dGTP, dTTP) for DNA synthesis. | Use a 10 mM solution of each dNTP. The final concentration in the reaction is typically 200 μM of each dNTP [102] [65]. |
| Primers | Short, single-stranded DNA sequences that define the start and end of the target region to be amplified. | Resuspended in sterile water or TE buffer to a working concentration (e.g., 10 μM). For long PCR, primers are typically 21-34 bases with a Tm of 65-72°C [102]. |
| Template DNA | The source DNA containing the target sequence to be amplified. | Requires intact, high-quality DNA. For complex genomic DNA, 10-1000 ng per reaction is typical. Avoid repeated freezing and thawing to prevent damage [102] [65]. |
| Magnesium Chloride (MgCl₂) | A cofactor essential for DNA polymerase activity. | Optimization is often required (typically 1-5 mM final concentration). Note that Mg²⁺ may precipitate in high-pH buffers and must be vortexed thoroughly before use [102] [65]. |
| PCR-Grade Water | Solvent to bring the reaction to its final volume. | Nuclease-free, sterile water to avoid degradation of reagents and template. |
Step-by-Step Procedure
Reaction Setup: In a thin-walled 0.2 mL or 0.5 mL PCR tube, assemble the following reagents on ice [102] [65]:
- PCR-grade water: Q.S. to 50 μL
- 10X LA PCR Buffer: 5 μL
- dNTP mix (10 mM): 1 μL
- MgCl₂ (25 mM): Optional, if not in buffer; volume to be optimized
- Forward Primer (10 μM): 1 μL
- Reverse Primer (10 μM): 1 μL
- Template DNA: 10-1000 ng
- DNA Polymerase Mix: 0.5 - 2.5 units
Mixing and Centrifugation: Mix the reaction gently by pipetting up and down. Briefly centrifuge the tube to collect all components at the bottom and eliminate air bubbles [65].
Thermal Cycling: Place the tube in a thermal cycler and run the following program. Parameters may require optimization for specific templates and cyclers [102]:
- Initial Denaturation: 94 °C for 1 minute.
- Cycling (30-35 cycles):
- Denaturation: 94 °C for 30 seconds.
- Annealing: Temperature specific to primer pair (e.g., 55-72 °C) for 30 seconds.
- Extension: 68 °C for 1 minute per kb of expected product length (e.g., 10 minutes for a 10 kb fragment).
- Final Extension: 68 °C for 10 minutes.
- Hold: 4 °C.
Post-Amplification Analysis: Analyze the PCR product by loading 8-10 μL of the reaction mixture onto a 0.8-1% agarose gel for electrophoresis. Stain with ethidium bromide or a suitable DNA stain and visualize under UV light [102].
A Simplified Direct Real-time PCR Protocol
Technology Overview: This protocol, adapted from a recent study, enables real-time PCR from whole blood without a dedicated DNA extraction kit, reducing time, cost, and DNA loss [103]. This method, termed "GG-RT PCR," is suitable for applications like SNP analysis and deletion detection.
Research Reagent Solutions
Table 3: Essential Reagents for Direct Real-time PCR from Blood
| Reagent | Function | Notes |
|---|---|---|
| EDTA-Treated Whole Blood | The source material containing the genomic DNA target. | Acts as both the sample and the source of template, eliminating the DNA isolation step [103]. |
| SYBR Green I Master Mix | Contains DNA polymerase, dNTPs, buffer, and a fluorescent dye that intercalates into double-stranded DNA. | The fluorescence signal increases proportionally with the amount of amplified DNA, allowing for real-time quantification [103]. |
| Sequence-Specific Primers | Define the target sequence for amplification. | Designed and validated for specificity. In the referenced study, amplicons ranged from 100 bp to 268 bp [103]. |
| Distilled Water | Used to lyse blood cells via osmotic pressure and to dilute the resulting lysate. | Reduces the concentration of PCR inhibitors present in blood [103]. |
Step-by-Step Procedure
Blood Lysate Preparation:
- Mix 400 μL of EDTA-treated whole blood with distilled water to an 80% dilution (e.g., 320 μL blood + 80 μL water) [103].
- Incubate the mixture at 95 °C for 20 minutes. Vortex the sample 2-3 times during this incubation to ensure thorough lysis [103].
- Centrifuge the lysate at 14,000 rpm for 5 minutes to pellet cellular debris [103].
- Carefully collect the clear supernatant. This supernatant can be used directly as a template or diluted further (1:5 or 1:10 with water) to reduce the concentration of PCR inhibitors [103].
Real-Time PCR Setup:
- In a real-time PCR tube or plate, assemble the following reaction [103]:
- SYBR Green I Master Mix: 5 μL
- Forward Primer (5 pmol): 0.5 μL
- Reverse Primer (5 pmol): 0.5 μL
- Blood Lysate (supernatant): 2.5 μL
- PCR-grade Water: 1.5 μL
- Total Volume: 10 μL
- In a real-time PCR tube or plate, assemble the following reaction [103]:
Real-Time PCR Cycling:
- Run the following program on a real-time PCR instrument [103]:
- Initial Denaturation: 95 °C for 10 minutes.
- Amplification (40 cycles):
- Denaturation: 95 °C for 15 seconds.
- Annealing/Extension: 60 °C or 61 °C for 30 seconds (acquire fluorescence at the end of this step).
- Perform a melting curve analysis after amplification to verify the specificity of the product.
- Run the following program on a real-time PCR instrument [103]:
The choice of PCR technology is a strategic decision that hinges on the specific requirements of the experiment. Endpoint PCR remains a robust, cost-effective tool for simple detection and analysis of DNA fragments. In contrast, qPCR is the established workhorse for quantitative applications requiring high throughput and dynamic range, such as gene expression studies. dPCR offers a premium solution for applications demanding the highest precision, absolute quantification, and tolerance to inhibitors, making it ideal for detecting rare mutations and validating biomarkers [1] [101].
Ongoing innovations in PCR continue to enhance its sensitivity, speed, and accessibility, promising to further transform diagnostic practices and biomedical research. By aligning project goals with the strengths of each platform as outlined in this article, researchers can optimally leverage these powerful tools to advance their work in DNA amplification and beyond.
The Evolving Role of End-Point PCR in the Era of Advanced Diagnostics
Despite the rapid adoption of advanced quantification technologies like digital PCR (dPCR) and real-time quantitative PCR (qPCR), End-Point PCR remains a fundamental technique in molecular biology [1] [25]. Its evolution is marked not by displacement but by a refined application within modern diagnostic and research workflows, particularly where qualitative analysis is sufficient [25]. This method involves amplifying a specific DNA target through repeated thermal cycles, with the final product (amplicon) analyzed only after the completion of all cycles, hence the term "end-point" [1] [41]. As the foundational generation of PCR technology, its simplicity, cost-effectiveness, and robustness ensure its continued relevance in applications ranging from clone screening to preparative biology [25]. This application note details the established and emerging roles of End-Point PCR within contemporary settings, providing detailed protocols and frameworks for its effective use by researchers and drug development professionals.
The Current Diagnostic PCR Landscape
The field of nucleic acid amplification has expanded significantly, with each PCR technology offering distinct advantages.
Table 1: Comparison of Major PCR Technologies
| Feature | End-Point PCR | Quantitative PCR (qPCR) | Digital PCR (dPCR) |
|---|---|---|---|
| Core Principle | Amplification followed by end-point detection | Fluorescence-based, real-time monitoring of amplification [1] | Partitioning of sample into thousands of individual reactions for absolute counting [93] [1] |
| Quantification | Qualitative or semi-quantitative [1] [25] | Quantitative (relative or absolute with standard curve) [1] | Absolute quantification without a standard curve [93] [1] [104] |
| Detection Method | Agarose gel electrophoresis with staining (e.g., ethidium bromide) [1] [41] | Fluorescent dyes (SYBR Green) or sequence-specific probes (TaqMan) [25] | End-point fluorescence analysis of partitions (droplets or nanowells) [93] [1] |
| Primary Application | Target presence/absence, cloning, genotyping, template preparation for sequencing [25] | Gene expression analysis, viral load determination, copy number variation [25] | Rare allele detection, liquid biopsy, copy number variation, precise quantification without standards [93] [1] [104] |
| Key Advantage | Low cost, simplicity, high yield of product for downstream applications | High throughput, broad dynamic range, quantitative capability [1] [25] | High precision, sensitivity, resistance to inhibitors, absolute quantification [93] [1] [104] |
The strategic selection between these techniques depends on the experimental objective. While qPCR and dPCR excel in precise quantification, End-Point PCR is unmatched for straightforward, cost-effective qualitative detection [25]. Its enduring value is evidenced by its sustained and significant market share alongside more advanced technologies [105].
End-Point PCR in Modern Research and Diagnostics
Established and Core Applications
End-Point PCR serves as a workhorse in foundational molecular biology procedures. Its primary strength lies in the amplification of specific DNA sequences from minimal starting material for downstream analytical or preparative purposes [41]. Key applications include:
- Pathogen Detection: The simple "yes-or-no" result for the presence of a pathogen-specific gene makes it ideal for screening infectious agents, such as in the detection of Merkel cell polyomavirus in clinical samples [41].
- Genotyping and Allele Detection: It is widely used to amplify specific genomic regions for subsequent analysis by restriction fragment length polymorphism (RFLP) or Sanger sequencing to identify single nucleotide polymorphisms (SNPs) and other mutations [25].
- Cloning and Sequencing: The ability to generate a high yield of a specific amplicon makes it the preferred method for creating inserts for cloning vectors or preparing templates for sequencing [25].
- Routine Quality Control: In biomanufacturing and drug development, it provides a rapid and reliable method for checking plasmid identity, verifying constructs, and screening bacterial colonies [7].
The Niche in the Era of dPCR and qPCR
The emergence of dPCR, with its unparalleled sensitivity for detecting rare genetic mutations and enabling liquid biopsy applications, has redefined the standards for molecular quantification in oncology and prenatal diagnosis [93]. Similarly, qPCR is the undisputed gold standard for viral load testing and gene expression analysis [104] [25]. In this context, End-Point PCR has not become obsolete but has instead solidified its niche. Its role is justified when:
- The research question is purely qualitative.
- Budgetary constraints are a primary concern.
- The goal is to generate a large mass of a specific DNA product for downstream applications where the initial template concentration is irrelevant.
- The infrastructure or expertise for more advanced platforms is unavailable.
The following decision tree outlines the process for selecting the appropriate PCR technique based on experimental goals.
Detailed Application Note: Long and Accurate (LA) DNA Amplification
Background and Principle
Many contemporary applications in genome analysis, cloning, and protein expression require the amplification of DNA fragments longer than what standard Taq DNA polymerase can efficiently produce (typically limited to ~5 kb) [106]. This limitation is partly due to the enzyme's lack of 3′→5′ exonuclease (proofreading) activity, which allows misincorporated nucleotides to arrest elongation [106]. Long and Accurate (LA) PCR overcomes this by combining a highly processive thermostable polymerase with a second, proofreading enzyme. The proofreading enzyme repairs terminal misincorporations, allowing the polymerase to continue strand elongation and dramatically increasing the potential amplicon size from 0.25 kb up to 40 kb [106].
Experimental Protocol
This protocol is adapted for a 50 µL reaction using a commercial LA polymerase mix.
Table 2: Reagent Setup for Long and Accurate PCR
| Reagent | Final Concentration/Amount | Volume (µL) for 50 µL Reaction |
|---|---|---|
| 10X LA PCR Buffer | 1X | 5 |
| dNTP Mix (10 mM each) | 0.4 mM each | 2 |
| Forward Primer (10 µM) | 0.2 - 1.0 µM | 1 - 5 |
| Reverse Primer (10 µM) | 0.2 - 1.0 µM | 1 - 5 |
| DNA Template | Varies (e.g., 0.1-1 µg genomic DNA) | |
| LA DNA Polymerase Mix | 1.0 - 2.5 U | 0.5 - 1 |
| PCR-Grade Water | - | To 50 µL |
*Template amount: For complex genomic DNA, 0.1-1 µg per reaction is typical. Less is needed for plasmid or viral DNA. [106] [107]
Procedure:
- Reaction Setup: Combine all reagents in a thin-walled 0.2 mL or 0.5 mL PCR tube on ice. Gently mix and briefly centrifuge to collect the contents [106].
- Thermal Cycling: Place the tube in a thermal cycler and run the following program. The parameters are critical for successful long-range amplification [106]:
- Product Analysis: Analyze 8-10 µL of the PCR product by 0.8-1.0% agarose gel electrophoresis followed by ethidium bromide or other DNA-staining dye and visualize under UV light [106].
Critical Factors for Success
- Template Quality: Intact, high-quality DNA is essential. Nicked or damaged DNA serves as false priming sites, leading to high background [106].
- Primer Design: Primers should be 21-34 bases long with a GC content of 45-60% and a Tm between 65-72°C. The Tm of the forward and reverse primers should be within 3°C of each other [106].
- Mg²⁺ Concentration: Optimization between 1-5 mM is often necessary. Mg²⁺ binds dNTPs, so its concentration must be adjusted if dNTP concentration is altered [106] [107].
- Additives: For GC-rich or complex templates, additives like DMSO, betaine, or commercial GC enhancers can improve denaturation and yield by lowering the melting temperature of the DNA [107] [7].
The Scientist's Toolkit: Essential Reagents and Materials
Table 3: Key Research Reagent Solutions for End-Point PCR
| Reagent/Material | Function and Importance | Key Considerations |
|---|---|---|
| DNA Polymerase | Enzyme that synthesizes new DNA strands. The choice dictates fidelity, amplicon length, and yield. | Standard Taq: Low fidelity, fast, adds 3'A-overhangs for TA cloning. High-Fidelity Mixes (e.g., with proofreading): Higher accuracy, essential for long amplicons and protein expression work [106] [7]. |
| dNTP Mix | The building blocks (dATP, dCTP, dGTP, dTTP) for DNA synthesis. | Use high-quality, balanced solutions to prevent misincorporation. Final concentration typically 0.2-0.25 mM each [107]. |
| Primers | Short, single-stranded DNA sequences that define the start and end of the amplified region. | Design is critical. Avoid self-complementarity. Resuspend in sterile TE buffer or water. Working stocks typically 10 µM [106] [107]. |
| PCR Buffer | Provides the optimal chemical environment (pH, ionic strength) for the polymerase. | Often contains MgCl₂. If not, Mg²⁺ must be added separately. Commercial buffers are optimized for specific polymerases [7]. |
| MgCl₂ Solution | Cofactor essential for DNA polymerase activity; stabilizes primer-template complexes. | Concentration is a key optimization variable (1-4 mM). Insufficient Mg²⁺ reduces yield; excess causes non-specific products [107]. |
| Hot-Start Enzymes | Polymerases engineered to be inactive at room temperature. | Prevents non-specific amplification and primer-dimer formation during reaction setup, dramatically improving specificity and yield [107] [7]. |
In the landscape of advanced diagnostics dominated by quantitative techniques, End-Point PCR maintains a vital and well-defined role. Its enduring value lies in its simplicity, robustness, and cost-effectiveness for qualitative applications and preparative molecular biology. The evolution of its role is characterized by strategic specialization rather than decline. For the detection of pathogen presence, genotyping, cloning, and any application where the question is "is it there?" rather than "how much is there?", End-Point PCR remains an indispensable tool in the researcher's arsenal. Furthermore, the development of enhanced enzyme systems, such as those for Long and Accurate PCR, ensures that this foundational technology continues to meet the demands of modern, complex research applications.
Conclusion
End-point PCR remains an indispensable, powerful, and accessible technique for DNA amplification in research and development. Its success hinges on a solid understanding of core principles, meticulous protocol execution, and systematic troubleshooting. While newer technologies like qPCR and dPCR offer advanced quantification capabilities, end-point PCR's simplicity, cost-effectiveness, and reliability secure its place for routine qualitative analysis, cloning, and sequencing. Future developments will likely focus on integrating end-point PCR with downstream applications in next-generation sequencing and point-of-care testing, ensuring its continued relevance in accelerating drug discovery and clinical diagnostics. Mastering this fundamental technique provides a critical foundation for navigating the expanding landscape of molecular biology.
References
- 1. dPCR vs qPCR vs end-point PCR [https://www.qiagen.com/us/knowledge-and-support/knowledge-hub/bench-guide/pcr/digital-pcr/digital-pcr-vs-quantitative-pcr-vs-end-point-pcr]
- 2. Polymerase Chain Reaction (PCR) - StatPearls - NCBI - NIH [https://www.ncbi.nlm.nih.gov/books/NBK589663/]
- 3. What is Polymerase Chain Reaction (PCR) [https://www.addgene.org/protocols/pcr/]
- 4. End Point PCR Protocol for Long and Accurate DNA ... [https://www.sigmaaldrich.com/US/en/technical-documents/protocol/genomics/pcr/long-and-accurate-dna-amplification?srsltid=AfmBOorGeIFDLXxJ2r_JzMzGUivCL_bj-V_vMiKx4BlKBoFyDaDRezCv]
- 5. Standard PCR Protocol [https://www.sigmaaldrich.com/US/en/technical-documents/protocol/genomics/pcr/standard-pcr?srsltid=AfmBOopbX9e6qakQPkjBnSup7v95fwehCzDvGZQEH343QTXL4Y2YjefX]
- 6. /qPCR PCR Analysis Data [https://www.sigmaaldrich.com/NP/en/technical-documents/technical-article/genomics/qpcr/data-analysis]
- 7. End-Point PCR and PCR Primers Support - Getting Started [https://www.thermofisher.com/us/en/home/technical-resources/technical-reference-library/pcr-cdna-synthesis-support-center/end-point-pcr-primers-support/end-point-pcr-primers-support-getting-started.html]
- 8. End-point PCR | PCR and reverse transcription PCR kits [https://www.qiagen.com/us/applications/pcr/end-point-pcr]
- 9. Endpoint PCR [https://solisbiodyne.com/EN/products/cat=endpoint-pcr]
- 10. PCR Amplification | An Introduction to PCR Methods [https://www.promega.com/resources/guides/nucleic-acid-analysis/pcr-amplification/]
- 11. End Point PCR Protocol for Long and Accurate DNA ... [https://www.sigmaaldrich.com/US/en/technical-documents/protocol/genomics/pcr/long-and-accurate-dna-amplification?srsltid=AfmBOoqbtSyCkAmOIHMvd21tmqI--ewkW5XWXoymwkbfOTIy2u2acrBu]
- 12. Polymerase Chain Reaction [https://www.sigmaaldrich.com/US/en/technical-documents/technical-article/genomics/pcr/polymerase-chain-reaction?srsltid=AfmBOoobOdjbMmSymtfILsQNpox6cCgl1pAxi5wtI2JLpTgA_7FpgFW_]
- 13. PCR Cycling Parameters—Six Key Considerations for ... [https://www.thermofisher.com/us/en/home/life-science/cloning/cloning-learning-center/invitrogen-school-of-molecular-biology/pcr-education/pcr-reagents-enzymes/pcr-cycling-considerations.html]
- 14. PCR Methods - Top Ten Strategies [https://www.thermofisher.com/us/en/home/life-science/cloning/cloning-learning-center/invitrogen-school-of-molecular-biology/pcr-education/pcr-reagents-enzymes/pcr-methods.html]
- 15. PCR Setup—Six Critical Components to Consider [https://www.thermofisher.com/us/en/home/life-science/cloning/cloning-learning-center/invitrogen-school-of-molecular-biology/pcr-education/pcr-reagents-enzymes/pcr-component-considerations.html]
- 16. Optimizing PCR Reaction Conditions for High Fidelity and ... [https://www.labx.com/resources/optimizing-pcr-reaction-conditions-for-high-fidelity-and-yield/5579]
- 17. Optimizing PCR: Proven Tips and Troubleshooting Tricks [https://www.the-scientist.com/optimizing-pcr-proven-tips-and-troubleshooting-tricks-71660]
- 18. PCR Optimization: Factors Affecting Reaction Specificity ... [https://www.mybiosource.com/learn/pcr-optimization-factors-affecting-reaction-specificity-and-efficien/]
- 19. Magnesium Induced Assembly of a Complete DNA Polymerase Catalytic Complex - PMC [https://www.ncbi.nlm.nih.gov/pmc/articles/PMC1868394/]
- 20. Comparison of Magnesium and Manganese Ions on the Structural and Catalytic Properties of Human DNA Polymerase Gamma - PMC [https://pmc.ncbi.nlm.nih.gov/articles/PMC12269790/]
- 21. Investigating concentration effects on reaction efficiency ... [https://www.sciencedirect.com/science/article/abs/pii/S0003269725001472]
- 22. Impact of metal ions on PCR inhibition and RT- ... [https://pmc.ncbi.nlm.nih.gov/articles/PMC7782418/]
- 23. Protocols Agarose Gel Electrophoresis [https://www.addgene.org/protocols/gel-electrophoresis/]
- 24. PCR Preparation & Gel Electrophoresis [https://www.protocols.io/view/pcr-preparation-amp-gel-electrophoresis-besyjefw.html]
- 25. Real-Time vs. Endpoint PCR: Choosing the Right Method ... [https://www.labx.com/resources/real-time-vs-endpoint-pcr-choosing-the-right-method-for-your-experiment/5578]
- 26. End Point PCR Protocol for Long and Accurate DNA ... [https://www.sigmaaldrich.com/US/en/technical-documents/protocol/genomics/pcr/long-and-accurate-dna-amplification?srsltid=AfmBOopqtbagytD8kX0h3jXB3HA1IaGw7jQYK8Nai4ulLJ7Up42IQBqw]
- 27. PCR Troubleshooting Guide | Thermo Fisher Scientific - US [https://www.thermofisher.com/us/en/home/life-science/cloning/cloning-learning-center/invitrogen-school-of-molecular-biology/pcr-education/pcr-reagents-enzymes/pcr-troubleshooting.html]
- 28. PCR Troubleshooting Guide [https://www.neb.com/en-us/tools-and-resources/troubleshooting-guides/pcr-troubleshooting-guide?srsltid=AfmBOopOrr5rxuTA52s_GSurAyQl0kt8zjeHkn7SbArQw3qXgQxpChBQ]
- 29. Optimizing your PCR [https://www.takarabio.com/learning-centers/pcr/faq/optimization?srsltid=AfmBOoq41PFXFigPIyAGbgFLo1A-DrD26cF8npOlOHekIaG5HFV6QwdI]
- 30. Guidelines for PCR Optimization with Taq DNA Polymerase [https://www.neb.com/en-us/tools-and-resources/usage-guidelines/guidelines-for-pcr-optimization-with-taq-dna-polymerase?srsltid=AfmBOorWsGprgq2_Y1HSarnW2hWsxopnWMEdEf0A6kZf-6uwIBQVfuXg]
- 31. dNTP Hot Start PCR Protocol [https://www.sigmaaldrich.com/US/en/technical-documents/protocol/genomics/pcr/dntp-mediated-hot-start-pcr?srsltid=AfmBOoqDHpmOUsatf7usBCZG5iXp8mce-B2hvd7FHCAbirk0sCY0i6Pa]
- 32. Nested PCR: Principle, Protocol and Application [https://www.bocsci.com/resources/nested-pcr-principle-protocol-and-applications.html?srsltid=AfmBOoog0NDVpNyvg2dkaIUR9g4-cKWXH2uieMLkr5w4_y1IZeOoFjD1]
- 33. Hot Start PCR with heat-activatable primers [https://pmc.ncbi.nlm.nih.gov/articles/PMC2582603/]
- 34. Touchdown PCR: Easy Intro Plus 5 Expert Tips [https://bitesizebio.com/2203/touchdown-pcr-a-primer-and-some-tips/]
- 35. Touchdown Polymerase Chain Reaction (PCR) [https://pubmed.ncbi.nlm.nih.gov/29717053/]
- 36. Touchdown and Stepdown PCR [https://bento.bio/resources/thoughts-notes-and-ideas/touchdown-and-stepdown-pcr/]
- 37. Nested PCR [https://resources.qiagenbioinformatics.com/manuals/clcmainworkbench/2303/index.php?manual=Nested_PCR.html]
- 38. A Fundamental Study of the PCR Amplification of GC-Rich ... [https://pmc.ncbi.nlm.nih.gov/articles/PMC2727727/]
- 39. Long PCR Protocol [https://arep.med.harvard.edu/labgc/estep/longPCR_protocol.html]
- 40. High-Resolution Melting Analysis for Rapid Detection ... [https://pmc.ncbi.nlm.nih.gov/articles/PMC5444143/]
- 41. Polymerase Chain Reaction (PCR) - PMC [https://pmc.ncbi.nlm.nih.gov/articles/PMC4102308/]
- 42. PCR Applications—Top Seven Categories [https://www.thermofisher.com/us/en/home/life-science/cloning/cloning-learning-center/invitrogen-school-of-molecular-biology/pcr-education/pcr-reagents-enzymes/pcr-applications.html]
- 43. Site Directed Mutagenesis [https://www.neb.com/en-us/applications/cloning-and-synthetic-biology/site-directed-mutagenesis?srsltid=AfmBOoqZGJ2prLMeMZzb-5OaVFmtjUC42d8W7TBiFviaQ7tQfBlTvWSi]
- 44. End Point PCR Protocol for Long and Accurate DNA ... [https://www.sigmaaldrich.com/US/en/technical-documents/protocol/genomics/pcr/long-and-accurate-dna-amplification?srsltid=AfmBOoo03fDKSMoibmdPGnr6pcB1ZCDfEsvsX_Gq5ZBzXBc5AoxcpcoA]
- 45. PCR Troubleshooting Guide [https://www.neb.com/en-us/tools-and-resources/troubleshooting-guides/pcr-troubleshooting-guide?srsltid=AfmBOorT-AQuEWY77BZCa4qX2dryRlSFwCJUXih-k4ARJ1BRCZIYr6sK]
- 46. PCR Troubleshooting Guide [https://www.genscript.com/pcr-troubleshooting-guide.html]
- 47. Guidelines for PCR Optimization with Taq DNA Polymerase [https://www.neb.com/en-us/tools-and-resources/usage-guidelines/guidelines-for-pcr-optimization-with-taq-dna-polymerase?srsltid=AfmBOopNlbeVbMkKvY8VfoAU7xEUmlEsvfpHmN2WeoVHxfeLHBzA8j6k]
- 48. End-point PCR and PCR Primers Support - Troubleshooting [https://www.thermofisher.com/us/en/home/technical-resources/technical-reference-library/pcr-cdna-synthesis-support-center/end-point-pcr-primers-support/end-point-pcr-primers-support-troubleshooting.html]
- 49. Why do I get smeared PCR products? [https://www.qiagen.com/us/resources/faq/87]
- 50. PCR Troubleshooting: Common Problems and Solutions [https://www.mybiosource.com/learn/pcr-troubleshooting-common-problems-and-solutions/]
- 51. How to Simplify PCR Optimization Steps for Primer Annealing [https://www.thermofisher.com/us/en/home/brands/thermo-scientific/molecular-biology/molecular-biology-learning-center/molecular-biology-resource-library/spotlight-articles/pcr-annealing-optimization-universal-annealing.html]
- 52. A Computational Tool for Large-Scale Primer Design and ... [https://pmc.ncbi.nlm.nih.gov/articles/PMC12469620/]
- 53. Proven tips for PCR primer design [https://www.neb.com/en-ca/nebinspired-blog/proven-tips-for-pcr-primer-design?srsltid=AfmBOooK_eOojRF9grGB_ORxtpPxM3GcCc5amCwj90bmNOfWzMGliaMI]
- 54. PCR Primer Design Tips - Behind the Bench [https://www.thermofisher.com/blog/behindthebench/pcr-primer-design-tips/]
- 55. Predicting sequence-specific amplification efficiency in ... [https://www.nature.com/articles/s41467-025-64221-4]
- 56. How to Calculate DNA Melting Temperature (Tm) | IDT [https://www.idtdna.com/page/support-and-education/decoded-plus/understanding-melting-temperature-t-sub-m-sub/]
- 57. How to Calculate the Melting Temperature (Tm) of a PCR Primer [https://www.letstalkacademy.com/how-to-calculate-the-melting-temperature-tm-of-a-pcr-primer/]
- 58. Tm Calculator for Primers [https://www.thermofisher.com/us/en/home/brands/thermo-scientific/molecular-biology/molecular-biology-learning-center/molecular-biology-resource-library/thermo-scientific-web-tools/tm-calculator.html]
- 59. Rules and Tips for PCR & qPCR Primer Design | IDT [https://www.idtdna.com/page/support-and-education/decoded-plus/how-to-design-primers-and-probes-for-pcr-and-qpcr/]
- 60. End Point PCR Protocol for Long and Accurate DNA ... [https://www.sigmaaldrich.com/US/en/technical-documents/protocol/genomics/pcr/long-and-accurate-dna-amplification?srsltid=AfmBOorjm5R_4VcbnGsqMldubOwEtMr8rCj235IWMEPDKxdjnHRCsOcV]
- 61. Primer design guide - 5 tips for best PCR results [https://the-dna-universe.com/2022/09/05/primer-design-guide-the-top-5-factors-to-consider-for-optimum-performance/]
- 62. Optimization of Annealing Temperature and other PCR ... [https://www.genaxxon.com/shop/en/blog/optimization-of-annealing-temperature-and-other-pcr-parameters]
- 63. How does magnesium concentration affect PCR? [https://www.aatbio.com/resources/faq-frequently-asked-questions/how-does-magnesium-concentration-affect-pcr]
- 64. Polymerase chain reaction [https://en.wikipedia.org/wiki/Polymerase_chain_reaction]
- 65. Polymerase Chain Reaction: Basic Protocol Plus ... [https://pmc.ncbi.nlm.nih.gov/articles/PMC4846334/]
- 66. What Are PCR Inhibitors? [https://www.zymoresearch.com/blogs/blog/what-are-pcr-inhibitors?srsltid=AfmBOoqT8rVkRwV5q33671LZ6xAvZTZGZxNuoKBlqxf7MfKYBAQcPfPI]
- 67. PCR inhibition in qPCR, dPCR and MPS—mechanisms and ... [https://pmc.ncbi.nlm.nih.gov/articles/PMC7072044/]
- 68. There may be PCR inhibitors present in your sample [https://www.thermofisher.com/us/en/home/life-science/pcr/real-time-pcr/real-time-pcr-learning-center/real-time-pcr-basics/real-time-pcr-troubleshooting-tool/snp-genotyping-troubleshooting/trailing-clusters/pcr-inhibitors-present-in-sample.html]
- 69. DNA Polymerase Inhibitor - an overview [https://www.sciencedirect.com/topics/chemistry/dna-polymerase-inhibitor]
- 70. An efficient protocol for isolation of inhibitor-free nucleic ... [https://pmc.ncbi.nlm.nih.gov/articles/PMC4752943/]
- 71. a simple technique for the removal of PCR inhibitors from ... [https://www.sciencedirect.com/science/article/abs/pii/S0305440306000550]
- 72. A comparison of four methods for PCR inhibitor removal [https://www.sciencedirect.com/science/article/abs/pii/S1872497314002762]
- 73. Removal of PCR Inhibitors by Silica Membranes [https://pmc.ncbi.nlm.nih.gov/articles/PMC88425/]
- 74. An optimized DNA extraction protocol for reliable PCR-based ... [https://plantmethods.biomedcentral.com/articles/10.1186/s13007-025-01460-y]
- 75. OneStep PCR Inhibitor Removal Kit [https://www.zymoresearch.com/products/onestep-pcr-inhibitor-removal-new-kit?srsltid=AfmBOorfpY0Dd4VdJviLBqn2_hZ65VxmRBoaSs5o7Z01yp_C5kCVf4hs]
- 76. DMSO Improves the Ski-Slope Effect in Direct PCR [https://www.mdpi.com/2076-3417/11/4/1943]
- 77. DMSO enhanced one-pot HDA-CRISPR/Cas12a biosensor ... [https://www.sciencedirect.com/science/article/abs/pii/S0039914025001468]
- 78. Betaine-assisted multiplex recombinase polymerase ... [https://www.sciencedirect.com/science/article/abs/pii/S0925400525015187]
- 79. Comprehensive evaluation of molecular enhancers of the ... [https://www.nature.com/articles/srep37837]
- 80. IST PCR Quality Control: Full Technical Guide with ... - ISCA [https://www.iscaconsortium.org/ist-pcr-quality-control-full-technical-guide-with-best-practices-and-protocols/]
- 81. Validating Real-Time Polymerase Chain Reaction (PCR) Assays [https://pmc.ncbi.nlm.nih.gov/articles/PMC7834634/]
- 82. Statistical analysis of real-time PCR data - PMC [https://pmc.ncbi.nlm.nih.gov/articles/PMC1395339/]
- 83. End Point PCR Protocol for Long and Accurate DNA ... [https://www.sigmaaldrich.com/US/en/technical-documents/protocol/genomics/pcr/long-and-accurate-dna-amplification?srsltid=AfmBOorPiPSx7ODyS7xcUMwyNuUW7cxiHfIi16BBxK55rodcoAW57lGe]
- 84. DNA Amplification, PCR & qPCR [https://www.neb.com/en-us/applications/dna-amplification-pcr-and-qpcr?srsltid=AfmBOopusG06M5CnfsRCkeeVgXNNh6Ejoy-pHMQ5KJkYgOHjH69q7h0r]
- 85. ISO 11781:2025 - Molecular biomarker analysis [https://www.iso.org/standard/83912.html]
- 86. Introduction to Quantitative PCR (qPCR) Gene Expression ... [https://www.thermofisher.com/us/en/home/life-science/pcr/real-time-pcr/real-time-pcr-learning-center/gene-expression-analysis-real-time-pcr-information/introduction-gene-expression.html]
- 87. Why is Real-time PCR is superior to end-point PCR? [https://help.medicinalgenomics.com/en/qpcr-vs-end-point-pcr]
- 88. High-Throughput Data Analysis for qPCR [https://www.neb.com/en-us/tools-and-resources/feature-articles/development-of-a-high-throughput-data-analysis-method-for-quantitative-real-time-pcr?srsltid=AfmBOorV-64jPNbh4Z8oHoyBP8sg_3d3JL1H9kMFPafUHXgkEBR4MxPC]
- 89. PCR vs qPCR aka endpoint or real-time | Solis BioDyne [https://www.bio-connect.nl/news/pcr-vs-qpcr-aka-endpoint-or-real-time/]
- 90. DNA Amplification, PCR & qPCR [https://www.neb.com/en-us/applications/dna-amplification-pcr-and-qpcr?srsltid=AfmBOop5G0n-vnmmgamTde7NwYWbGjFNKmMEw2iQAcXkeQb2r1TnoH3R]
- 91. Fundamentals of digital PCR [https://www.qiagen.com/us/knowledge-and-support/knowledge-hub/bench-guide/pcr/digital-pcr/what-is-digital-pcr]
- 92. Principles of digital PCR and its applications in current ... [https://pmc.ncbi.nlm.nih.gov/articles/PMC6943456/]
- 93. Digital PCR: from early developments to its future application ... [https://pubs.rsc.org/en/content/articlehtml/2025/lc/d5lc00055f]
- 94. Digital PCR Principle, techniques and applications [https://www.stillatechnologies.com/digital-pcr/principle/]
- 95. Absolute vs. Relative Quantification for qPCR [https://www.thermofisher.com/us/en/home/life-science/pcr/real-time-pcr/real-time-pcr-learning-center/real-time-pcr-basics/absolute-vs-relative-quantification-real-time-pcr.html]
- 96. Comparison of digital PCR platforms using the molecular ... [https://pmc.ncbi.nlm.nih.gov/articles/PMC10326530/]
- 97. Challenges and perspectives in the application of isothermal ... [https://pmc.ncbi.nlm.nih.gov/articles/PMC6453865/]
- 98. Direct PCR amplification of forensic touch and other ... [https://www.sciencedirect.com/science/article/abs/pii/S1872497317302119]
- 99. Digital PCR-dPCR Market Insights & Growth Outlook 2025 ... [https://www.congruencemarketinsights.com/report/digital-pcr-dpcr-market]
- 100. Integrating biotechnology into diagnostic labs: Innovations ... [https://www.sciencedirect.com/science/article/pii/S2590262825000565]
- 101. Applications of PCR in Drug Development [https://kcasbio.com/blogs/pcr-applications-drug-development/]
- 102. End Point PCR Protocol for Long and Accurate DNA ... [https://www.sigmaaldrich.com/US/en/technical-documents/protocol/genomics/pcr/long-and-accurate-dna-amplification?srsltid=AfmBOop-RdKEwGqyji_WBX_NUU2vAVTLVSsOHDthhky-8MuNHlnhRGGM]
- 103. A simple and cost-effective real-time PCR method using ... [https://www.nature.com/articles/s41598-024-78802-8]
- 104. Comparative Performance of Digital PCR and Real-Time RT ... [https://pmc.ncbi.nlm.nih.gov/articles/PMC12474457/]
- 105. Real-time PCR, Digital PCR, And End-point PCR Market Size [https://www.mordorintelligence.com/industry-reports/real-time-pcr-digital-pcr-and-end-point-pcr-market]
- 106. End Point PCR Protocol for Long and Accurate DNA ... [https://www.sigmaaldrich.com/US/en/technical-documents/protocol/genomics/pcr/long-and-accurate-dna-amplification?srsltid=AfmBOoqEPsUE1amSapa2QJZ9hFrdRXRpDQnrC2lHQnmoy9niitFjhwDq]
- 107. Endpoint PCR Technical Guide [https://www.biotechrabbit.com/support/technical-support/endpoint-pcr-technical-guide.html]